Elimination of ChatGPT from Exams
Pic. 1
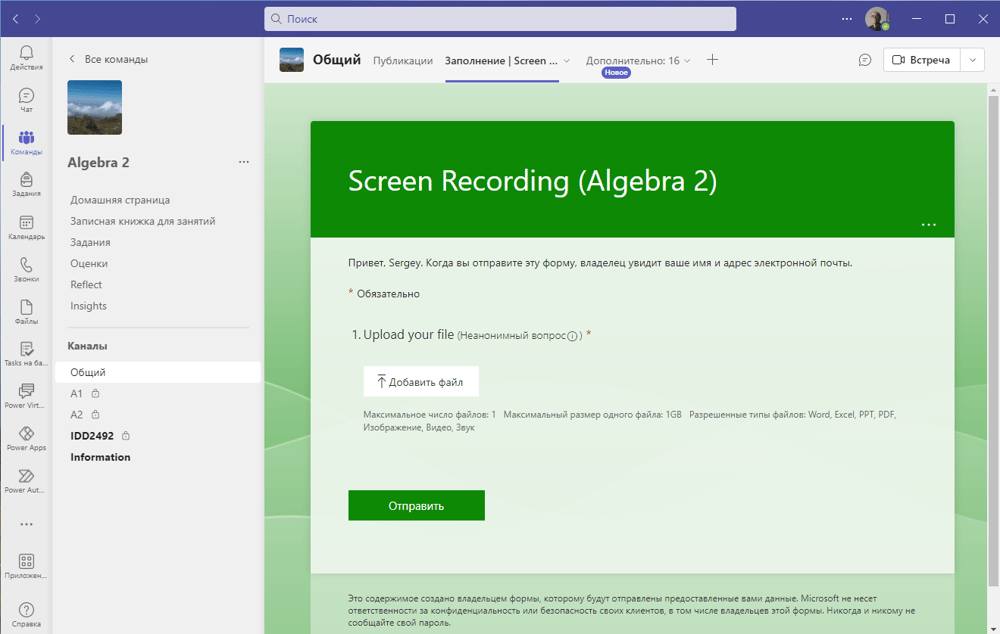
Chat GPT makes a serious threat to teaching online, especially for online exams. However, using solutions presented on this site, one can seriously restrict students' access to such bots. There are two types of tests. The first ones are those which are distributed in Microsoft Notebook through the Assignment program in Teams. The second ones are multi choice questions tests in Moodle. From the side of Microsoft 365 Education the main defense tool is based on screen recordings with a free software ShareX. Within 12 hours after the exam student submit the full screen recordings though the special Microsoft form. This form includes only one field to upload the file. It is not necessary to collect students' data since they are determined automatically. The size upload limit currently is restricted by 1 GB, which is enough to record 90 minutes with ShareX. In case the limit is exceeded by some reasons, one can use https://handbrake.fr/ to compress the recording up to 50%.
Pic. 2
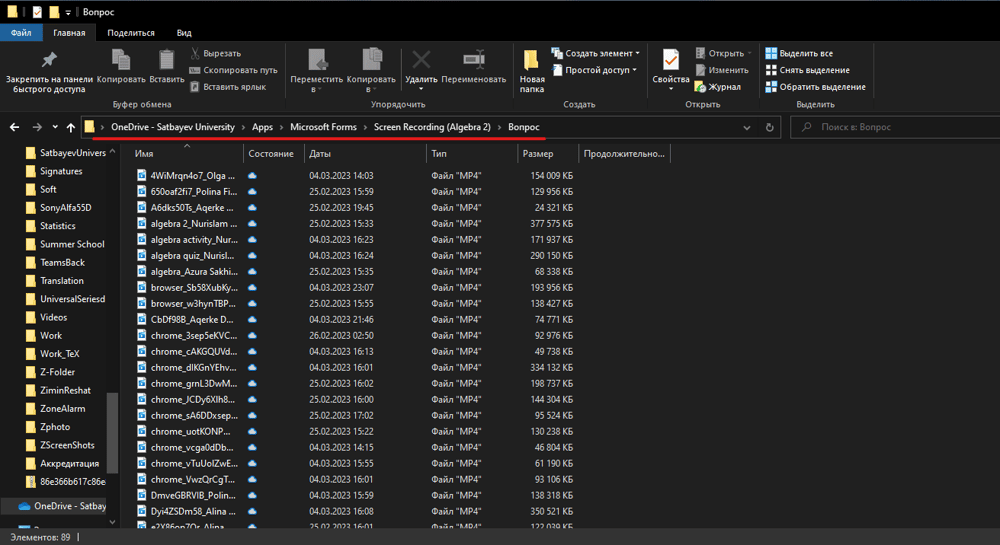
OneDrive-Apps-Microsoft Forms-Screen Recording
All recordings are delivered automatically to a special folder in the teacher's OneDrive, see the path on Pic.2 underlined in red. One can easily watch any recording in this very folder.
Pic. 3
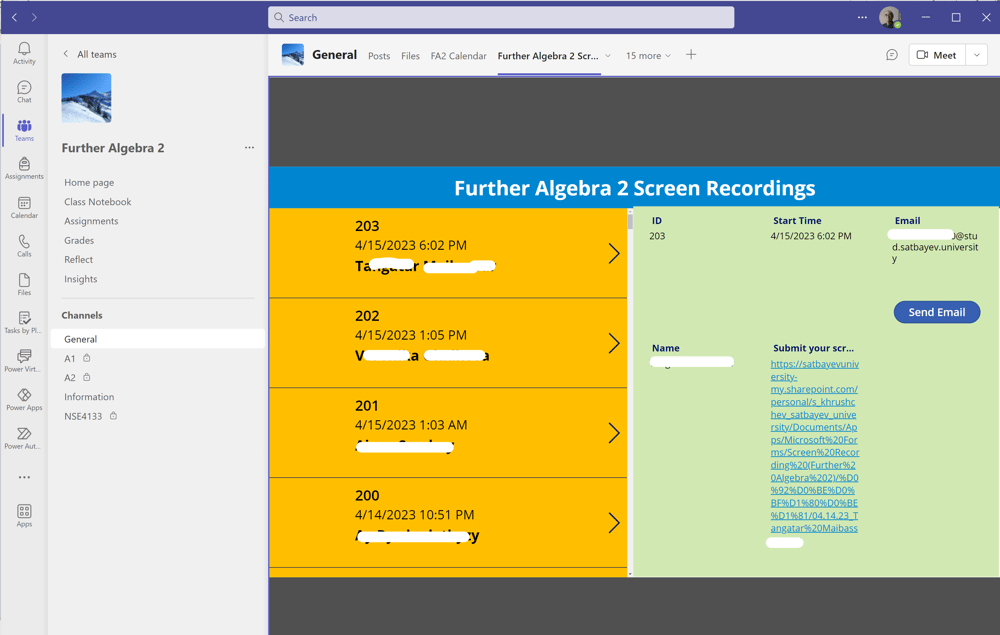
Getting a List of students who didn't send the Recordings.
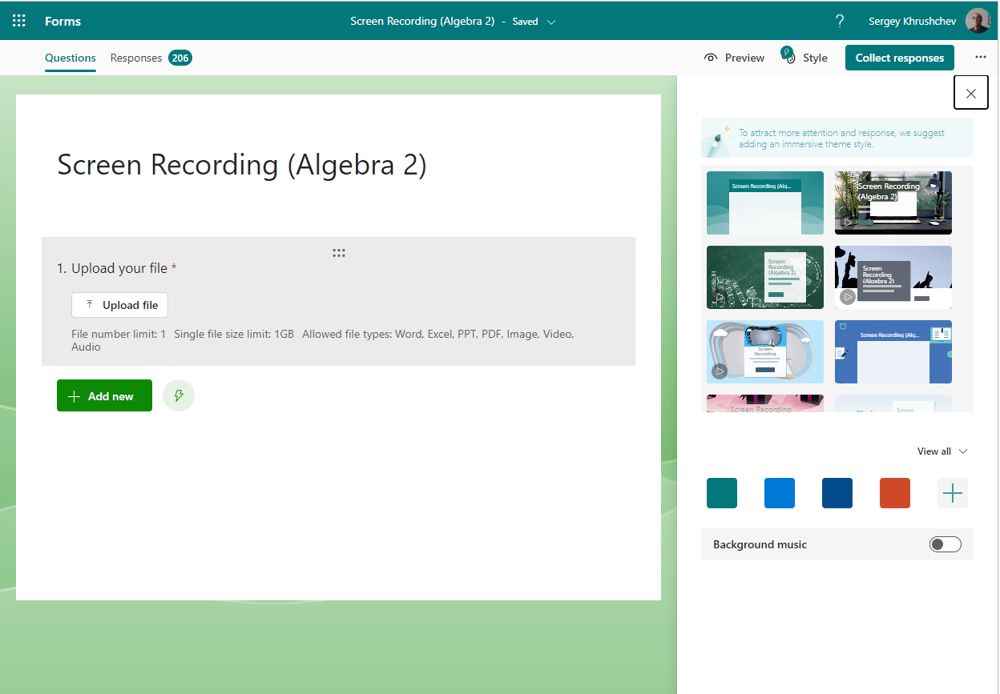
I open the corresponding Microsoft Form, see pic. 3.
Pic. 4
The Excel Table.
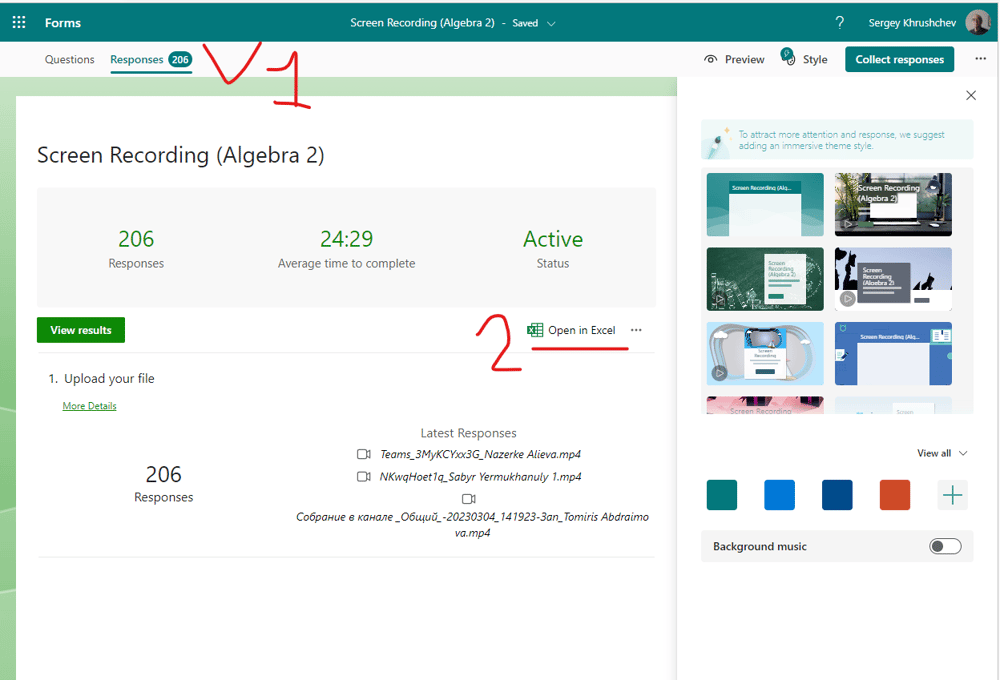
I select the Responses tab, see 1 on pic. 4, and then open the Excel file, see 2..
Pic. 5
The Excel Table
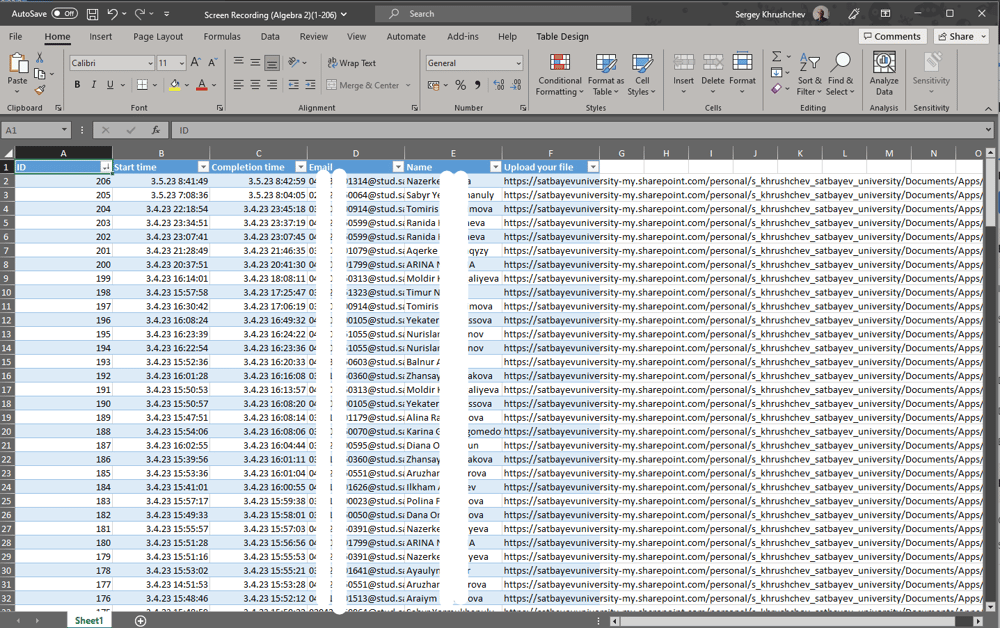
I reorder the records through the right icon in the ID column and obtain the full list of recordings made during a particular test. The names of students who are in the list can now be selected and pasted as a column in another Excel file. The process of automatic selection of those who didn't send the screen recording is described on the page of this site.
Pic. 6
Moodle
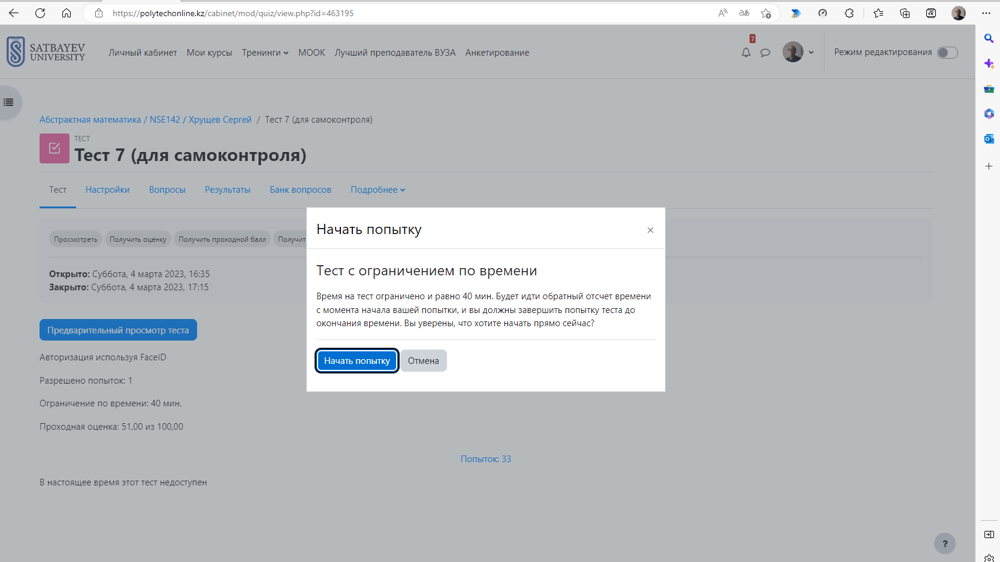
The Institute of Distant Education of Satbayev University created a very useful option in Moodle tests, which allows teachers to restrict the time limit for each ticket. I usually set it to four minutes. This option is applied together with the sequence option which does not allow students to move back and forth in the test. Finally, I usually include 20% of obligatory and 80% of randomly chosen tickets from the tickets' bank. If the final needs 40 points, I create a test with 45 tickets one point each. The final grade is the minimum of the earned points by a student and 40. There is a theory behind this choice, which can be found on the following page of this site. To provide a better individual set of tickets per each students the bank must include about 100 questions. So, in such an exam all tickets are given at random to each students, only 9 tickets are the same for each student, the rest tickets are chosen randomly. The system evaluates the earned points automatically from the maximal number 45 of earned points. The teacher insert the final grades to the Grade Book described on the page of this site. The teacher has the full set of screen recordings located in one place, see Pic. 2. The recording must start before the identification in Moodle test with Face ID, see pic. 6.
Pic. 7
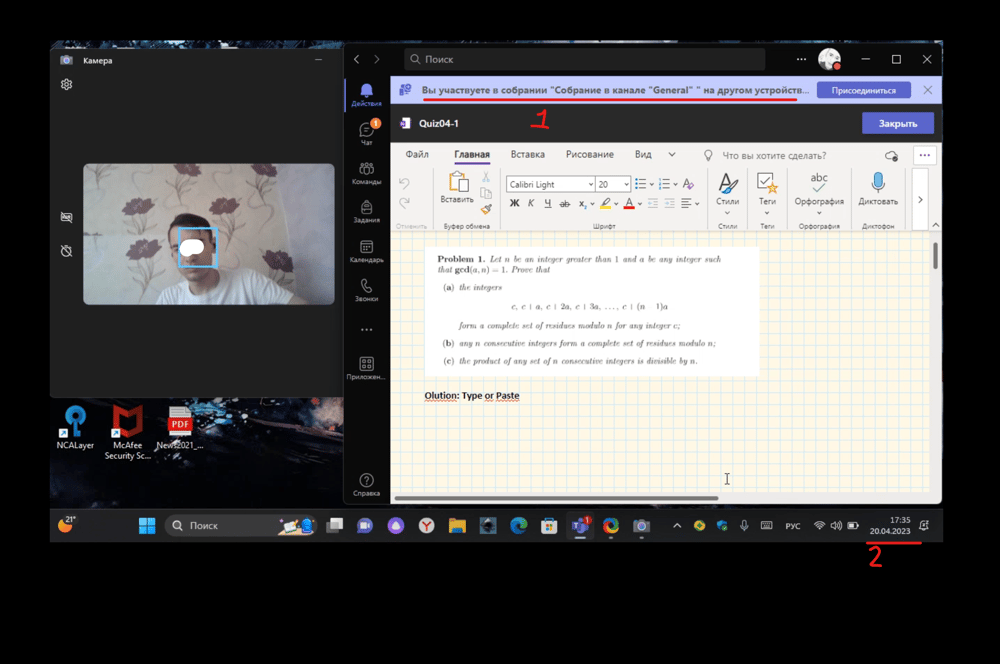
Examination Rules.
By pressing the button on pic. 7, students confirm that they agree with the examination rules stated above the button.
Pic. 8
Face ID control in Moodle
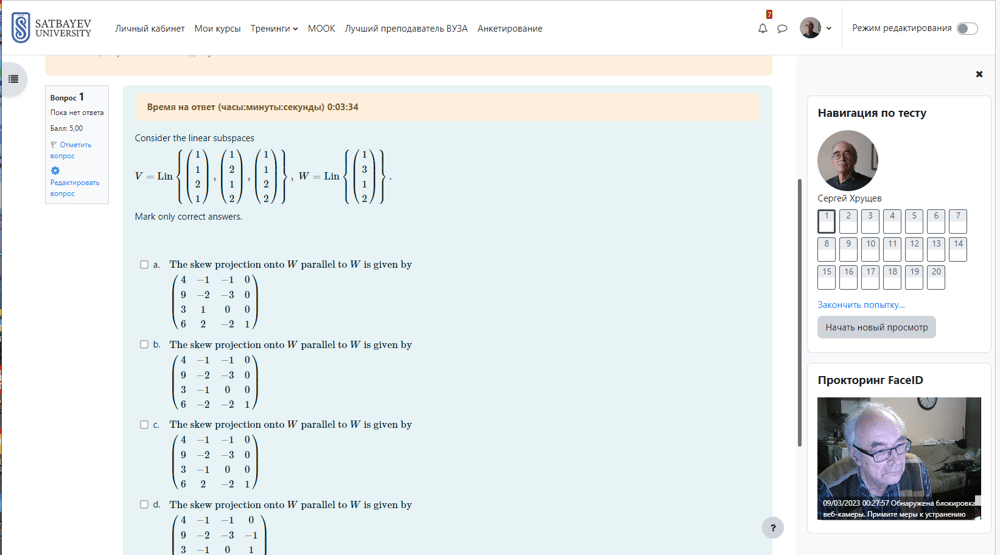
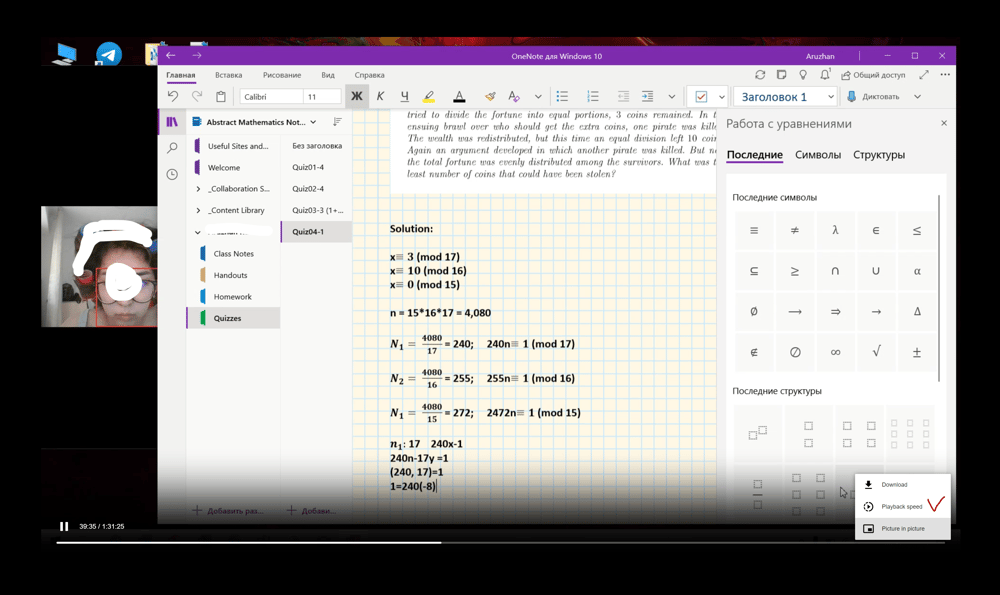
A ticket in Math has an introductory part and from 5 to 8 statements of which only some are true. It is a complete replacement of the free response questions in the multiple choice format.
Pic. 9
ShareX recording
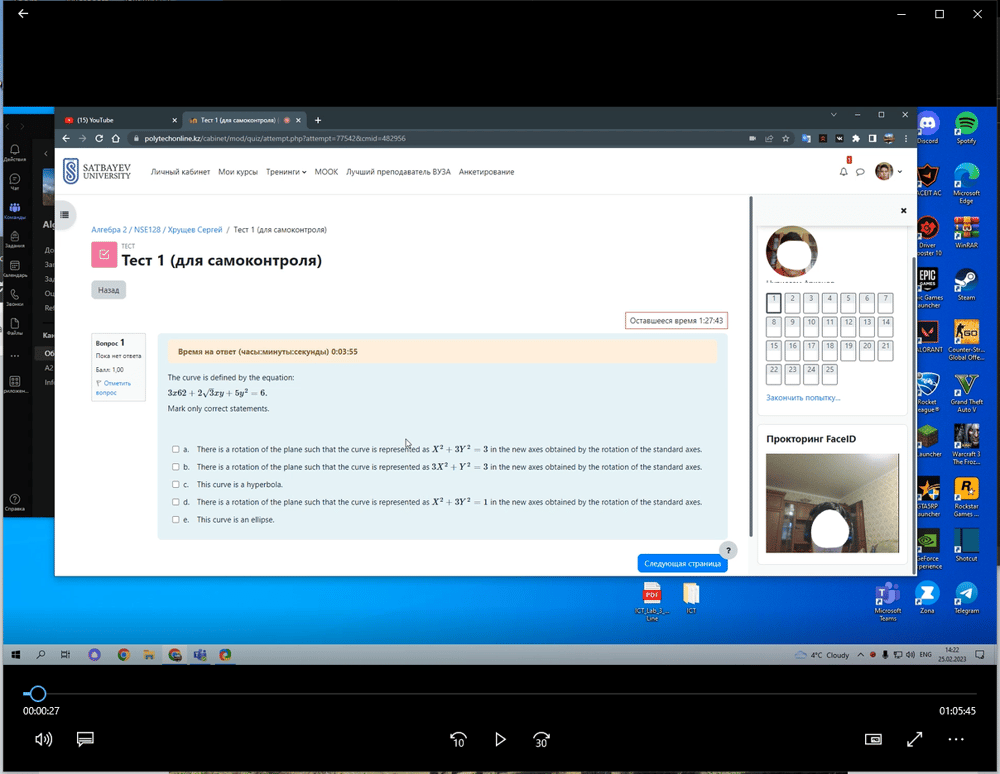
The picture above demonstrates a right recording. Notice that the Moodle test is shown in a separate window which is not in the full screen mode. The screen is recorded full and includes the task bar with time and mouse. The window of the Face ID is all the time on.
To apply for the ChatGPT help, students cannot copy the statement of the problem since this is forbidden. Students may have only ONE session of the test, which implies that they can pass it only on one Notebook. Theoretically students may retype the questions on the second monitor and even use the second mouse on the second screen. However, in this case the typesetting will be captured by the microphone which must be turned on in ShareX before the recording is started. They do not need to type anything since they can make all necessary calculations on the sheet of a paper. Or they can use Math Solver openly under the ShareX recording.
Even Essays can be given without problems. Then students must type everything on the main screen of the test. No typing anywhere else is allowed.
I recommend to create a number of meetings in private channels of a Microsoft Teams team for recording students presence via mobile phones. In this case teachers will have a more detailed information on students behavior during the exam. It is good to show the table of every student via the camera of a mobile phone. The proctoring process in Microsoft 365 Education is described on the following page of my site.
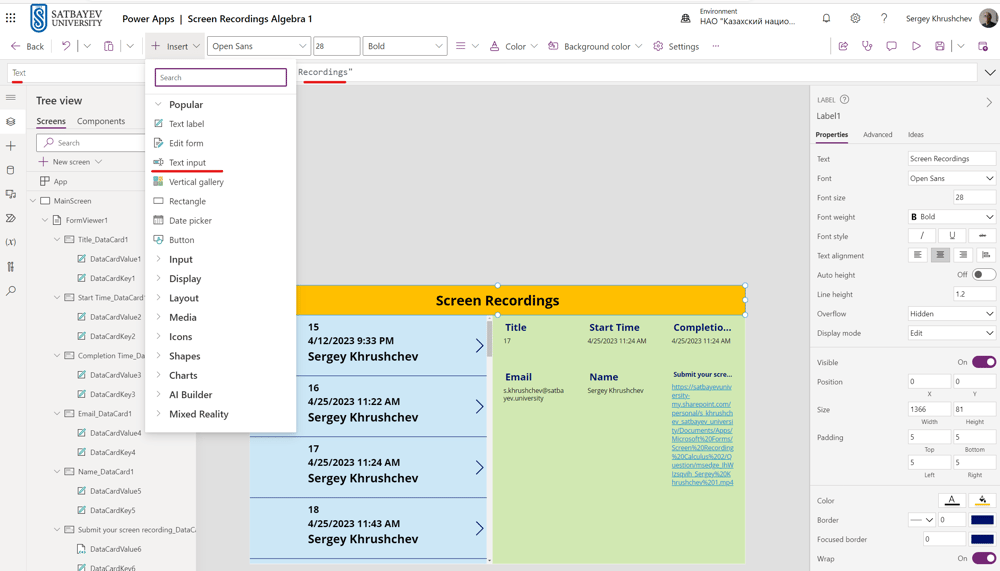
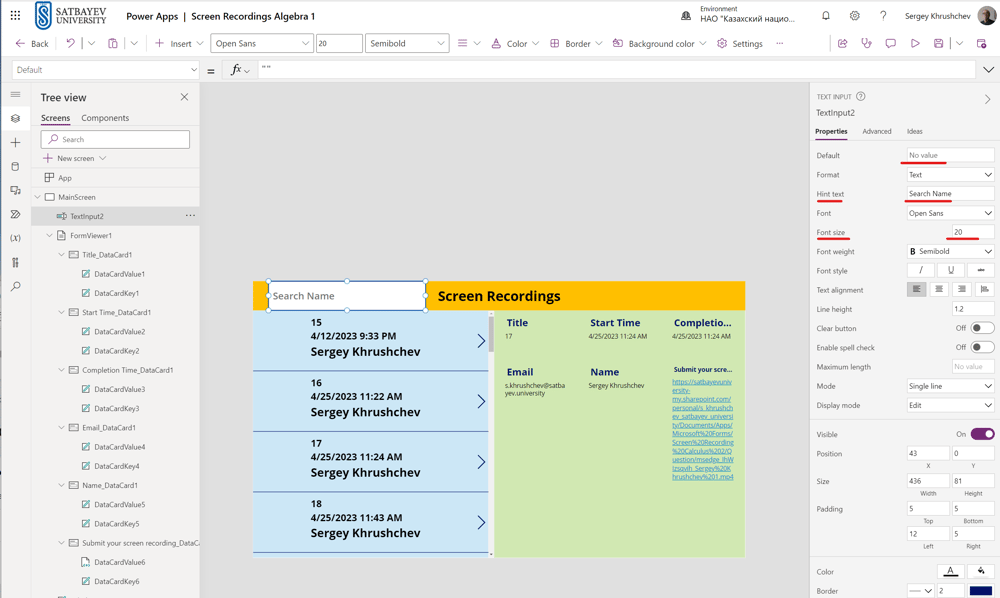
Pic. 10
Power Apps Control
To simplify my search of screen recordings, I created a Power app with one screen, see pic. 10. I placed the Gallery on the left and the details form on the right. As usual, the details of the recordings appear on the right if I click the arrow on the left. All files are sorted in the Gallery in the descending order of their IDs. I open the recording with a mouse click onto its URL in the details part of the screen. In case some violations are found, I can send an email directly from the details form. The button "Send Email" navigates me to another screen, see pic. 11.
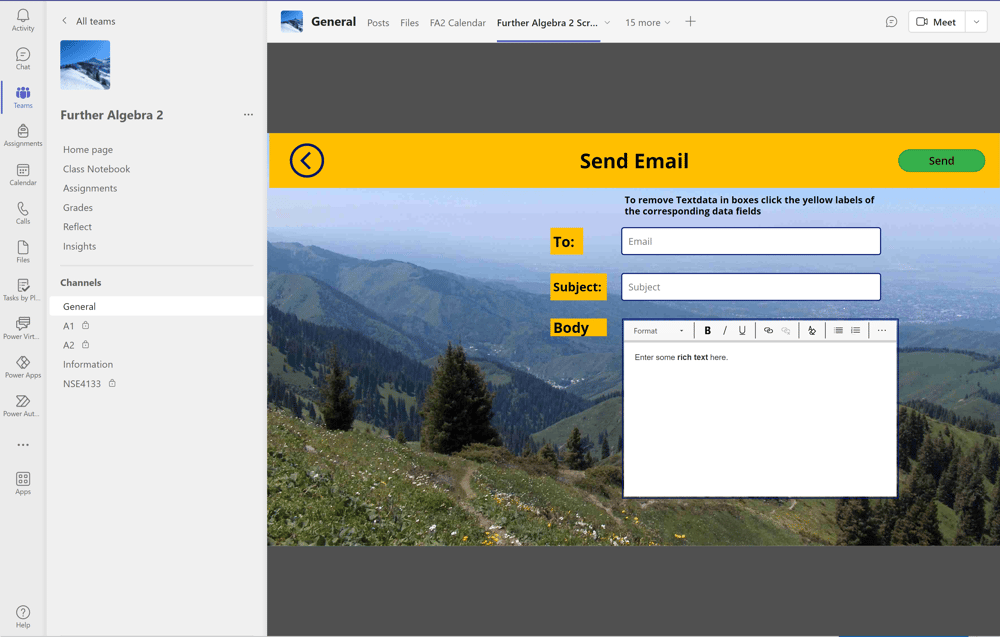
Pic. 11
Welcome to Send Email from Power Apps
The details of the creation of the "Send Email" application can be found in the following video https://youtu.be/SimDjo3WJOQ . I've added a few improvements. The yellow labels such as "To" activate the Reset("name of the field on the right") function in Power Apps. There are cases when you must send identical or slightly different emails. When I click any yellow label, the contents of the right box of the text input type disappears. I return back to the main screen by clicking onto the left arrow at the top left corner of the screen.
Pic. 12
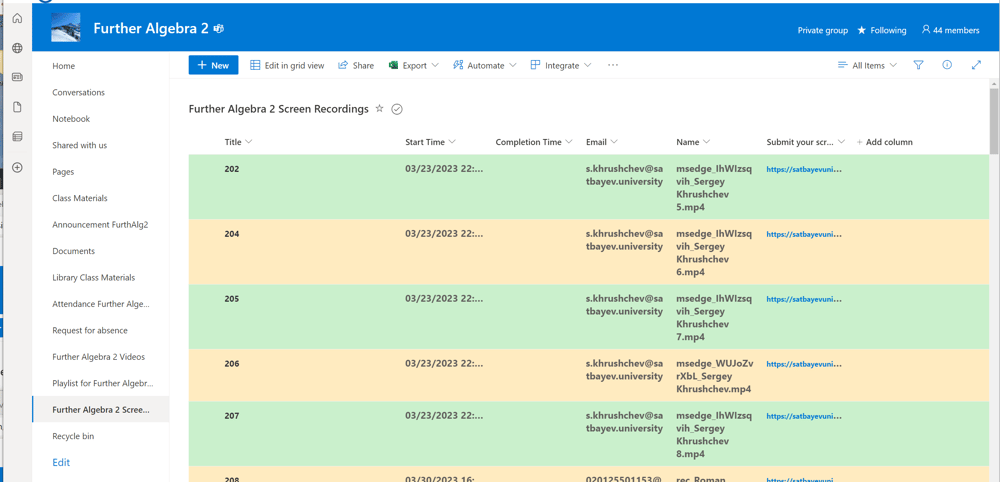
Welcome to Microsoft Lists
I create a Microsoft Lists list in the SharePoint of my class and change its permissions to read only for students. This list is connected to the Power App shown on pic. 10. The time columns have "Date and Time" time with the time switch turned on. The "Email" column has "Single line text" type, whereas the "Name" column is of the "Multiline text" type. Finally, the last column "Submit your screen recording" is of the "HTTPS" type. This SharePoint list is filled by a Power Automate flow triggered via the Microsoft Form shown on Pic. 1.
Pic. 13
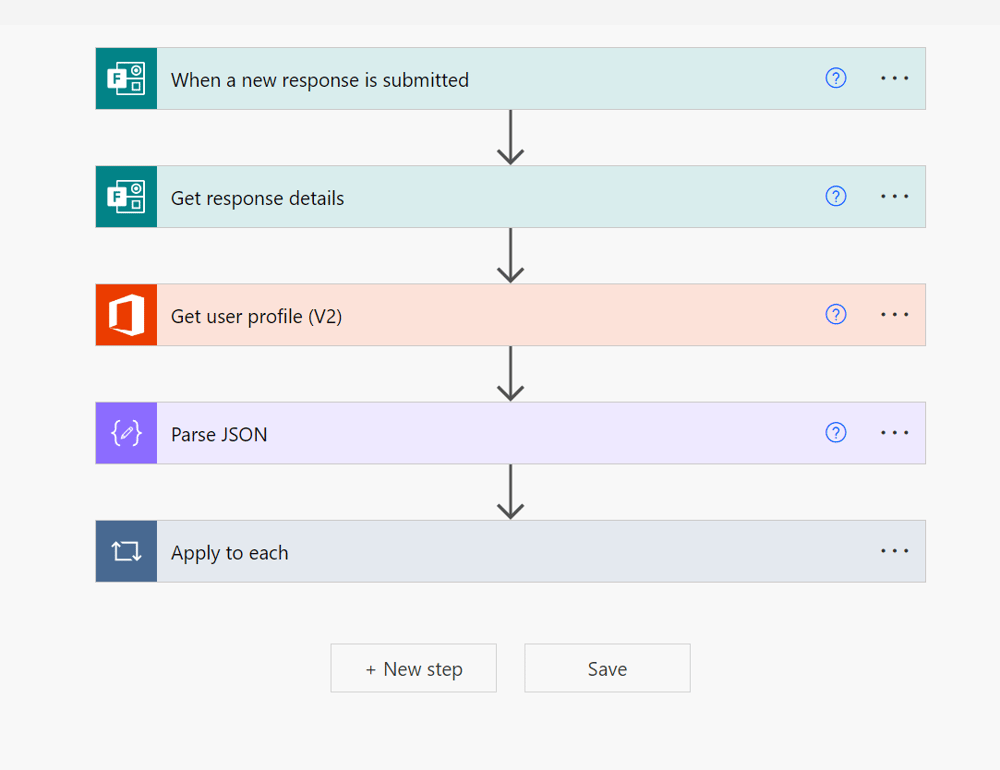
Welcome to Power Automate
The structure of the flow is shown on pic. 13.
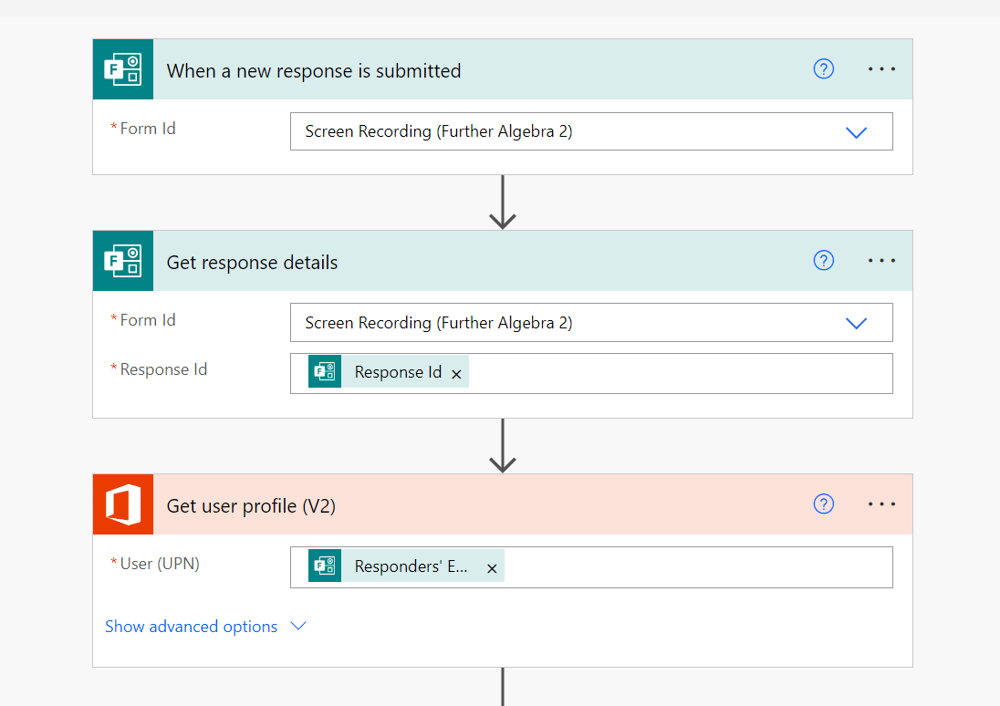
Pic. 14
Welcome to Power Automate
Pic. 14 shows how one should fill the fields in different steps. The last step shown on pic. 14 gets the "Display name" of the student submitting the screen recording.
Pic. 15
Welcome to Power Automate
The "Parse JSON" block provides the access to the "link" field with the "HTTPS" link to the screen recording, see the last field on pic. 15.
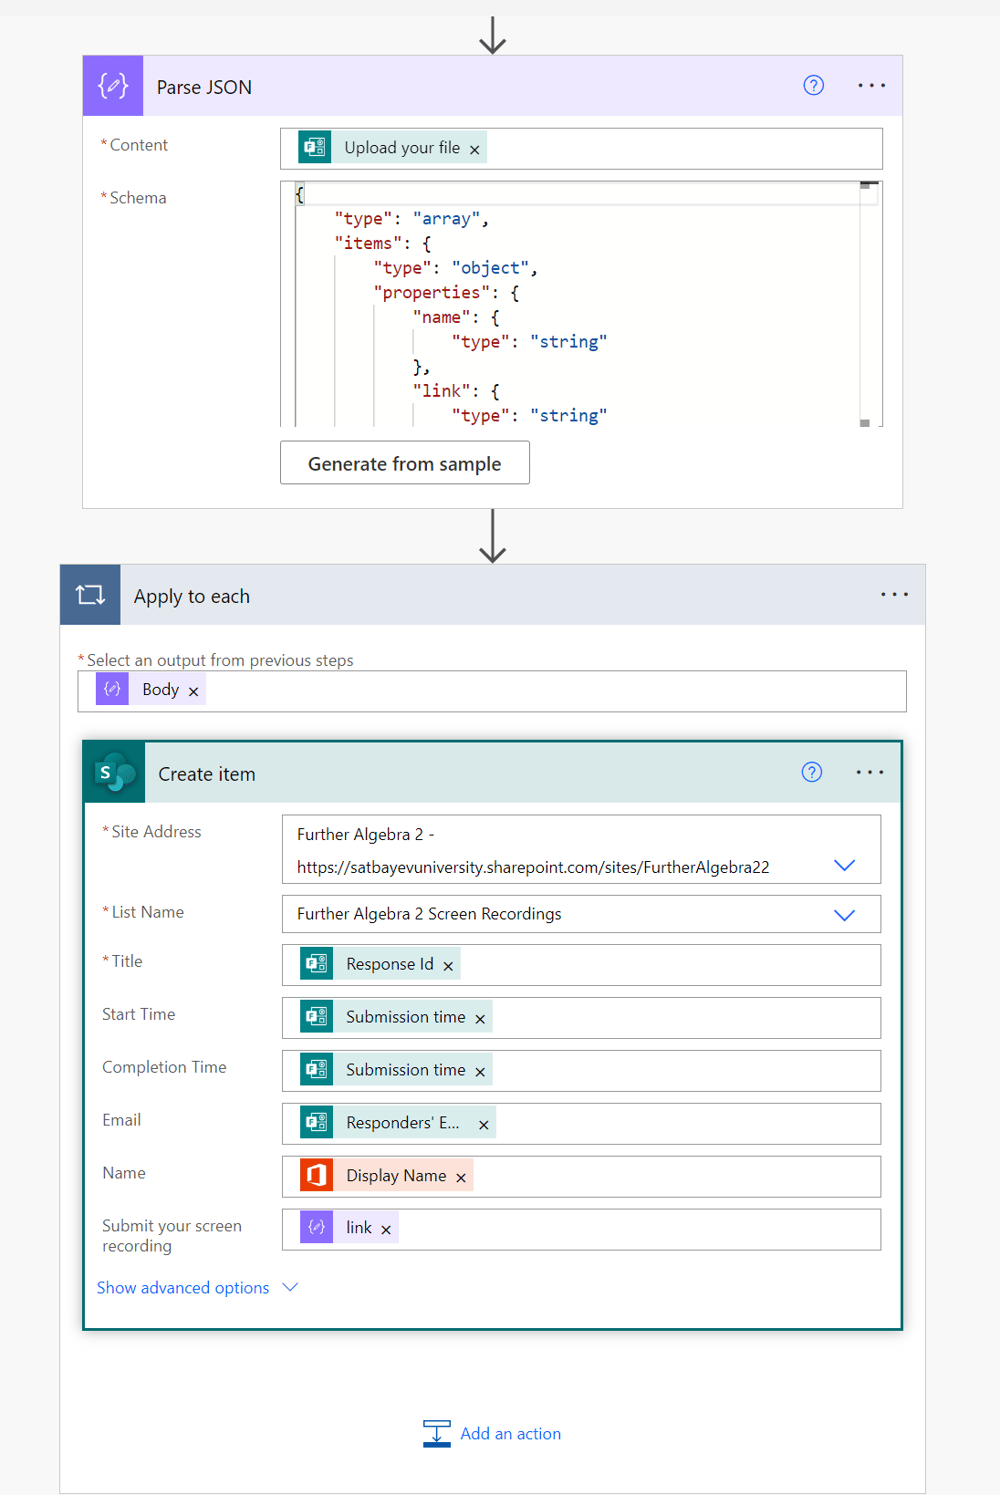
Pic. 16
Organize the recordings.
Although Microsoft Forms allows one to get a good organization of recordings in the proper folder of the teacher's OneDrive, see pic. 1-4, Microsft Power Apps Studio can provide much better results. The application shown on pic. 10 can be equipped with the search box which is shown on pic. 16 to the right of the red check mark. It makes a search following first letters of the student Display Name. The green part displays the details of the student's recording selected. A click onto the html reference opens the corresponding video immediately.
Pic. 17
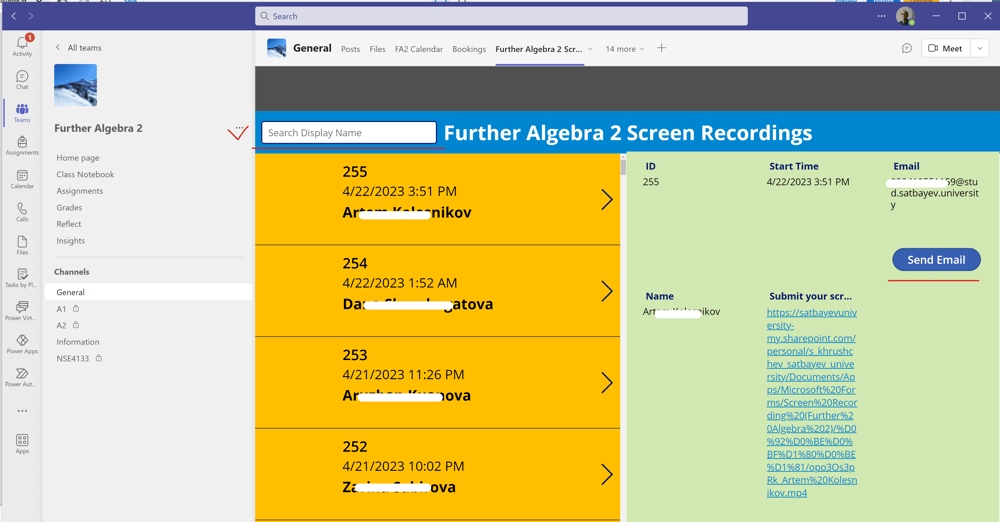
The application for Grades can be also shown on the SharePoint site as well as in a tab of the General channel in Teams, see pic. 17. In case screen recordings influence Grades (as it should now be since CahtGPT can solve problems for students) the Home screen for students' results can be placed in the SharePoint above the application for screen recordings for teacher's convenience, see pic. 18. Both screens have search fields but for grades it is not do important since all grades are odered alphabetically exactly as in the Assignments program in Microsoft Teams.
Pic. 18
This makes a very convenient control of the recordings submitted. I open a quiz of a student in the Assignments program. I search the corresponding name through the box of the application, see pic. 18. Then only screen recordings of the required student remain in the gallery. Using the date field, I choose the correct one ant click onto the html refences in the right form. This opens the recording in a separate window and the recording starts automatically within 10-20 seconds usually. I do not waste time and begin grading of the paper.
Pic. 19
The recording can be played back with the doubled speed. To activate this regime one can just click the vertical ellipsis at the bottom right conner of the screen, see pic. 19.
Pic. 20
A correct screen recording is shown on pic. 20. Notice that the camera shows students' face, the teams window shows the top, which says that this student participates in the meeting with another device which is student's mobile phone. The window of OneNote does not hide this important information as well as the camera. The teacher can see the clock on the right part of the tool bar. It is not necessary to view the whole recording, but it is reasonable just to watch some pieces at random. This does not increase the time of grading noticeably.
Pic. 21
Welcome to ChatGPT
The measures described on this page block access to ChatGPT during quizzes and other tests. On the Moodle level students have time restrictions on each question and copying in the test window is blocked. The second monitor cannot be used, and the student's face is recorded since it is shown in the Face ID part. Students must record the full screen of their PC including the tools bar with the time. This is duplicated in the Moodle window twice with the down clock timers for each question and the whole exam. Therefore, it is actually impossible to do any editing of the screen recordings. The application created for screen recordings allows teachers easily find required recordings and open them for investigation. I have already run over fifty tests and all results are distributed according to the normal law and follow the current successes of students exactly. Homeworks are useless because of ChatGPT. They also were never very useful since many students just copied them. ChatGPT and the system shown on this page open new possibilities. Since students record their sessions with ShareX, they have the text of problems they were given by an automate during tests. Therefore, they may try solving them step by step with ChatGPT. Although this bot is not reliable, still it may give students some ideas for possible solutions. I usually warn students that they must ask for step-by-step solutions to learn how to solve problems of different type. In the Final I add 50% of problems which were not distributed before.
Pic. 22
Welcome to Search Boxes
Pictures 22 and 23 show how to insert the search field on to the title of the Main Screen. Notice that pic. 23 shows on the right pane the necessary corrections which should be made.
Pic. 23
Welcome to Search Boxes
Pic. 24
Welcome to our website
The renaming operation shown on pic. 24 is not actually required but it helps me to avoid mistakes in the formula to follow. The formula is shown in the pic. 25.

Pic. 25
A Sorting and Filtering Formula
I select “Items” in the left field and type
SortByColumns(Filter('Screen Recordings Calculus 2',StartsWith(Name,txtName.Text)),"Title",SortOrder.Descending)
in the right part of the command line. Here “SortByColumns()” is a sorting command, 'Screen Recordings Calculus 2’ is the name of the SharePoint list used for data connection.
StartsWith(Name,txtName.Text) is another filter command. Here the “Name” is the name of the column in the SharePoint list where students Display Names are collected. The parameter “txtName.Text” makes a reference to the search field (I renamed it on pic. 24). The “Title” parameter indicates that sorting will be made through the “Title” column of the SharePoint list, whereas “SortOrder.Descending” says that sorting goes from larger to smaller ID numbers which are collected in the “Title” column of the SharePoint list.
Pic. 26
Welcome to Sorting and Filtering
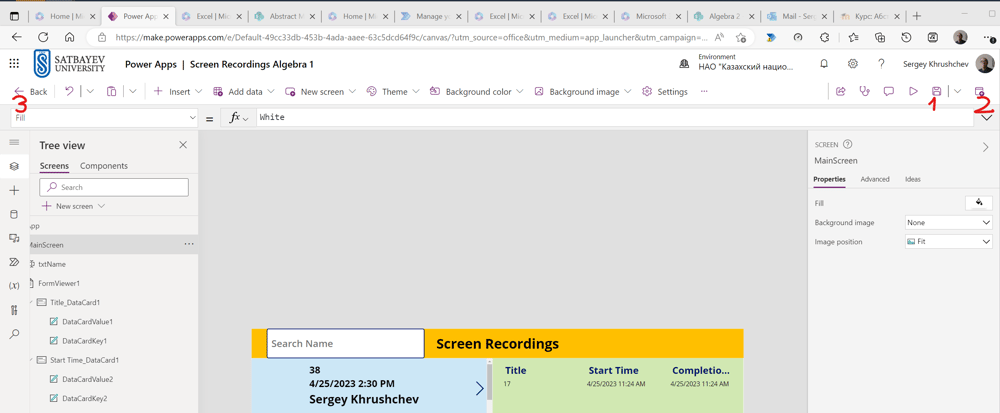
The application is ready. It can be saved, see 1 in the pic. 26, and published, see 2. Since it is hardly possible that the class will have over 500 records per month, it is not required to increase this number to 2000 through the settings icon.
Pic. 27
Screen Recording App in SharePoint
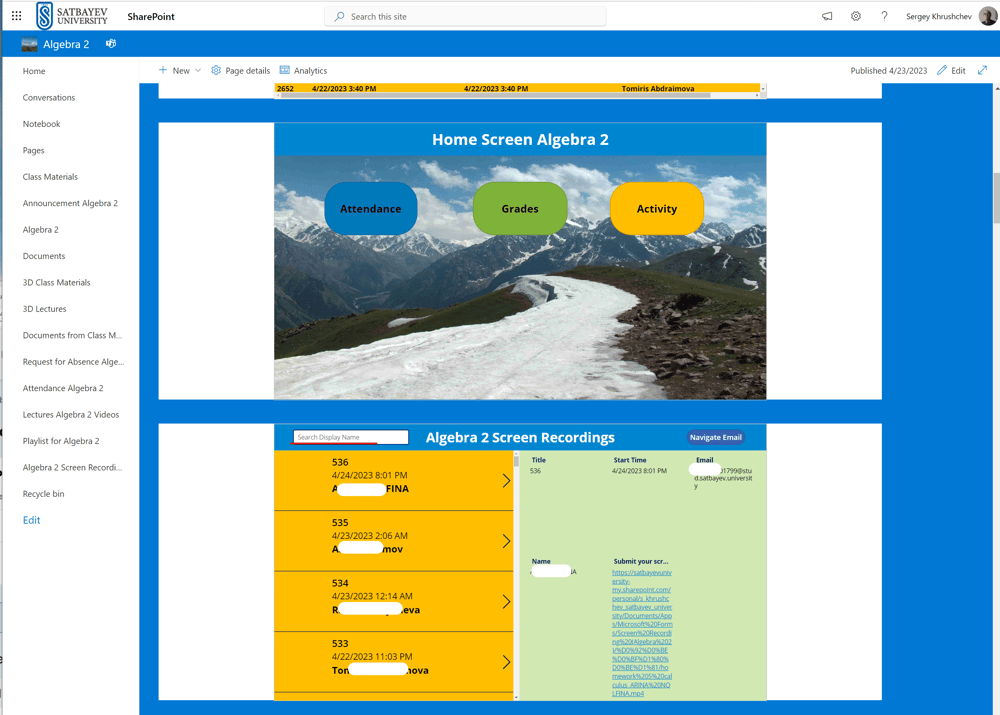
For the sake of convenience, I insert this application after the application for Grade Books, see pic. 27. The result of a concrete search is shown on pic. 28. Then I click on the Gallery field which includes the required record and open it from the Detailed form see pic. 29.
Pic. 28
Pic. 29
There is a problem hidden behind these applications. The recordings are automatically collected in a special folder of teacher’s OneDrive and therefore get automatically assigned hyperlinks which may exceed the limit of 255 character established by Microsoft for all URL fields in Power Automate flows. This may happen in 10% cases on average and the remaining cases may be treated with the help of excel files associated with the initial Microsoft form. Moreover, one can give a very short name to this form.
Still, nobody can guarantee that such exceptions can be excluded. To solve this problem, one should first find a solution for SharePoint lists. Luckely, it is known. The first idea is to reserve a multiple-text column, which has no limits for the number of characters to proceed by a flow. The flow can copy URLs to this very column. The second idea is to edit in advanced mode the JSON of this column so that in practice it becomes of the hyperlink type at least in the limits of Microsoft lists. However, if one connects a Power apps application to this very list, then it will be impossible to open links there since for the application they look as of the multiple-text type. In contrast to hyperlinks automatically assigned to recordings submitted through Microsoft forms, the links to rows of a SharePoint list are shorter especially if the name of this list does not include many characters. It follows that it is possible to insert hyperlinks of the items created by a flow. The only problem here is that the reference to the item is possible to get only when it is included in the list. But one can get two identical lists and two flows so that the final list will have everything required to open recordings from a Power Apps application. Below, I am going to describe the details of the construction described.

Pic. 30
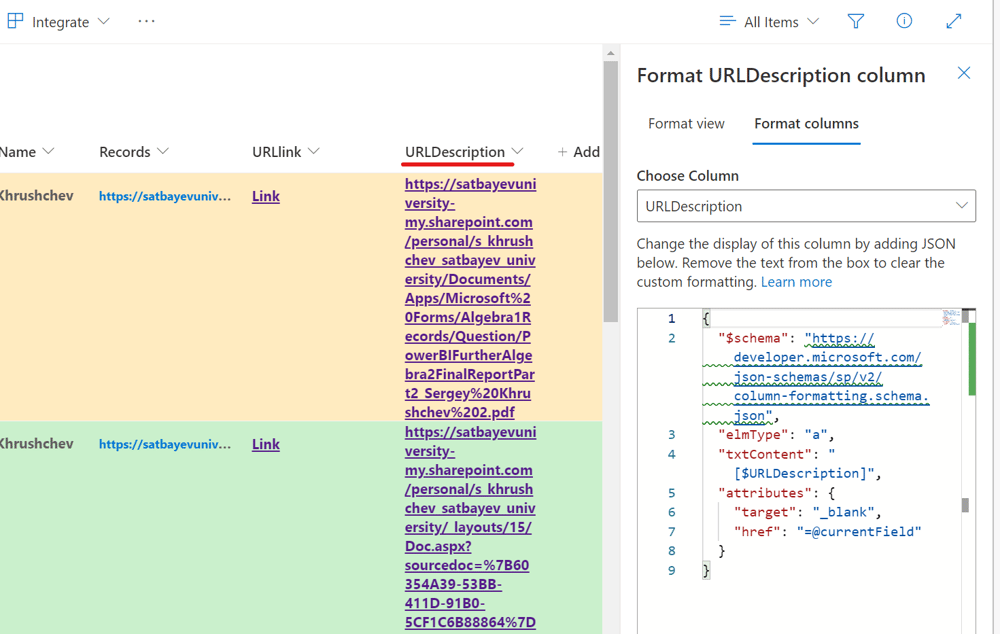
Format Multi-text Columns
I start by adding two extra multi-line text columns to the list shown on pic. 12. I format these two columns following the recommendations of Manuel T. Gomes which can be found here.
The column “Urllink” is the seventh column in the list. To open it for formatting after its creation as a multiple-line column, I expand the right checkmark and click “Column settings” followed by the click onto “Format this column” line. The default JSON code shown on the right of pic. 30 must be expended. I put the comma after the double quote symbol (to start a new JSON object) and typeset from the new line the code shown on pic. 30. Namely, I type
,
“elmType”: “a”,
“txtContent”: “Link”,
“attributes”: {
“target”: “_blank”,
“href”: “=@currentField”
}
I repeat the same with the second new multi-line column “URLDescription.” The code is shown on pic.31
Pic. 31
Format Multi-text Columns
,
“elmType”: “a”,
“txtContent”: “[URLDescription]”,
“attributes”: {
“target”: “_blank”,
“href”: “=@currentField”
}

Pic. 32
A Modification of the first Flow
After that I create the second list at the same location using this one as a pattern. Each list will be filled with its own flow. The first flow shown on pic. 13 has small modifications at the last step shown on pic. 32. This time, I leave blank field 1 and instead insert the dynamical icon “link” in both fields 2 and 3. These actions on the one hand prevent the first flow from failure if the real length of the link exceeds 255 characters, and on the other hand sends the link to new fields of the first SharePoint list.
Pic. 33
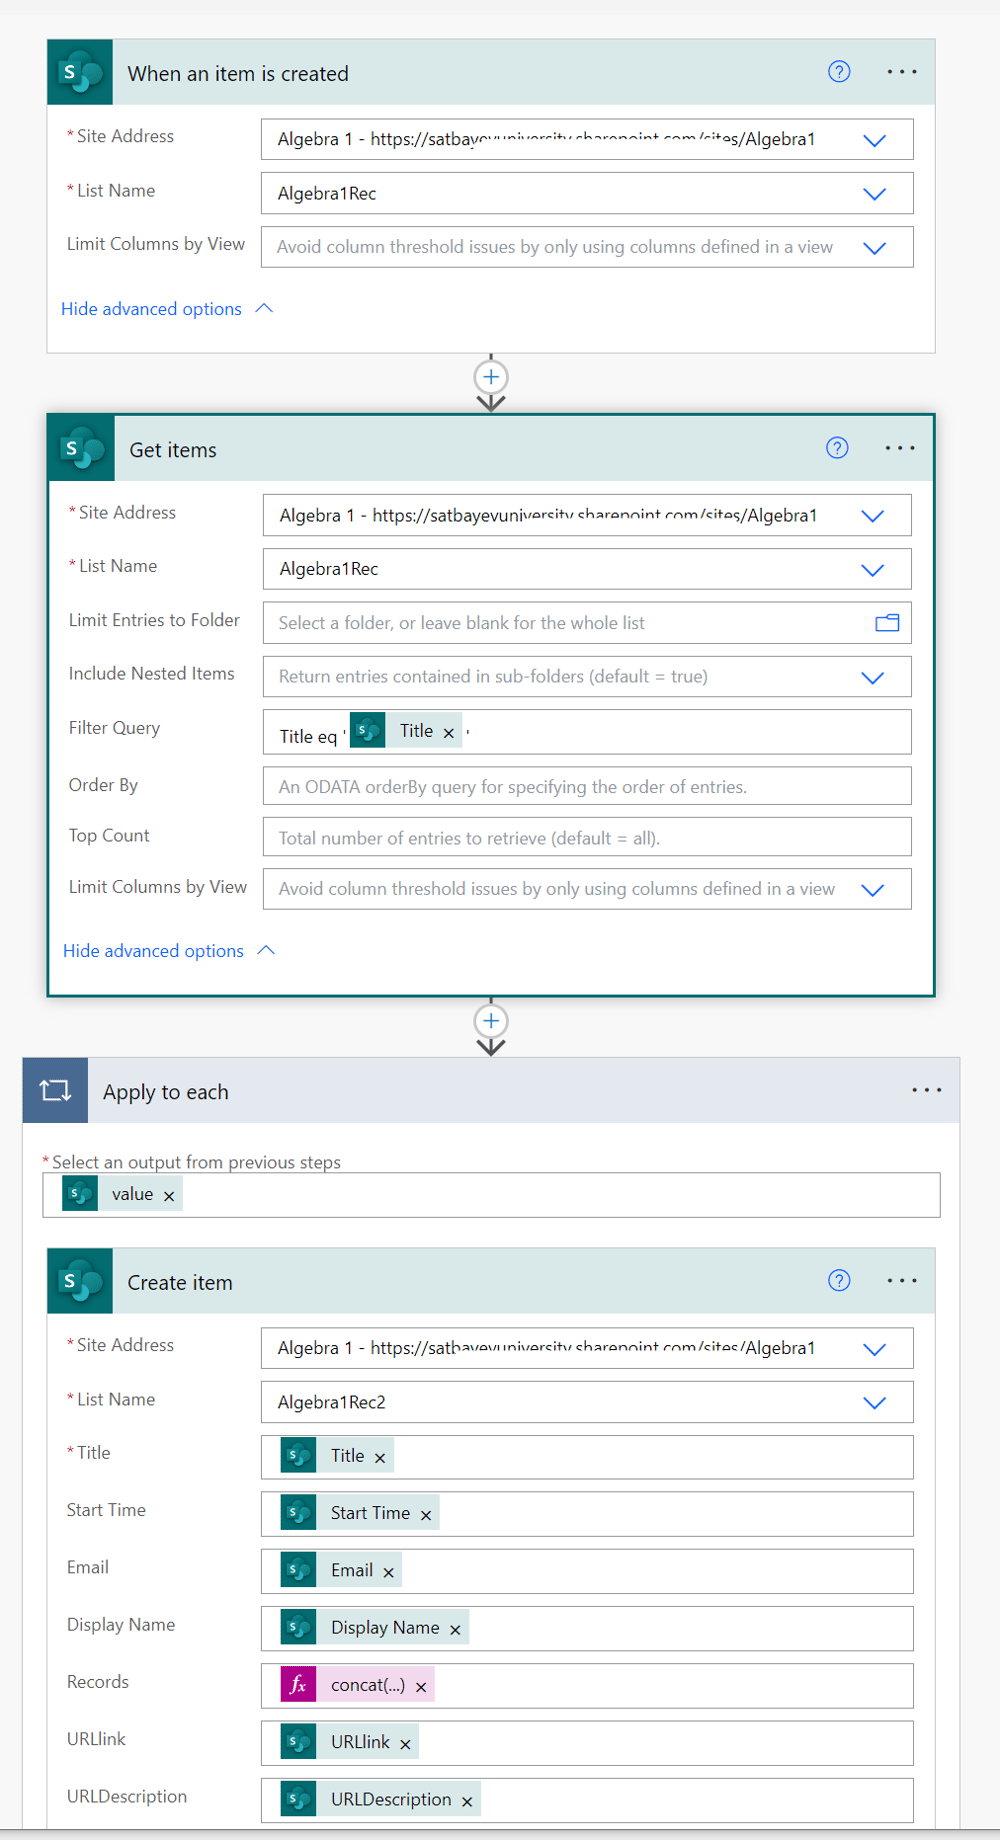
The Second Flow
The second flow is triggered by the row added to the first SharePoint list and is looked as it is shown on pic. 48. The two first steps are standard. These are “When an item is created” and “Get items” actions. In the “Filter Query” field, I type: Title eq ‘’. Then I put the mouse cursor between the quotes and select the dynamical icon “Title.”

Pic. 34
The Second Flow
One may include the action “Apply to each” but it will be included automatically with the correct icon “value” as soon as one starts filling the fields of the “Create item” action with dynamical icons. One can fill the “Records” field with the dynamical icon “Link to item,” which is an URL reference to the created row in the first SharePoint list, but it is better to use an f_x function here. Although the link to item action creates a shorter URL link, the “concat” function creates much shorter one.
The code in window 2 of pic. 34 looks as follows:
concat('https://satbayevuniversity.sharepoint.com/sites/Algebra1/Lists/Algebra1Rec/DispForm.aspx?ID=',items('Apply_to_each')['Id'])
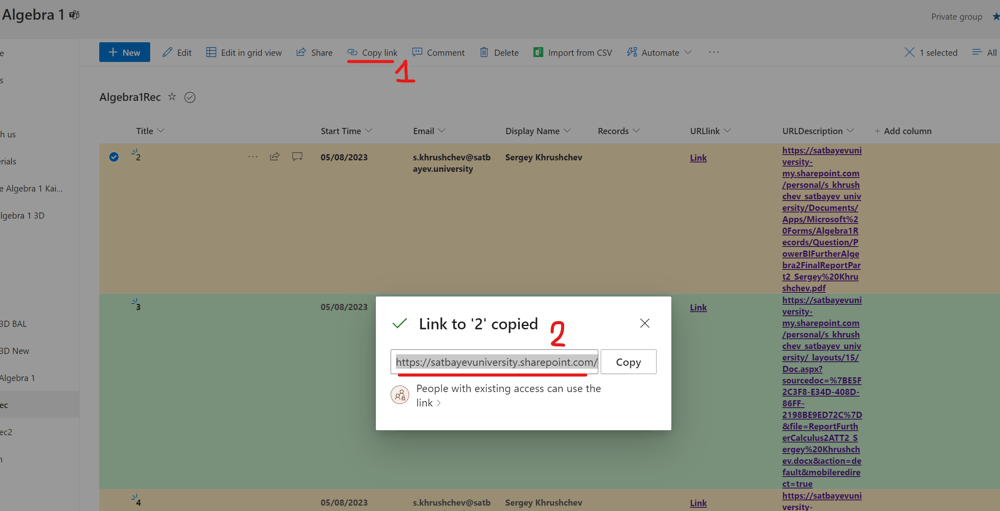
The part between the first quote mark and the question mark can be easily found from the first SharePoint list. If it is empty then just create one item manually, save it and find its link as it is shown on pic. 35. Select the item. Then click onto “Copy link,” put the mouse cursor in window 2 and with the right button copy the link. You will get something like this:
https://satbayevuniversity.sharepoint.com/sites/Algebra1/Lists/Algebra1Rec/DispForm.aspx?ID=1&e=yPshtN
The part between the quote marks must be filled with the code starting with “https” and ending with “ID=”. The code ‘Apply_to_each’ corresponds to the name of the action “Apply to each.” If by some reasons it is “Apply to each 2”, then the code will be ‘Apply_to_each_2’.
Pic. 35
Pic. 36
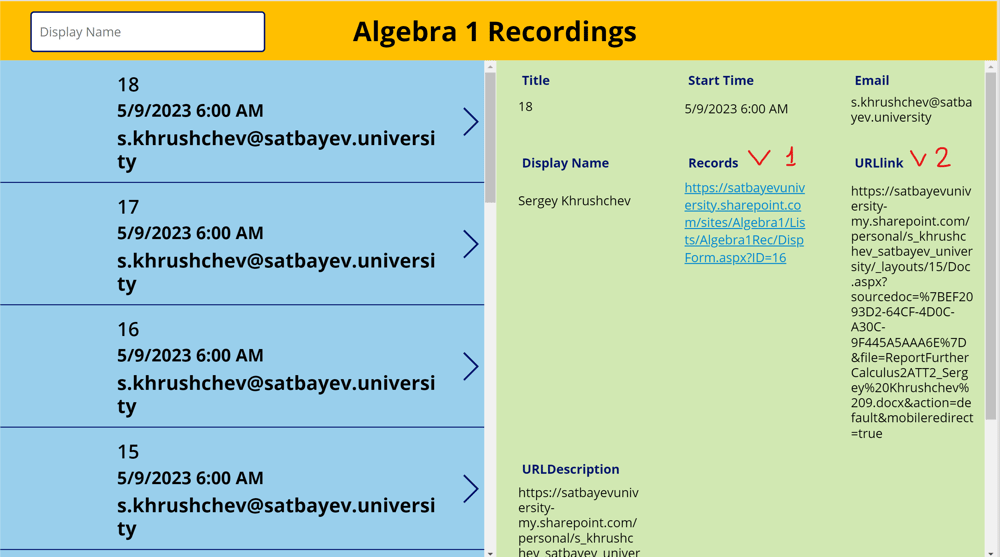
Welcome to the Application
To see how this system works in practice, . I submit a new recording through the Microsoft Form. In a few seconds a new record appears in the left Gallery of the application shown on pic. 36. Its number is 18 in the details view on the right. I can open links in either “URLlink” or “URLDescriprion” only by a copy/paste action. However, field “Records” is colored in blue indicating that it is a URL link. If I click on it with the mouse, then the system opens the window shown on pic. 37.

Pic. 37
Welcome to the Application
It is nothing but the contents of the first SharePoint list row added by the first flow. It has nothing in “Records” field but since in the SharePoint lists the last two columns were made artificially to be true URL links, I can click either of them to open my recording, see pic. 38.
Pic. 38
Welcome to the Application
Add a description here.
Pic. 39
Welcome to the Application
An analysis of the solution presented may create an impression that one can avoid usage of two lists if in the first flow inserts into the “Recordings” field a properly constructed function. I couldn’t find any, but instead I found a connector in Microsoft Power Automate, see pic. 39, which creates Short URLs. The problem with this connector is that it relays on external companies charging for their service. I do not think that one extra click of a mouse costs these charges.