Teaching Mathematics in Microsoft 365 Education with ChatGPT


Abstract
Add Standard features of Microsoft 365 Education with A3 for faculty licenses may be insufficient for a full transition from in-person classes to digital classrooms. To supplement these functionalities, educators should leverage Microsoft Lists, Power Automate, Power Apps, and Microsoft Forms, with Microsoft Lists serving as the cornerstone. A crucial element is the development of an Automatic Proctoring System (APS) which significantly curbs student misuse of AI like ChatGPT during tests, while still allowing its use as a study aid outside of testing scenarios. The APS discussed in this paper is free for educators with A3 license (most likely even for A1 license). It can be run on a daily basis but it requires some knowledge of Power Automate and Power Apps. To make this system accessible for every teacher, I present this system in detail. A part of this APS can also be used to replace the premium connector for assigning shorter URLs.
Introduction
According to historical records documented on Wikipedia, the origins of distance education date back to 1728 when Caleb Phillips began teaching via postal correspondence, as evidenced by his announcement in the Boston Gazette. While this event signified the advent of remote learning, it came with a significant limitation - the inability to monitor tasks executions. This challenge has persisted throughout the evolution of online education, preventing it from the fully replacing traditional face-to-face teaching. In formal education, institutions issue certificates to their graduates, attesting to their level of expertise. These certificates are compiled based on comprehensive record of all grades earned by a student, as well as evidence of academic honesty. They are typically sanctioned by the Ministry of Education or carry international recognition. As we explore digital solutions, it is crucial to ensure that they uphold the credibility and reputation of formal education.
The monitoring issue becomes especially crucial both in the online teaching and traditional classrooms due to advent of AI services such as ChatGPT. While it is true that one can use business proctoring systems, they are costly and can hardly be utilized for routine tests. This paper provides a solution to this problem for Microsoft 365 Education A3/A5 LMS, widely known as Microsoft Teams. Contrary to popular belief, Microsoft Teams is just one significant component of the broader Microsoft 365 Education suite. It also includes such important programs for the solution of this problem, like Microsoft Lists, Power Automate, and Power Apps.
The concept of the solution is straightforward. Microsoft LMS includes a useful program, Microsoft Forms, which allows anyone with Microsoft license to upload mp4 files of up to 1 GB in size to the teacher’s OneDrive cloud (see Figure 1). Students can record full screens of their notebooks using a free program, ShareX (https://getsharex.com/), or Power Point with another free program HandBrake (https://handbrake.fr/), which allows students to compress mp4 files significantly. For the ninety minutes allocated for a test, these programs produce mp4 files of approximately 400 MB in size. It is crucial that the student’s face is also recorded, as it can be captured by the front camera of the notebook in real time. The soundtrack is recorded too. Given that every teacher has 1Tb of space, all recordings can be stored for at least 30 days with no problem of space shortage.
However, the system, as described above, will not work efficiently due to the poor organization of recordings in Microsoft Forms. There is no search mechanism to instantly find a specific recording, and manual search is practically impossible. Therefore, this system requires significant adjustments, which is the focus of the present paper.
When creating such services like Automatic Proctoring Systems, educators should follow Microsoft’s rules on permissions. By default, the OneDrive of a teacher or student is open for any action only to the owner. In contrast, by default, the SharePoint site of a team is open for any action to every student in the class. Since safe arrival of screen recordings is essential for every student, they should have the ability to view their files in the teacher’s OneDrive.
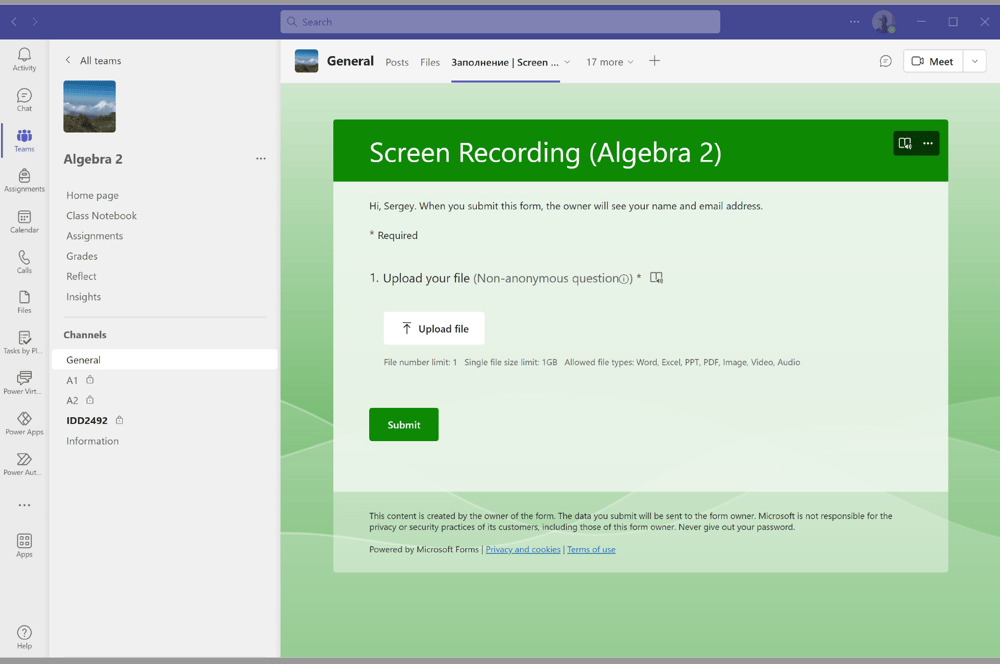
Figure 1
The Microsoft Form displayed in Figure 1 saves all student’s recordings in a special folder. The path to this folder is as follows:
/Apps/Microsoft Forms/Screen Recording (Algebra 2)/Question/.
Using the “Share” option, the teacher should give the “View Only” permission for this specific folder to the class team. While it is not obligatory, if you want to save time on correspondence with students concerning file submission, it is better to do this. It is possible to arrange a workflow that assigns read-only permission only for recordings created by the particular student. Thus, any student can see only personal files attached to the Microsoft forms. However, the publicity in the submission policy psychologically can prevent cheating.
Since the folder for any Microsoft form has a URL, its contents can be displayed as a tab in the corresponding Microsoft Teams or in SharePoint. Then, students can view their screen recordings and be confident that they have been received.
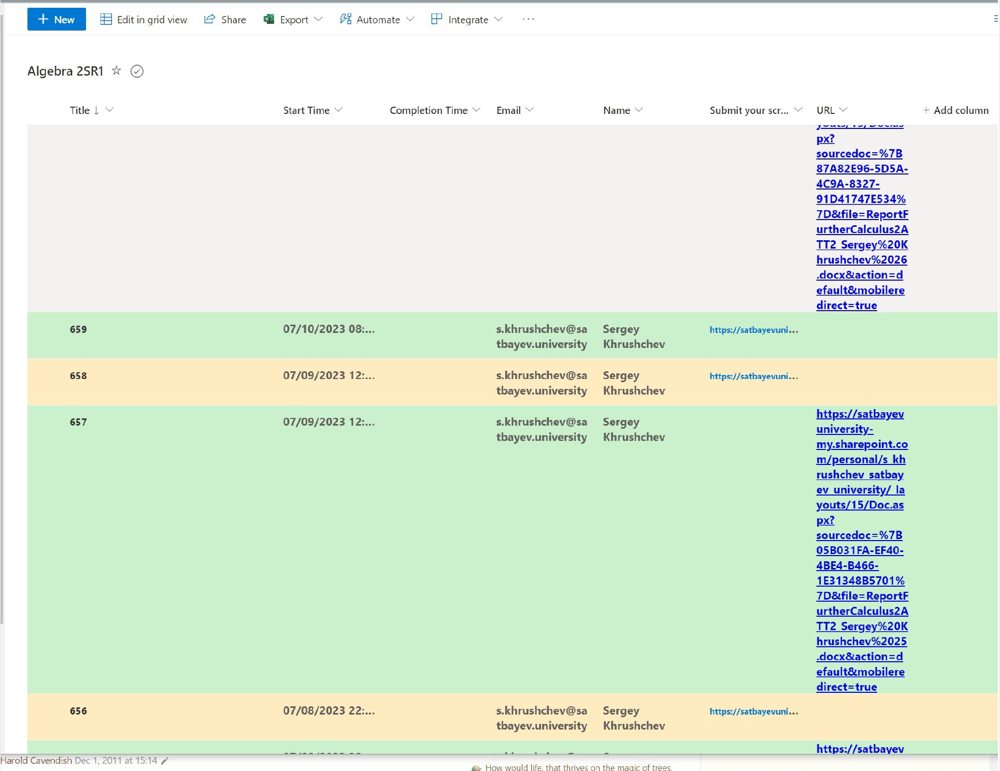
Figure 2
Microsoft Lists
The system is designed to emulate in-class proctoring, like how every student takes a quiz in front of a camera that records everything. All recordings are then collected and organized through Microsoft Lists, Power Automate, and Power Apps, enabling a teacher to access any recording within seconds. For instance, if a teacher opens a student's paper in the “Assignments” program, the APS system using a Power Apps application finds and presents the recording of that specific student to the teacher immediately.
From the students’ perspective, it looks as follows: Students record their full screens using the free ShareX program if they are using notebooks with Windows 11/10. If a student uses a Mac Notebook, recording is performed either with the internal program or with PowerPoint. In this case, compression may be required since Microsoft forms have a 1GB limit for attached files. The free compression program HandBrake is available for both Windows and Mac OS. The format of video files must be mp4. If a quiz is administered in Class Notebook, students activate the front camera to show their faces. In the case of a test in Moodle, the frontal camera is used for control from the Moodle side. There are simple requirements for these recordings: No exam should be opened to full screen, the video from the frontal camera must always be on top (there is free software to arrange this), the task bar with the date and time must be included to avoid editing of videos, and the mouse cursor should be made well visible. Its permanent presence in the recorded video indicates that a second monitor, if even present, was not used.
There are two versions of the system from the teacher's perspective: a weaker and a stronger version. The weaker APS assumes that students upload recorded videos to folders of their own OneDrive and send only the URLs of these recordings to the teacher. Conversely, the stronger version of APS requires these videos to be uploaded to the teacher's OneDrive through a Microsoft Form. The average size of 50-minutes video recorded through the ShareX program does not exceed 0.5 Gb in the mp4 format. This means that the teacher’s OneDrive can accommodate approximately 5000 of such recordings. Given the relatively short lifespan of these recordings, they can be deleted after about a month. It is pragmatic to use the weaker APS for routine tests and the stronger APS for more crucial examinations, such as midterms and final exams. The advantage of a weak APS is that it has practically no restrictions on the total size of the recorded video. The disadvantage is that a weaker version requires more accurate actions from the student’s side. However, since Microsoft provides a template for automatic cleaning of folders in OneDrive, the chances of overloading of the cloud with recording reduce to zero.
Let us first consider the stronger version. Relying solely on the standard Microsoft Forms interface proves to be insufficient, as the required recording search is time-consuming. By utilizing SharePoint lists, Power Automate and Power Apps, this function can be significantly enhanced. Here is a list of required actions.
1. Create a SharePoint list that corresponds to the Microsoft Form for collecting student responses. The list should include the “Title,” “Email,” “Name” columns of a single line text type, the “Start Time,” column of the date and time type with the time switch in the “On” position, and a “Hyperlink” type column for the link to the student's recording (see Figure 2).
2. Develop a Power Automate flow that is triggered when a new response is submitted to the Microsoft Form (see Figure 1). Include the “Get response details” action.
3. Test the flow by submitting a recording through the form. If successful, you’ll see a hyperlink in the field corresponding to the submitted recording.
4. Implement the “Parse JSON” action using the dynamic icon provided by the “Get response details” action. This allows the code to include the link to the file.
5. To gather student information, use the “Get user profile (V2)” action with the “Responders’ Email” dynamic icon. This step provides the flow with necessary information to fill in the list.
6. Lastly, use the “Create item” action from the SharePoint connector to add the responses to the list. This can be easily done if the names of the list columns match the names used in the form.
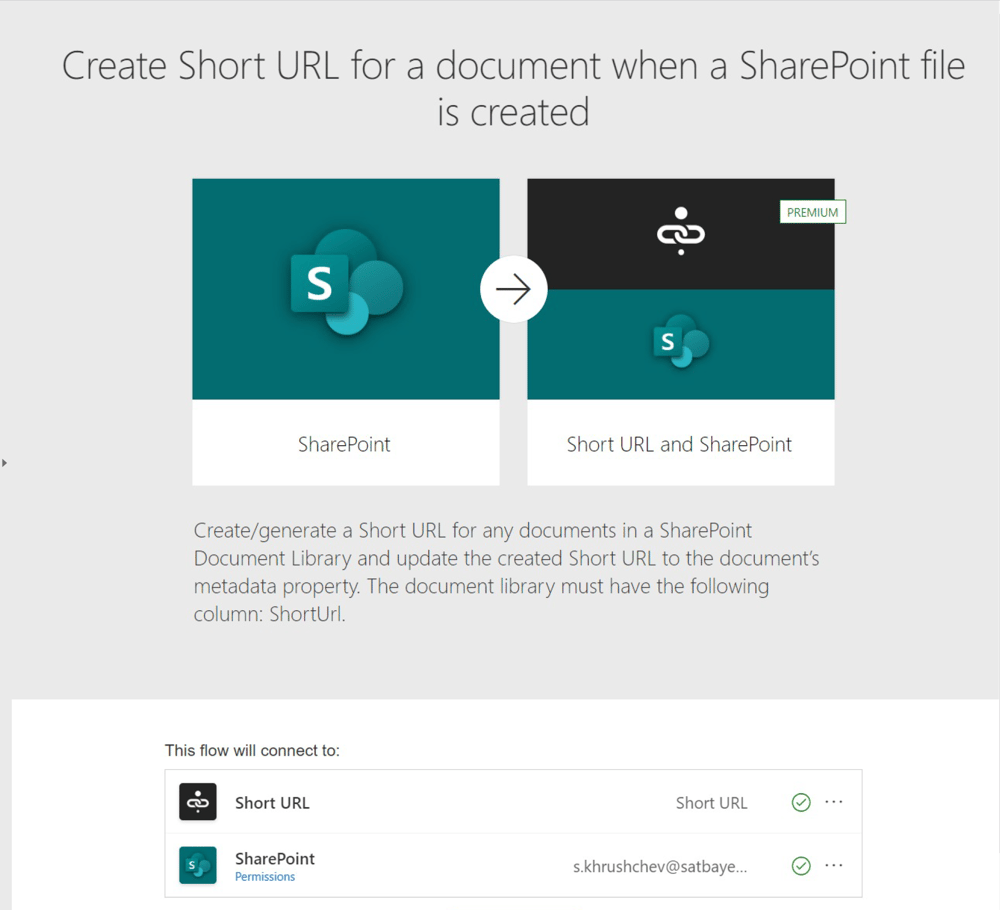
Figure 3
The premium Short URL connector
Microsoft provides a premium connector shown in Figure 3, which creates “Short URL” for files created. However, the term “Premium” implies that each such link incurs a cost to the University. Given the number of tests, this service can be expensive for any university.
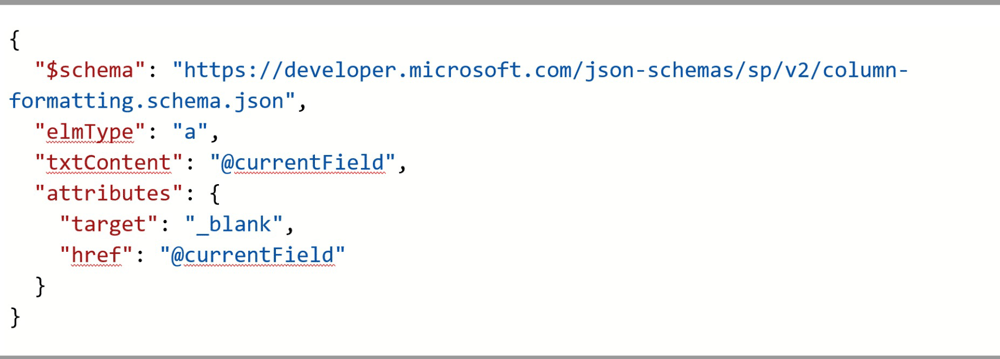
Figure 4
The JSON formatting code
Multi-line columns in SharePoint lists can store up to 63,999 characters by default. Therefore, it seems reasonable to use them instead of hyperlink columns for storing long URL links. I added a new multi-line text column named “URL” to the list. Then, I opened the format option for this column, followed by the “Advanced mode” option. For the “URL” column the JSON code needs to be extended as it is shown in Figure 4. After saving this new format option, any hyperlink pasted into this column can be opened with a single mouse click. However, any Power Apps application connected to this list will consider the “URL” column as of multiline-text type. Of course, the educator could copy the content and insert the link into a browser, but this requires additional actions, which may turn the educator’s life in a complete mess. Instead, we create a duplicate of the list and set up the second flow for populating items in the duplicated list (see Figure 5).
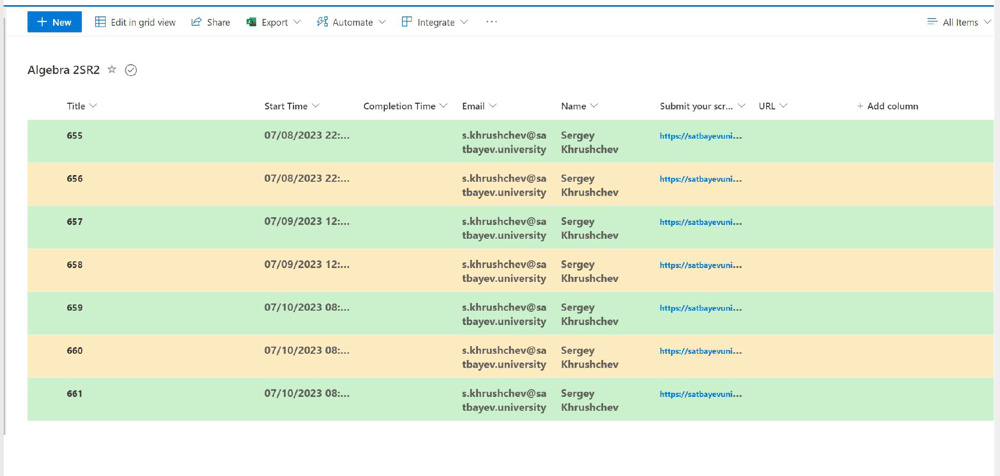
Figure 5
The second SharePoint list
When students submit the screen recording through the Microsoft Form (see Figure 1), the first flow (depicted in Figure 6) captures the available data, processes it, and inserts it into the first SharePoint list as rows (shown on Figure. 2). Note that the file number limit in this form is set to 1. While it is not mandatory, it simplifies the search of recordings for a teacher.
Like the screen recording folder, both SharePoint lists require some attention from the educator regarding permissions for these lists. While the list is open, I click the setting button at the top and select the “List settings” option. Then, in the “General settings” block of the list settings window, I click the “Advanced settings” option. This action opens a window with a few options. I find the “item-level Permissions,” which is the second in the list from the top. Then, I select the circles in front of “Read items that were created by a user” and “Create items and edit items that were created by a user.” I click the “Ok” button at the bottom to save changes. Next, in the “Permissions for the list”, I stop inheriting permissions. These measures are required to prevent any student action directed at removing other students’ recordings from Power Apps application. Students can only see their own records in this Power Apps application, which will be discussed later. Consequently, the teacher may use this application instead of the one described at the end of Section 1.
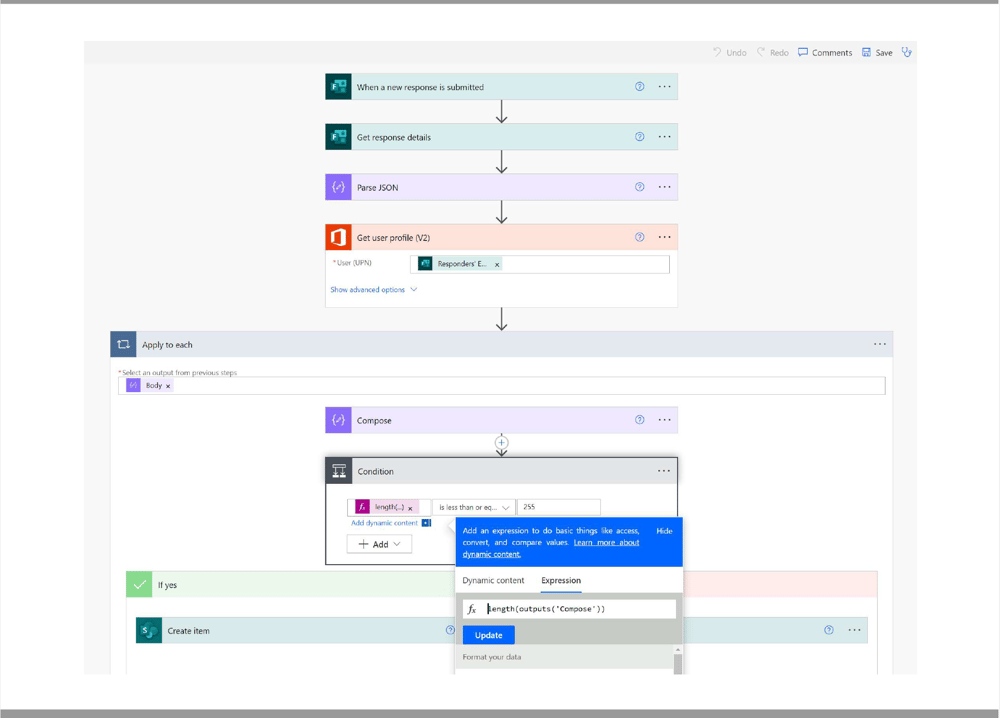
Figure 6
The First Flow
The first flow is triggered by the “When a new response is submitted” action, as shown in Figure 7. The “Form Id” field is populated by the name of the form selected via the check mark. The second step of the workflow involves the “Get response details” action, where the “Response Id” field is populated by the dynamic icon, also shown in Figure 7.
The third “Parse JSON” action is used to retrieve a dynamic icon for the recording link. The input for this action is the “Upload your file” dynamic icon, which gets its name from the corresponding field in the Microsoft Form used to collect screen recordings. This icon contains a JSON code, which includes a lot of extra information. The “Parse JSON” action enables one to obtain key internal references, including the hyperlink assigned to the recording.
To populate the “Parse JSON” action, I first save the initial steps of the workflow and run a test, which results in successful execution. Then, I click the “Get response details” box to expand all details (see Figure 8). In the “OUTPUTS” section, I find the “Upload your file” field containing the JSON code. I position the cursor in front of the left square bracket symbol and use the “Ctrl+A” shortcut to select all characters of the JSON code in this field. Then, I use the “Ctrl+C” shortcut to copy the selected block to the clipboard. Finally, I return to the edit mode by clicking the “Edit” icon on the Power Automate interface.
Once in the edit mode, I add the “Parse JSON” action and populate its first field with the dynamic icon, as shown in Figure 9. Next, I click the “Generate from sample” button. This action opens a new window with an empty field to accommodate the content of the clipboard. I position the cursor in this field and use the “Ctrl+V” shortcut to paste the code into it. These actions generate schema shown in Figure 9.
To retrieve information on the student who submitted the form, I add the “Get user profile (V2)” action and populate the “User (UPN)” field with the “Responders’ Email” dynamic icon, as seen in Figure 9.
The first flow must differentiate between the cases of a long URL and a short URL. The “Parse JSON” action generates the URL link to the screen recording. Therefore, it is logical to evaluate its length to determine which path to follow. The “length()” function in Power Automate cannot be applied directly to the “link” icon, since it only works with strings. The required string can be created using the “Compose” action in Power Automate, which features only one “Inputs” field. This field should be populated with the “link” dynamic icon. As soon as it is inserted into this field, the Power Automate system generates the “Apply to each” loop with the “body” dynamic icon.
The “Compose” action should be followed by the “Condition” action, as shown in Figure 6. The left field of the “Condition” action is populated with the “Expression” editor, which automatically appears when you place the cursor in the left box. You can also click the “Add dynamic content” button below the box. By default, the window opens in the “Dynamic content” tab. To activate the expression editor, you should click the “Expression” tab. In the expression editor, I type the following formula:
length(outputs(‘Compose’))
Then, I click the “OK/Update” button and the expression is inserted into the left field. Instead of typing the above expression in the expression editor, you can type only “length()”, place the cursor between the parentheses, switch to the “Dynamic content” tab and select the “Outputs” dynamic icon from the “Compose” action list. By default, the middle box shows the “is equal to” choice. Therefore, it is crucial to select the “is less or equal to” option via the check mark. The upper bound, 255, is entered directly in the right field of the condition box.
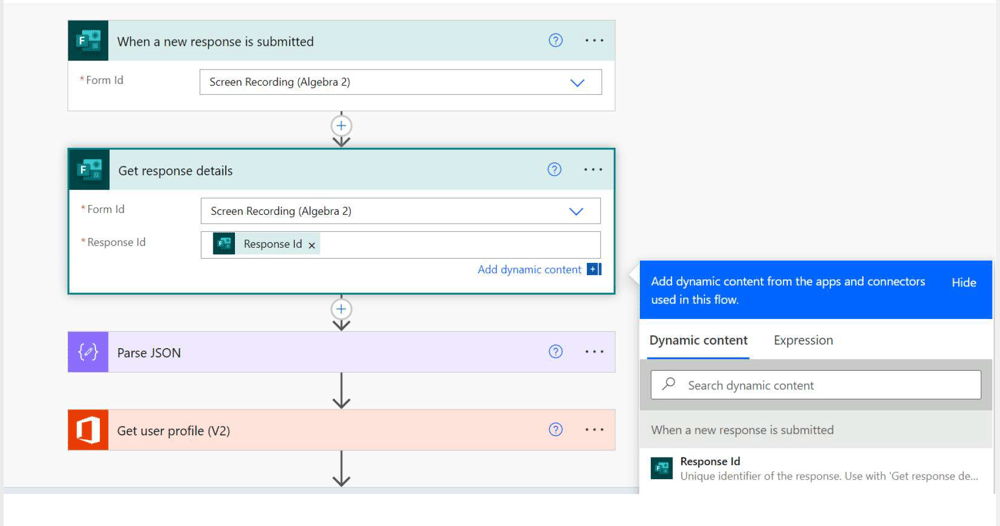
Figure 7
The first two steps
The condition action directs the flow in the “If yes” branch for short URL links, and to the “If no” branch otherwise.
Each branch includes the “Create item” action, which is named “Create item 2” in the “If no” branch, simply because I first added it to the “If yes” branch (see Figure 10). The first two fields are populated via the check marks. They illustrate that this work flow delivers items to the first SharePoint list “Algebra 2SR1”.
The rest five fields in both actions are populated with dynamic icons shown in Figure 10. The difference is that the “link” icon is populated in the “Submit your screen recording” field in the “If yes” branch, and in the “URL” field in the “If no” branch.
It follows that the “Algebra 2SR1” SharePoint list has links in the hyperlink column if the item corresponds to a short URL, and in the URL column otherwise.
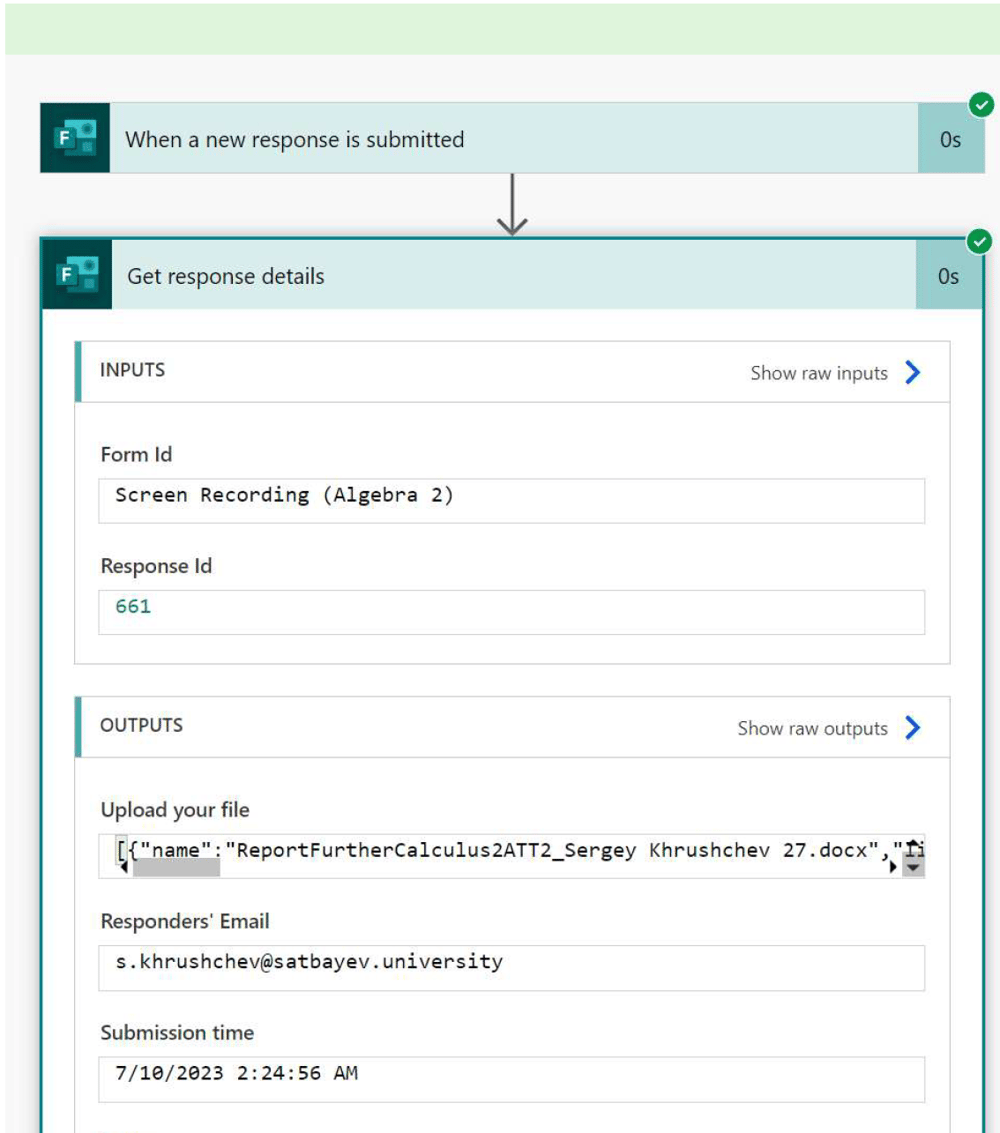
Figure 8
Get response details
Figure 9
Parse JSON
Click here to edit your description
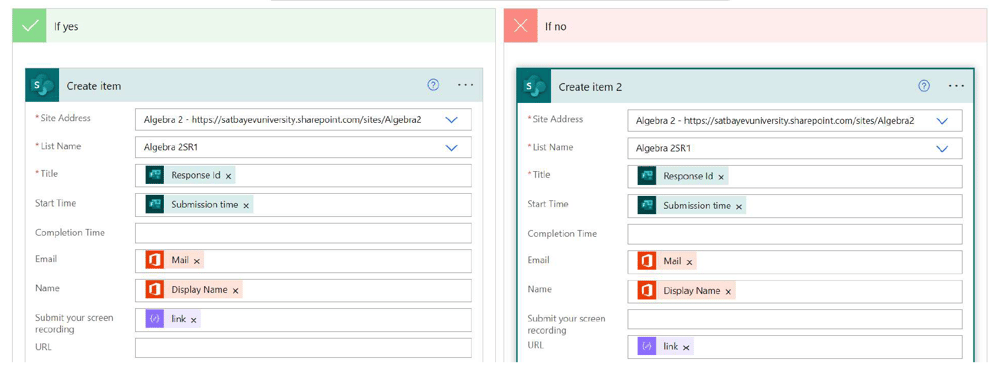
Figure 10
The last steps of the first flow
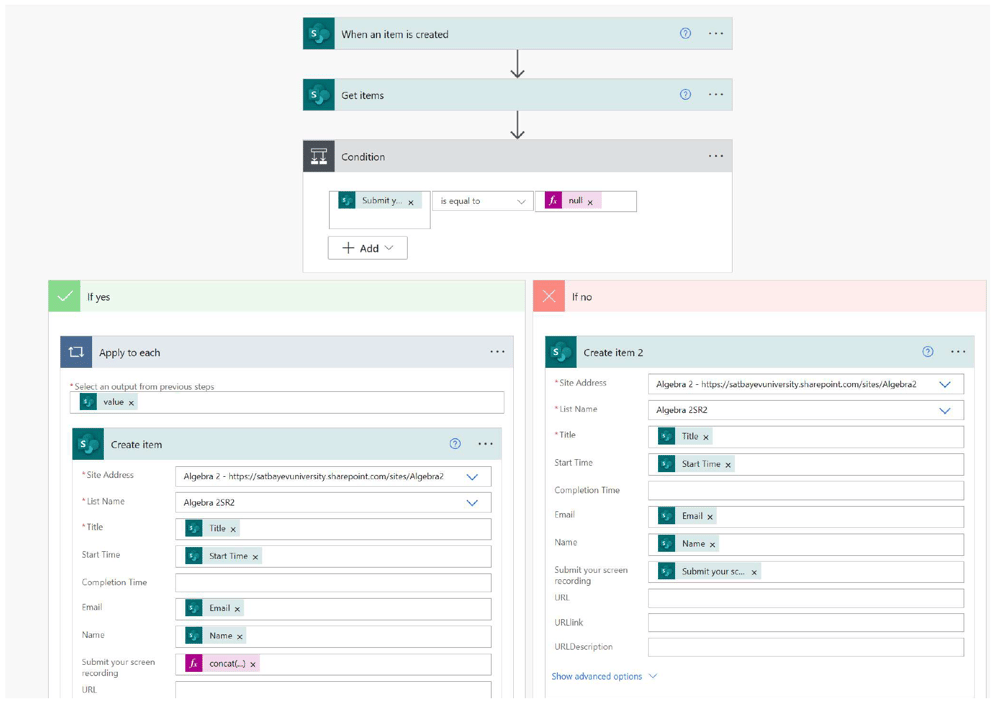
Figure 11
The Second Flow
The second workflow is illustrated in Figure 11. It is triggered by the “When an item is created” action, which monitors the first SharePoint list for newly added rows (or items). As soon as a new item is added to the first SharePoint list by the first workflow, the trigger initiates the second workflow. Each of the two initial steps generates lists of dynamic icons under the title of the corresponding step. Thus, the “When an item is created” list includes the dynamic icons representing the fields of the item that was added to the first list. Both boxes are populated in a similar way via the check marks. After clicking the “Get items” box, I expand the “Show advanced options” line via the check mark. Then, in the “Filter Query” field, I enter “Title eq ‘ ’”. I replace the empty space between these two single quotation marks with the “Title” dynamic icon, which is only present in the “When an item is created” list.
The “Condition” action verifies whether the hyperlink cell of the newly added item is empty or not. To do this, I insert the “Submit your recording” dynamic icon in the left field and enter “null” in the expression editor. If the icon is not empty, then its content is pasted into a similar cell of the second list, as shown in the “Create item 2” action in Figure 11. The “Create item” is populated by the dynamic icons from the “Get items” list, which generates the “Apply to each” loop in the “If yes” branch with the “body” dynamic icon inserted automatically.
I cannot insert the “Submit” icon into the “Submit your screen recording” field of the “Create item” box, since this link has more than 255 characters. However, this link is clickable in the first Microsoft list, since it is pasted to the “URL” column of the first SharePoint list.
The idea is to arrange a short URL link form the second SharePoint list to this long URL link in the first SharePoint list. One solution is to select the “Link to item” dynamic icon for this field in the second workflow. It creates a shorter URL link. However, the function “concat()” generates the shortest possible link.
Each row in a SharePoint list has its own unique URL. To get it, I open the first SharePoint list, select any existing row via selecting the circle at its very beginning, and then in the menu select the “Copy link” option. This link can be pasted to a word file:
https://satbayevuniversity.sharepoint.com/sites/Algebra1/Lists/Algebra1Rec/DispForm.aspx?ID=1\&e=yPshtN
The part of this URL starting with “https” and ending with “ID=” is used as the first expression inside the “concat()” function:
concat(‘https://satbayevuniversity.sharepoint.com/sites/Algebra1/Lists/Algebra1Rec/DispForm.aspx?ID=’,items(‘Apply_to_each’)[‘Id’])
This part is completed with the code shown in the above formula. The second flow is ready and can be tested.
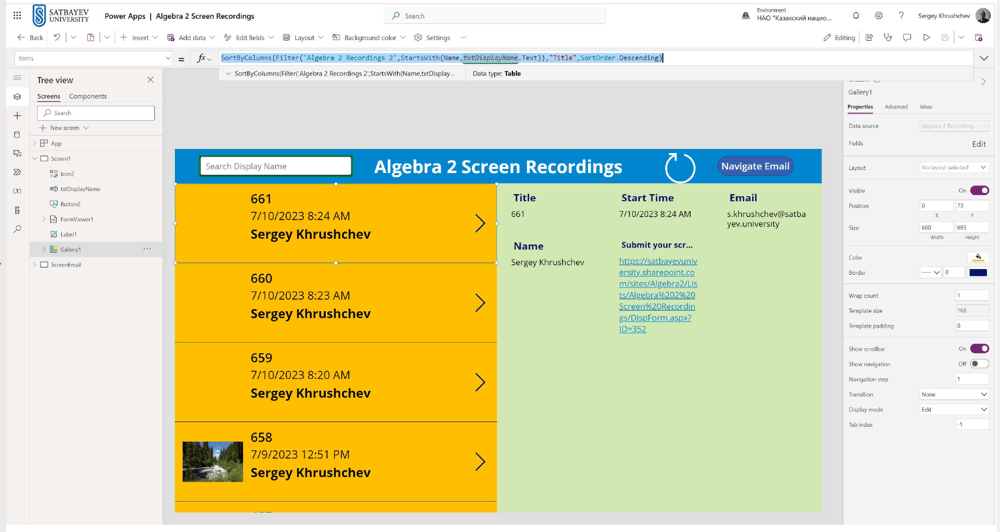
Figure 12
A Power Apps Application
To leverage screen recordings most efficiently, it is necessary to create a Power Apps application connected to the second SharePoint list. If you look at this list shown in Figure 5, you may find the “Integrate” icon in the top menu with the check mark on the right to open options. Among these, the “Power Apps” option allows you to automatically create a mobile application connected to this list. As the second SharePoint list includes fewer than eight columns, there is no need to modify anything in this application. However, as a standard mobile application, it does not align well with teacher’s needs. Therefore, since teachers’ convenience is the primary aim of this APS, it is better to create this application from scratch.
To do so, I open the link https://www.office.com and find the Power Apps icon by clicking either the applications or waffle icon on the left pane of the window. Then, I create a blank application by clicking the “+ Cteate” button on the left pane, followed by a click on the “Blank app” button. In a few steps a Power Apps Studio with a blank tablet application will be created.
The final edition of this application is shown in Figure 12. Many instructional videos by Reza Dorrani (available at https://rezadorrani.com/) provide detailed guidance on working with Power Apps Studio. Therefore. I mention here only the main points in the construction of this application. You can also find required details on this very site on the pages devoted to "Power Apps."
As is clear from Figure 12, this is a single-screen application with a gallery of screen recordings and the Details form shown on the right. Having a single screen saves time. The gallery on the left is linked to the details form for each recording on the right via the “Title” field. If I click on the top arrow or on the gallery’s field on the left, then the details with 661 value in the Title field are automatically opened. Above the gallery, you can see the search box. It is indicated in the left Tree view as “txtDisplayName.”
The formula for the search and filter actions should be typeset in the formula field when Gallery1 is selected in the tree view (as shown in Figure 12) and when “items” is selected in the left formula field.
SortByColumns(Filter(‘Algebra 2 Recordings 2’,StartsWith(Name,txtDisplayName.Text)),”Title”,SortOrder.Descending)
The above expression is a composition of several functions. The external one is “SortByColumns()” function, which has three arguments: the “Filter()” function, the double quoted Title (this is a sorting column when filtering was executed) and the sorting order (Ascending or Descending). The parameter ‘Algebra 2 Recordings 2’ is the name of the list, StartsWith(Name,txtDisplayName.Text) is the function selecting the names which first letters coincide with those available in the list. Usually, two or three letters of a student’s name are enough to select this student. Therefore, in seconds, a teacher can get access to the required link in the detailed view. One click is enough to open the recording if its URL link is short. One additional mouse click is required if it contains more than 255 characters.
Here is a brief plan to create this application from scratch:
1. Using the “+ Insert” icon, I expand it through the right check mark and select the “Text label” option, which creates the label on the blank screen. I expand it to the size shown in blue in Figure 12 using the mouse. All adjustments of font size, color, etc., are made through the right pane shown in Figure 12. The color background for the gallery or their form are selected through the “Background color” icon in the top menu.
2. Similarly, I insert the “Vertical gallery” and connect it to the required SharePoint list following the system’s directions. Then, using the “Layout” option in the right pane, I expand it through the check mark and select the template with four fields names: Image, Title, Subtitle, and Body. The gallery refreshes after the template selection. I position it as shown in Figure 12 using the mouse. Using the “Edit” option in the right pane, the order of data shown in the gallery can also be fixed as required. Please note that the gallery can be selected either via the Tree view or with a mouse click at the top right corner of the first gallery field. Any change made for this cell automatically extends to the whole gallery.
3. I open “+ Insert” icon again and in the search field type “form”, followed by the selection of the “Display form” option. These actions create a new form on the screen. I position it properly using the mouse. While editing the form, I select the same data source for this form using the “Data source” option in the right pane of the studio. This action inserts the names of the columns in the SharePoint list into the form. Using the “Edit” option of this pane, I can remove some and include other titles, reorder them by dragging icons with the mouse in the list of displayed icons.
4. To populate the cells in the form, I select it in the Tree view, ensure that the “item” option is chosen in the left formula bar, and type “Gallery1.Selected”. This expression carries out the required actions. Similarly, to open the details view from the gallery, I select it in the Tree view or with a mouse click at the upper right corner of the gallery. I ensure that the left formula bar displays “OnSelect” and type the formula “Navigate(FormView1,ScreenTransition.Fade)” in the right bar.
5. Using the “+ Insert” icon, I place the refresh icon in the title bar of the application, select it and after ensuring that “OnSelect” option is shown in the formula bar, I type “Refresh(‘Algebra 2 Recordings 2’). This action refreshes the connection with the corresponding SharePoint list.
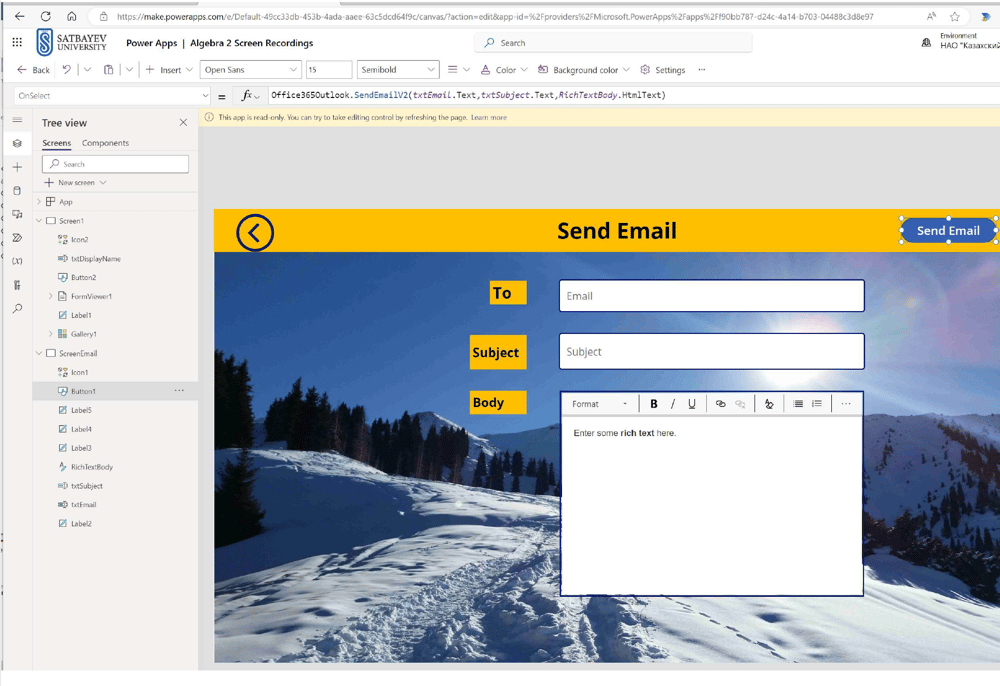
Figure 13
Send Email from the Application
6. The “Navigate Email” button shown in the right part of title bar is inserted through the “+ Insert” icon. When selected, this button displays “OnSelect” in the left cell of the command bar, and “Navigate(ScreenEmail)” on the right side. Note that any object in the Tree view can be renamed through the ellipsis on the right of this object. This screen is shown in Figure 13. A mouse click on the back arrow on the left part of the title bar for this screen takes me back to the application via the corresponding navigation command. The background image is inserted in this screen via the corresponding icon in the top menu of the studio. This screen is connected to the data source via the “Office365Outlook” connector. For sending emails, I arrange the “Send Email” button. A mouse click on this button activates the command:
Office365Outlook.SendEmailV2(txtEmail.Text,txtSubject.Text,RichTextBody.HtmlText),
which sends the message capturing information entered in three white boxes. The top two are of “Text input” type inserted via the “+ Insert” icon. The third one is of the “Rich text editor” type and can be found through the search field. Yellow buttons are of “Text label” type and are related to the reset command. For instance, a mouse click on the “To” icon activates the “Reset(txtEmail)” commands, which clears up the right box.
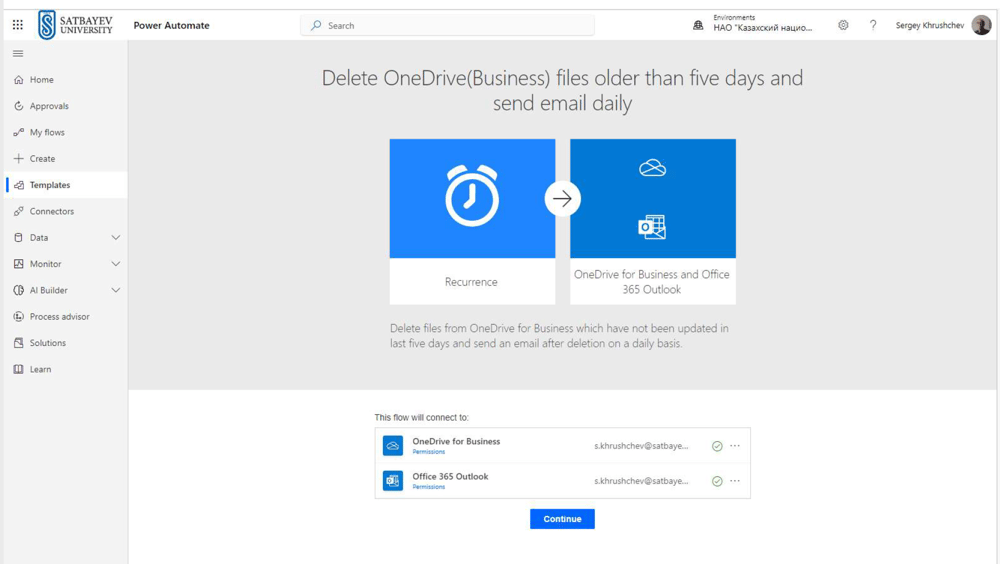
Figure 14
Automatic deletion
7. The last step is to clear out the screen recordings that are older than 30 days. Microsoft provides a template (see Figure 14), which automates this task. This flow requires minor adjustments. It should be set to run automatically once per week, and the final block that sends an email should be removed. Then one simply needs to replace 5 with 30 in the flow’s edit mode. To avoid delegation problems with the application, old items can be also automatically removed by another template called “Delete SharePoint list items on a recurring basis based on a condition.”
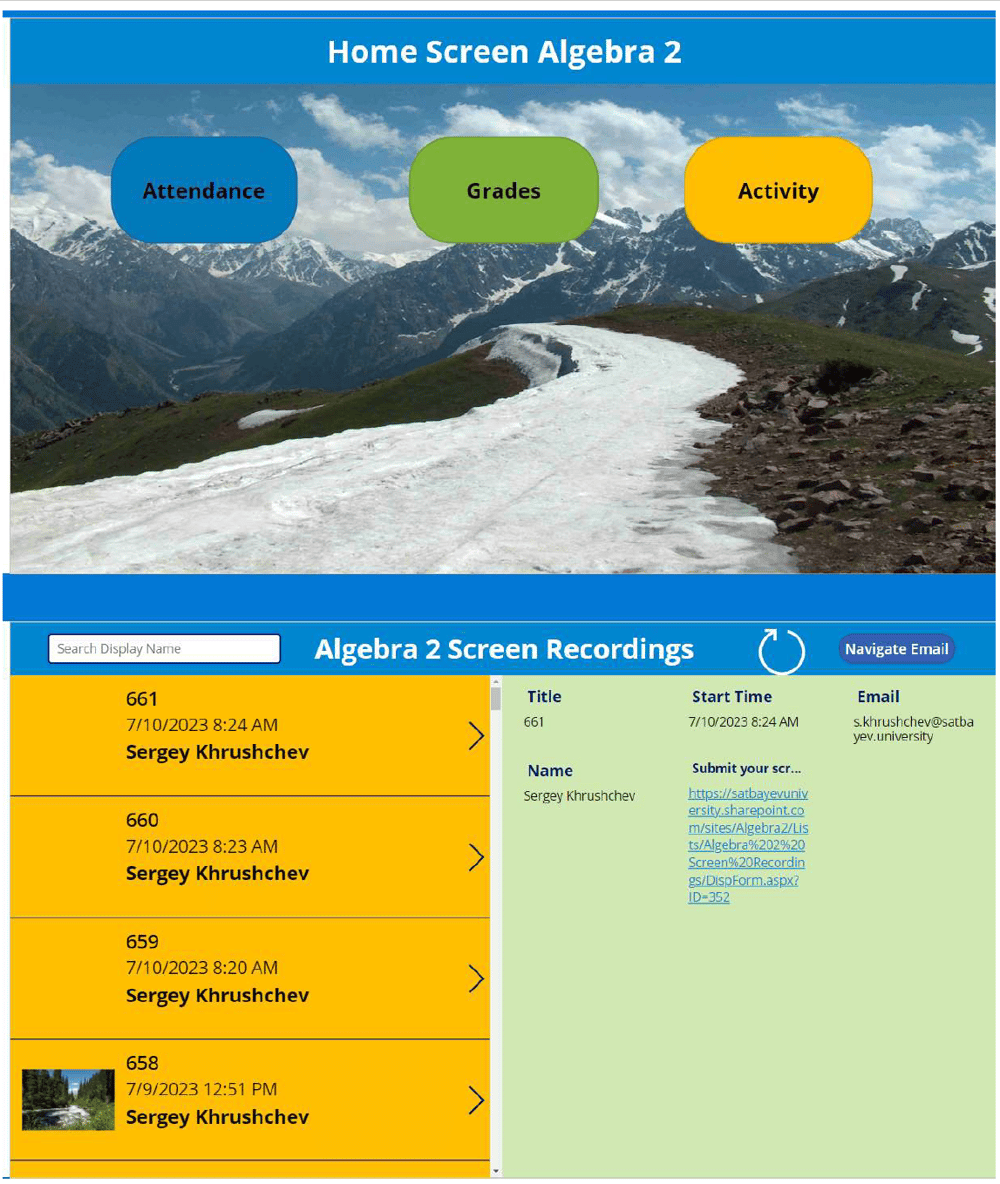
Figure 15
8. A less robust APS system can be constructed as a robust one. The difference is that instead of the screen recording students include its OneDrive URL in the Microsoft Form. However, finding the correct reference is a more challenging task for students than attaching a file to a Microsoft form. Considering there is an automatic flow deleting old records, it is preferable to use the robust version of the APS.
Practical Results
The APS described in this paper has the following advantages:
1. It is entirely free and can be personally created and run by any educator with A3 license, and it is likely to work even with an A1 license. However, in the latter case there is no guarantee that it will work.
2. It is entirely automatic, and in addition to the window with students’ tests, educators receive another window with the screen recordings, as shown in Figure 15. The first window includes the data and time stamps, which allows any teacher to open the required recordings listed in the second window in seconds.
3. It provides a reliable shield against students’ usage of ChatGPT during the tests.
4. Since students keep their screen recordings, they can consult ChatGPT after any test either to get a step-by-step solution or just some hints on how problems can be solved.
5. I tested this system in over forty tests in my classes, and there were no instances of system failure. The results showed normal distribution of grades both when the test was given through the university’s Moodle system and the Assignment program of Microsoft 365. Since all student’s actions are recorded, educators can safely arrange tests using Microsoft Forms. In such cases, they should inform students that returning to the previous questions is forbidden. Violations of this rule can be easily detected with the APS.
6. Students who solved problems after the tests either on their own or with the assistance of ChatGPT improved their grades at the end of the course.
7. Considering the excellent organization of materials in Microsoft 365, teaching Mathematics online yields much better results than in the classroom.
8. From educators’ perspective, this new APS system requires a sufficiently large database of practical problems for students. I personally prefer Moodle since this system in our university includes full LaTeX functionality, and it allows the teacher to not only set a time limit for the whole test bat also for each question. The questions are distributed at random with no possibility to return. Additionally, this system has its own safeguards against cheating, including the mouse control, second monitor control, and the Face ID control. The APS provides evidence of any improper student’s behavior. Therefore, the combined usage of both systems results in a level of control that is impossible in a classroom setting. Although the creation of this system may seem complex, it will be beneficial for any educator, as it paves the way for easy automation of other tasks in the future.