Gallery
Microsoft Teams Configuration.
How to Create Your Team?
Your University must have Microsoft 365 Education A3 installed. This system has an advantage of simple installation. Even a person with very basic knowledge of computers can do this. The only requirement is that it is necessary to follow Microsoft's instructions. Every customer of this system gets a login and a password. You may be asked to activate a two-factor authentication during your first login. Do it! Using these credentials one can sign in to https://www.office.com. First, install office to your PC. Then, install OneDrive by clicking its icon with clouds. Now, install desktop version of Microsoft Teams. Start the desktop version on your PC. Notice that a web version does not have all options available in the desktop one. If the administrators of your University already assigned you teams with students automatically, then you will see them all after the first login to Microsoft Teams. If it is not the case, it is not at all difficult to create necessary Teams manually. The sequence of required actions is shown on the pictures below. Let me provide some comments to picture "Final steps." At this stage you may skip the option of adding Teachers and Stiudents. Do not add yourself, since you, as a creator of this class is already a Teacher. You can always add students and teachers later. So, it is better to press "Skip" for the system could create this team with only one member. The last picture in the list below shows the new team created.
Pic.1
How to Create Your Team?
I open my desktop Microsoft Team and click "Join or create a team."
Pic.2
How to Create Your Team?
I click "Create a team."
Pic.3
How to Create Your Team?
There are four templates for teams in education. The PLC (Professional Learning Community) team must be used for Departments, Institute, Faculties, etc. teams. The distinction between the Class Team and PLC Team is that they have different configurations of notebooks. Another very essential difference is that a teacher can install "Dataverse for Teams" only in a PLC team. The reason is that students should not see the classes, which they are not members. There is absolutely no necessity to configure "Dataverse for Teams" in student's classes.
Pic.4
How to Create Your Team?
I click "Class" to create a team for my course.
Pic.5
How to Create Your Team?
I insert the name of the team. By the reasons I explained on the Home page, the name of any team cannot be changed later.
Pic.6
How to Create Your Team?
Here I have three options. I can enter the corporative accounts of students manually, I can do the same for my assistants, and I can skip this step.
Pic.7
How to add a member to your Team?
I click the ellipsis and "Add a member." I get a new window with upper tabs for students and teachers. If I type the name of a student, then the system displays possibilities to simplify the work. When I finish with students, I switch to teacher's tab and include my assistants into my team. They get the owner's role.
Pic.8
How to add a member to your Team?
When you fill the field with the account name of a student, the system shows you a list of possible choices. Notice that if you want to add the students from another class as a bulk, then you just type the name of their team.
Pic.9
How to add a teacher to your Team?
Pass to the teacher's tab as shown above. Any added teacher gets the Owner Role in the team as well as in Class Notebook and SharePoint.
Pic.10
How to Create the Class Notebook?
To configure the Class Notebook, I press the line indicated above and follow the instructions.
Pic.11
How to Create the Class Notebook?
I press "Configure Class Notebook."
Pic.12
How to Create the Class Notebook?
I press the line "Empty Class Notebook." If you already created your personal structure in some of your Class Notebooks and plan to recreate it in the new one, then you may try the second option. Notice, that the system creates only the structure and does not copy the contents of a Notebook. However, I recommend to follow the ready template.
Pic.13
How to Create the Class Notebook?
The system displays the sections to be created and their permissions. I press "Next."
Pic.14
How to Create the Class Notebook?
The system creates the sections to be created in student's Class Notebooks. I press "Create."
Pic.15
How to Create the Class Notebook?
The system informs a teacher that the Class Notebook is being created.
Pic. 16
How to Create the Class Notebook?
The Class Notebook is ready.
Pic.17
I block student's access to sections
The picture above shows how to open the menu.
Pic.18
I block student's access to sections
I press the ellipsis and then "Manage notebooks."
Pic.19
I block student's access to sections
To block the space for the common work, I put the lower switch in the left position.
Pic.20
I block student's access to sections
Add I click with the mouse on the lower circle. This blocks student's access for editing of the content library.
Pic.21
I open access to place teaching materials
I return back to the "Publications" tab and press "Send teaching materials."
Pic.22
Students can only read the materials
I can now safely drag all teaching materials in this folder. They appear with the same read only permission for students in the Document Library of the SharePoint site.
Learn more about what we do
How to Create Examination Rooms?
If your class includes many students, say seventy or more, then you definitely need examination rooms. Your class may include at most thousand students, and you can split it into up to 30 groups called private channels. In such a case, you first make your assistants to be the members in your Team with the teacher's role. Then they include their students into this team separately. Now, you may create private channels for future examination rooms. They are necessary for separate communications with the students included. To create a private channel press "..." to the right of the General channel and chose "Add a Channel." Type the name of the channel (in this example, it is "GroupM1"), select "private" below and press "Next." The channel will be created. Repeat this for all your groups. After that add your assistants to the corresponding channels by pressing "..." to the right of channels names. Your assistants will add their students to these channels themselves.
Pic.23
Private Channels in the Main Class
I begin creation of private channels as shown on the picture above.
Pic.24
Private Channels in the Main Class
I assign a short name to a private channel.
Pic.25
Private Channels in the Main Class
Add I make this channel private (see the picture above).
Pic.26
Private Channels in the Main Class
I press "Next."
Pic.27
Private Channels in the Main Class
Private channels with lock icons are shown under the General channel.
Examination Rooms
You are ready to create Examination Rooms. You create these rooms one by one and assign them names related to the names of corresponding private channels. The main reason why you need them is simple. Private channels are designed for collaboration only. Therefore, they do not have neither assignment's tabs nor class notebooks, which are necessary for exams and tests. When you distribute an assignment or test in one of these examination rooms, then the system will distribute them among all students of this particular class. Since during this process, the system will give you a choice among all assignments distributed earlier, it is very important for you to be the owner of all examination classes. If you plan to distribute tests from your Class Notebook, then you can just copy your tests into the teachers' space in Examination Rooms.
Gallery
Examination Classes and Private Channels
We love to take pictures and show them to the world.
Private Channels in the Main Class
The Examination Room of a Private Channel
The Interface of a Private Channel
Left Talgar is covered by clouds
How to Fill in Examination Classes with a Code?
You can fill in your examination classes by special codes. First, you create a code in a given examination class as shown below. Then you copy this code and return to the main class. You send a message with this code to the private group associated with this examination class. Then you inform all the students in the main class that they should visit their channels and use the code which they find there to enter the corresponding examination class. See below for details.
Gallery
Examination Classes
We love to take pictures and show them to the world.
Go to one of the Examination Classes. It is Algebra 1 in this case.
Click "Team Management"
Then click Settings
Click Team's Code
Click Create
Copy or record the Code
Return to the Main Team and send a message to the private channel with this code
The message is ready
A Student Joins His Examination Class
IA Student inserts the code and it is done!!!
Learn more about what we do
How to Organize Work in a Huge Team?
If you teach a course for 800 - 1000 students, then it is reasonable to have 20-30 students in each examination class. This means that you should have 30 assistants. These figures are approximate and can be adjusted. The Lecturer prepares all class materials in electronic form and keeps them all in the Main Class. All assignments, quizzes and exams also are the duty of the Lecturer. Students visit the Main Class for online lectures and to study class materials. Using Teams Power Shell the Lecturer creates a Grade Book in the tab of the Main Class. His assistants are teachers. Therefore, they can edit the Grade Book. In any case, the Lecture can easily make them the owners of the ShairPoint associated with the Main Class, which will give them editing rights. All assignments are distributed in examination class by the Lecturer. The assistants grade student's papers in Examination Classes and put the grades into the Grade Book in the Main Class. The grades are automatically summed up in the calculated fields of attestations in the Microsoft List. They can be easily exported into Excel files into One Drive. If the Grade Book is connected to the Student Information System, then this export is not necessary. If it is not the case, these Excel files can be given to Office Registrar.
Learn more about what we do
How to recover students to Teams with .csv files?
When a teacher works with his class, it is very useful to have Excel tables with the class data. Using Teams PowerShell, a teacher can easily get a .csv file directly from the team of his class. How to do this I explain here. This file is used for creation of the Grade Book, Jibble classes and for other purposes. One of them is a retake exam. Similar to the main exam it runs in the Examination Rooms of the class. During the retake exam it is reasonable to block access to the main class, since it contains all materials of the course. The simplest way to do this is to remove all students one by one. The pictures below explain how to do this.
By clicking "Members and guests" I open the list of all members of this particular Team. Then I can delete any user by pressing the cross sign on the right. It does not take long. However, before doing this you should double check if you have a complete list of this class. It is better to get a new one for each examination class, using tip and tricks, which are explained on the Grade Book page. Then after the retake exam you delete all students and recover each examination room with the method described below. The main class can be recovered by adding examination classes to it as bulk groups. Notice that after the recovery all students materials will appear again. The next step is to copy column Email in the .xlsx file created for this class to Notepad:
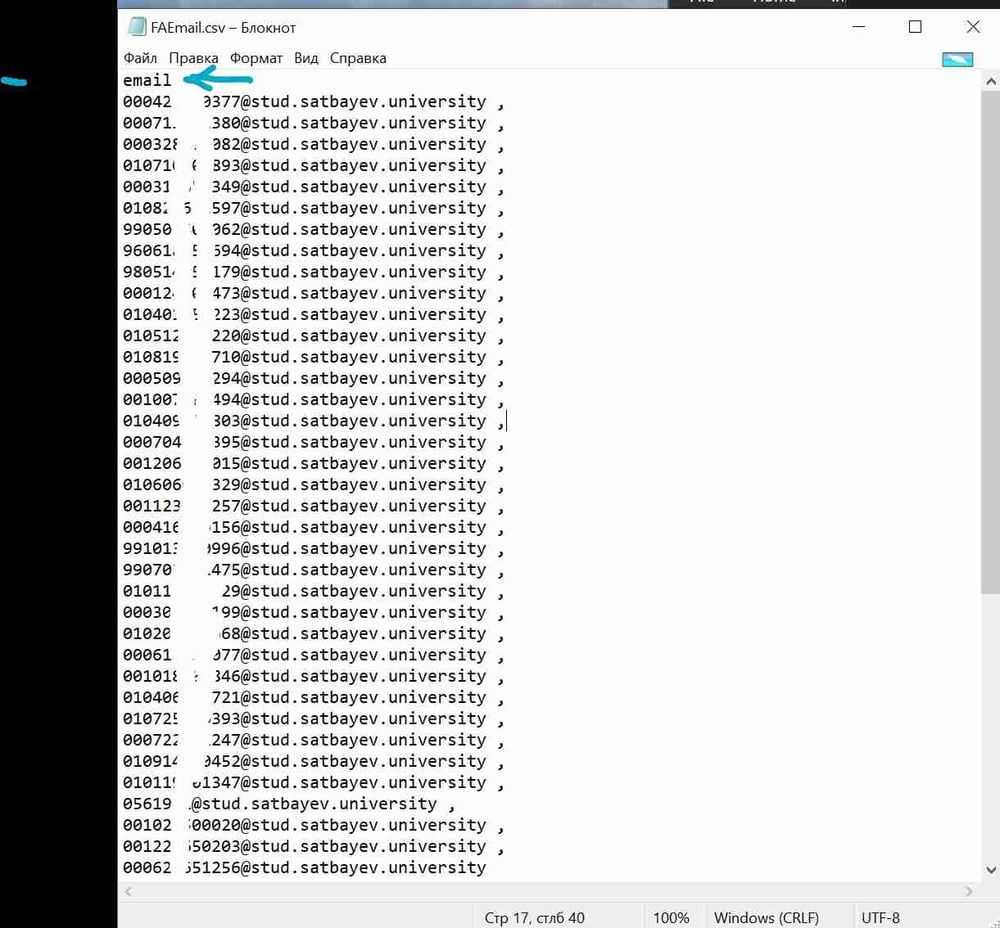
If the list is not so long, then you can add the space followed by the comma manually. Another possibility is to use the Excel command, which adds this combination to each cell of the column. I save this file as "FAEmail.csv" to the directory "c:\temp". The next step is to get the groupId of the class.
This time I click another line (see above).
I press button copy and using "Ctrl+V" paste this long combination of symbols to MS Word or to another copy of Notepad. The required combination is places it this string between "groupId=" and "&tenantId". We obtain something like this:
0babe62c-bde1-4663-8d78-585841d12b78. This is the GroupId of my Team.
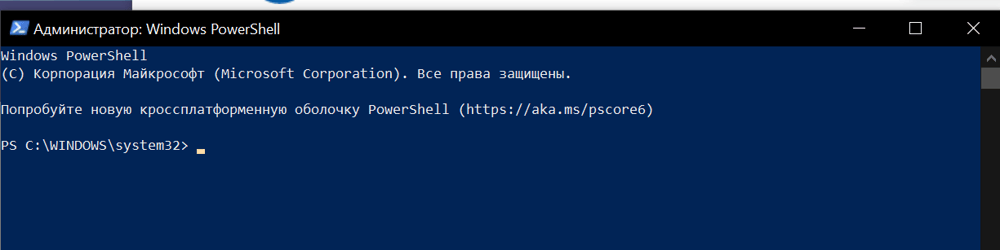
Now I press Windows symbol on the task bar with the right button of the mouse and open PowerShell (Admin). Since Teams PowerShell was already installed (see page "Grade Book"), I can execute a number of commands as it is shown below.
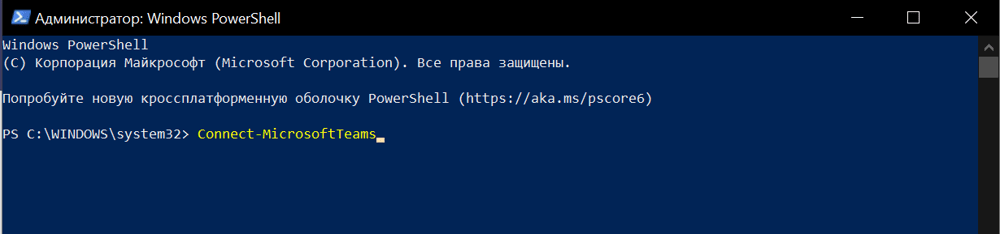

Do After the retake exam I restore my team with the command shown above. For readers convenience I typeset it here
Import-Csv -Path "c:\temp\FAEmail.csv" | foreach{Add-TeamUser -GroupId 0babe62c-bce1-4383-8f7d-585821d12b78 -user $_.email}
Why Kaizala Pro is a Right Messenger for Microsoft Teams?
In spite of great communication abilities of Microsoft Teams any teacher needs a messenger for communications with students. What is the difference of Kaizala and other messengers? Kaizala is included in Office 365, and therefore, its goups are easily created from existing teams. By the same reason, Kaizala is protected by Microsoft Azure. There is also a possibility to use Power Automate to arrange regular messages in Kaizala. Some of them can be found on this page. In addition, Kaizala Pro has its own actions, which are useful in collaboration with students. They include a possibility of Forms distribution, and in particular, quizzes. The most important action is called "Attendance". It is available only in Kaizala Pro. The attendance card may be configured so that it appears ten or five minutes before the class. Students press it, take a selfie and send the message to Kaizala Pro site. Currently, it only collects student's locations, which are delivered to a special page which shows the Analytic related to the Attendance Card of Kaizala. Besides of Analytics, the teacher gets all mobiles of all students in the class as well as their addresses automatically. There are situations when it is important. It looks like pictures will be collected later when Microsoft finishes its integration with Microsoft Teams. I hope that Kaizala includes a facial recognition robot currently available for universities free on https://www.jibble.io. Jibble is an official partner of Microsoft. The robot and some other options are free. Such services are important in Distant Teaching since teachers must be sure that only their students arrived to the Final Exam. Below you find some pictures illustrating the work with Kaizala Pro.
Gallery
Kaizala Pro
We love to take pictures and show them to the world.
Kaizala Groups
Analytics of Attendance Cards
Install Kaizala to Your Mobile
Kaizala's Actions
Business Solutions
The top of Butakovka
Facial Recognition With Jibble
Jibble is an official partner of Microsoft. One can find Jibble in the list of applications available for Teams. You can easily find this bot by pressing "..." on the left panel of Teams (see the picture below). However, for owners of A3 license this is not very useful, since they can use Insights. To get the facial recognition option the teacher should register on the site https://www.jibble.io. You will get 14 days of free usage of all plans available. You may try, but if you want to use only facial recognition, then switch to the free plan. To use this plan the teacher must create his classes in Jibble. The process follows the lines of creation of the csv Excel files from teams using Teams PowerShell. The files must be prepared in a special format shown below. Field A must be named "Code," field B has name "FirstName," field C is named as "LastName," D is "Email," and E is "MobilePhone." In column "Email" students corporate addresses of your school are placed. Column "MobilePhone" may be left blank. As to column "Code" put the school code of the class. Then you create an empty class in Jibble and upload the csv file with students. There is a restriction. You cannot upload more than 150 students in one file. However, the number of students in a class is practically unlimited. The system sends invitations to each student to the corporate mail address indicated in the csv file. Students enter the class in Jibble through these invitations. Therefore, they must open the invitations through their mobile phones after they install the Jibble app. Their login to Jibble is made with these e-mail addresses. It is very important to keep this order of actions in mind. Otherwise, students will send messages to a teacher asking for an additional authorization. To avoid unnecessary authorizations later, it is better not logout of Jibble site. Students just go in and out. They must take selfie when they enter the class. The teacher selects best pictures and installs them as a template for future selfies in the profile of each student. There is an extensive help on the site. Some pictures demonstrate different stages of this process below. In case of any mismatch of a selfie with the base picture of a student, the robot sends to teacher's corporate email a warning with both pictures enclosed. The idea of this system is that by times of first tests it will work stable, and any replacement can be noticed. Similarly to Kaizala, Jibble also provides the geolocation data.
Gallery
Jibble
We love to take pictures and show them to the world.
Item title
Item title
Item title
Item title
Item title
Item title
Item title
Item title
Welcome to our website
Add a description here.
Welcome to our website
Add a description here.
Welcome to our website
Add a description here.