
Welcome to Microsoft Team of a Department
In this document, I describe the workflow of the department. The main strategic mistake currently made by companies manufacturing document management systems for organizations is that they adhere to a system that is well known to them, when the connection of workplaces was carried out over local networks. In this case, it is really better to create a separate program that performs the entire workflow by filling out forms in the form of separate windows. The disadvantage of this method is the need to train the entire staff of the organization. As a rule, all these forms in most cases are not visual and difficult to remember.
With the advent of the Microsoft 365 Education A3 / A5 (Enterprise E3 / E5) system, the situation in this area has changed dramatically. Employees are organized into teams, and each team has its own site in the organization's cloud, called SharePoint. The team has a notebook, and the team's SharePoint has a site content page.
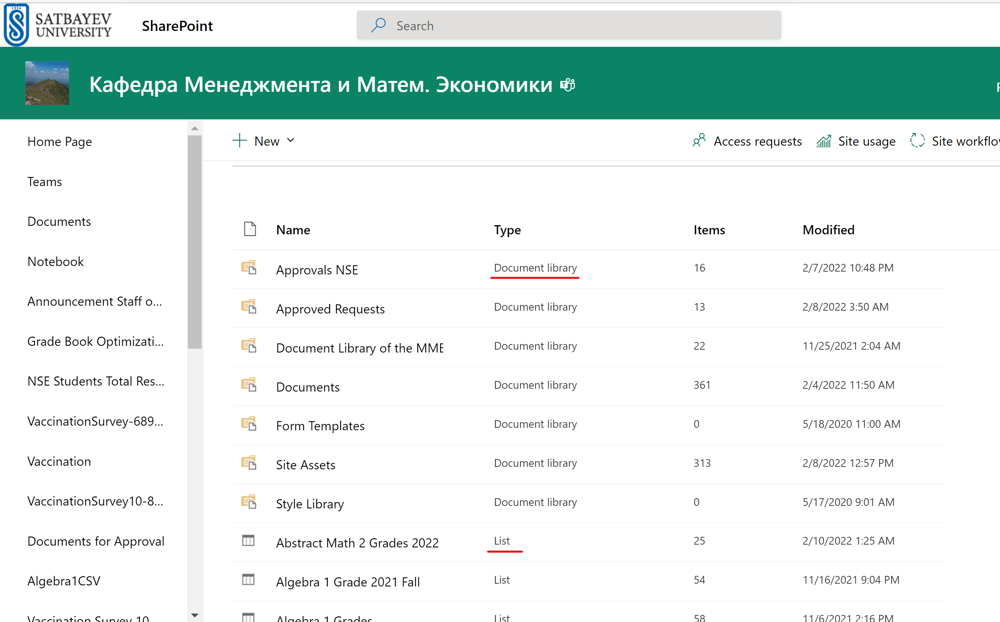
Pic. 1
As you can see from the picture above, all document libraries and so-called Microsoft Lists (=Microsoft Lists) are shown here. For an office employee, this page looks like an office cabinet for storing a variety of documents. Microsoft lists are used to visualize documents stored in folders and for support purposes. In the same way, a notebook is used as a desktop document work in a team. Each employee has his own office there (see pic. 2). The idea behind Microsoft's workflow is that these two pictures are all that an organization's office staff should see. In this case, they do not need to know or be able to do anything other than the usual skills of working with programs such as Word and Excel. The movement of documents in the system is handled by machines hidden from employees, which are constructed from Power Automate templates. This solution has another important advantage. Microsoft is committed to continuous improvement of all components of the system and therefore, at any given moment, the organization receives the best system possible. Intermediaries who make their own document management systems often simply go bankrupt and disappear. And why pay them for something that is already in the Microsoft system?
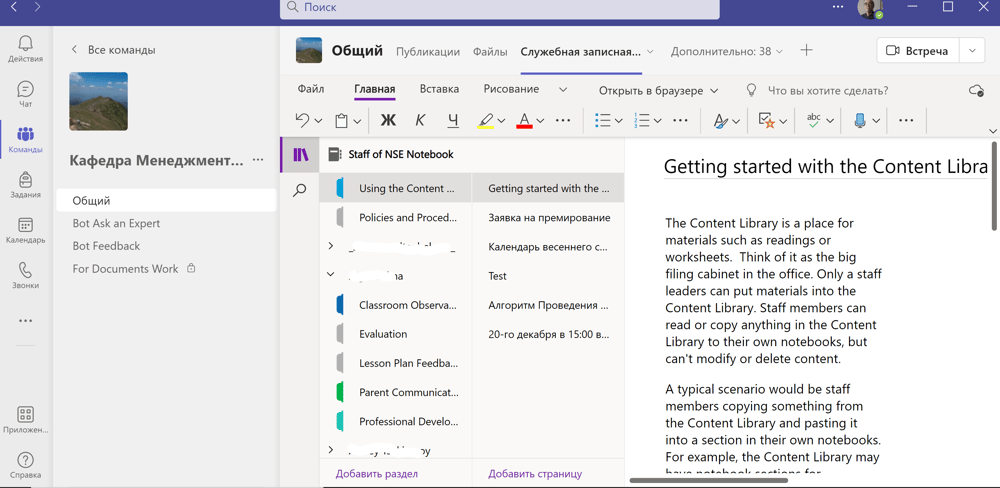
Pic. 2
In this guide, I give an example of configuring the workflow of the department using Microsoft Automates. In fact, IT specialists of the organization can create such workflows. Another solution is to invite outside specialists to carry out the work described in this manual. For employees, the operation of these machines is not visible at all. Let's consider this on the example of document approval. On pic. 1 we see a library of documents for approval by the manager. The employee simply puts the document there and the Power Automate start the automatic approval process. In fact, we see a computer model of work in paper form. The secretary has a folder for approving documents. And in this case, it is in a virtual cabinet. At the same time, it does not take much mental efforts to create on this page all the folders stored in a real closet. This manual covers eight automates. Among them there are logs of incoming and outgoing documentation, two options for approving documents (in the samples there are many more of them and of various types). Since Microsoft has been working on this project for many years, any commercially available workflow can be implemented. Digital signatures can also be included if the organization has them. I think that for the departments it is quite enough that I have sorted it out here. All of this works flawlessly for me.
Creation of the Department's Team
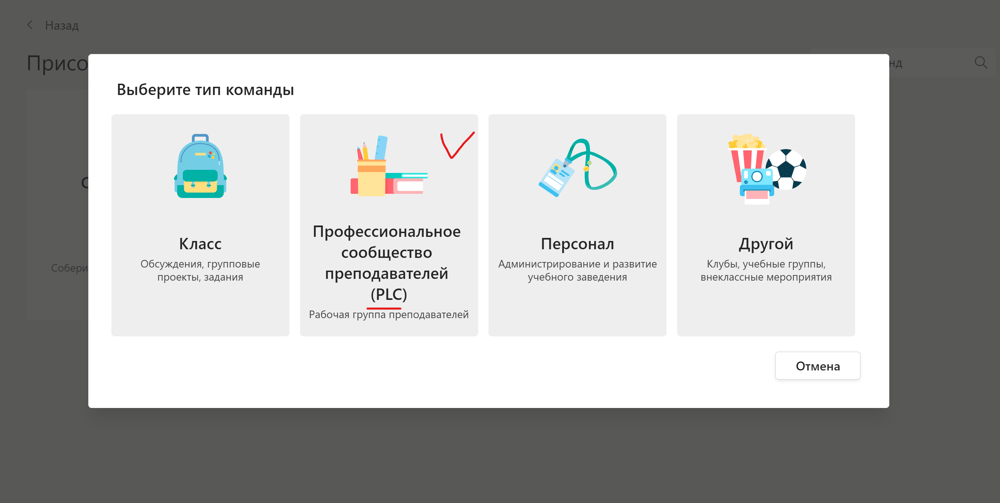
In order for everything to work without problems, it is necessary that managers have at least A3 licenses, and employees have A3 for students or A3 licenses. Unlike student teams, which need to create a team of type Class, these teams are created using the PLC template (second icon from the left after the “Class” icon).
PLC teams are designed for departments or institutes, while "Personnel" is suitable for administration, for example. There are three important features that contrast class teams with PLC and staff teams. The first is the different notebook targets that are created by default in these three commands. The Class Notebook is designed specifically for students. The Class Notebook for the PLC team, on the other hand, is prepared for teachers. Finally, the Staff Notebook is the simplest of the three. Any Class Team includes the Assignments program for scheduling and assigning tasks to students of different levels. This program is not available in PLC and Staff teams. Dataverse for Teams (formerly Common Data Service) is ready for use on PLC and Staff teams and is not available to student groups. Dataverse for teams is more than a cloud database. It includes several spreadsheet programs and can be used for the current records and operations of any university department. This service is available for A3 and A5 licenses. In fact, Dataverse for teams is also part of the Azure cloud, designed to store all kinds of tables and some applications that you can create yourself from samples. That is why, in order not to redo everything later, it makes sense to follow the recommendations of Microsoft and for the commands discussed in this manual, choose the PLC type.
Teams with a small number of employees can be filled in manually, but if the number of employees approaches one hundred, then it makes sense to fill in the commands automatically. In any case, it's not like the students, as the teachers' staff doesn't change as often as that of the student team. Moreover, employees can enter this team themselves using a code generated by the owner of this team. Once all employees have signed up for a team, the team owner, using the automate described in §2.7 of my Microsoft book, can retrieve all the employee information that was previously entered into the system by administrators. This list must be stored on the OneDrive of the leader - the owner of the team.
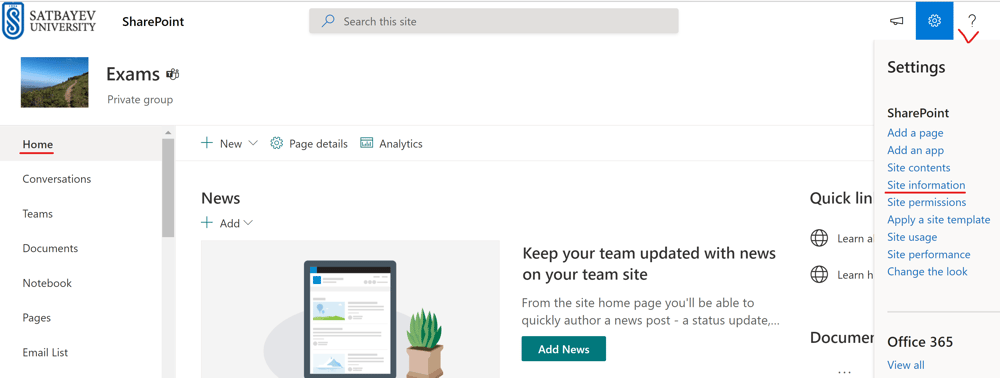
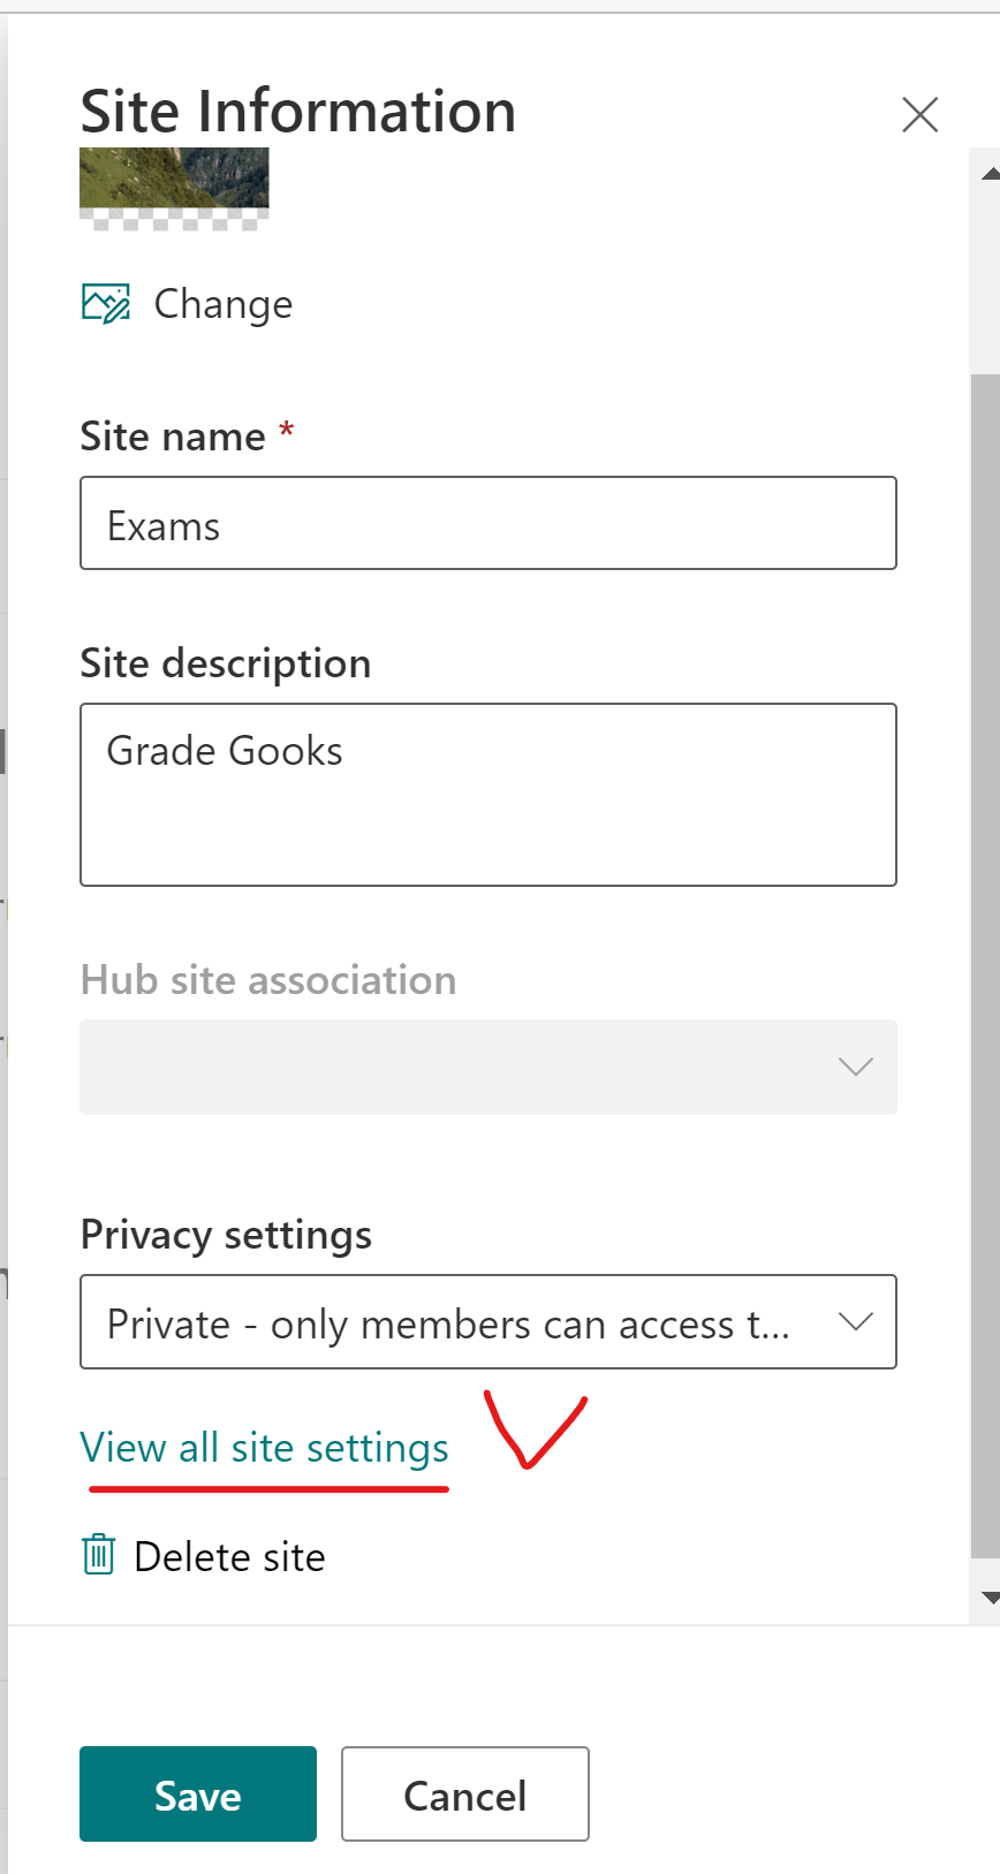
In Chapter 2 of this book, I explained the most basic features of a SharePoint team. This is a site that includes all the documentary part of the team and, in particular, a notebook for classes. Because each document, document library, or list in SharePoint has its own URL (uniform resource locator), all documents and lists in SharePoint can be opened in separate windows. This makes this site very convenient for working with documents. I click the settings icon, see pic. 3 and then "Site contents". This action opens a window with a list of all document libraries and SharePoint lists created on the team site. In practice, this list can be long, see pic. 1. To simplify management, SharePoint includes two important applications. One is for creating document libraries, and the other is for organizing SharePoint lists and libraries into blocks using URL links.
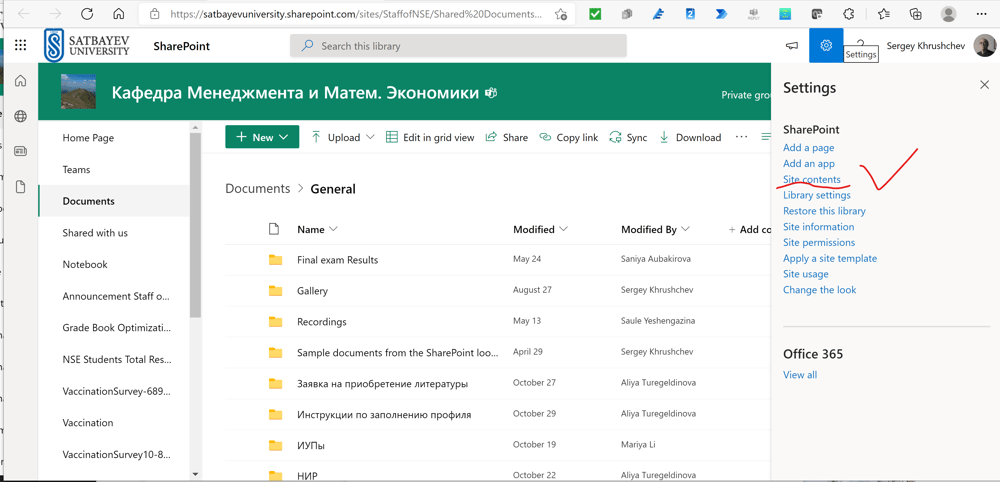
Pic. 3
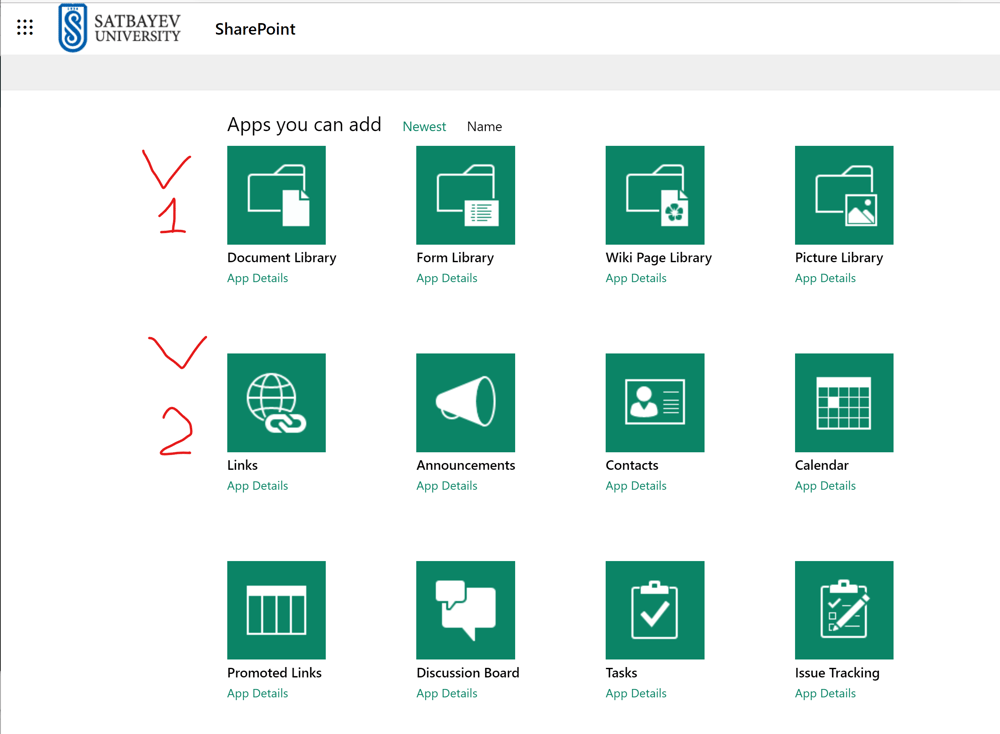
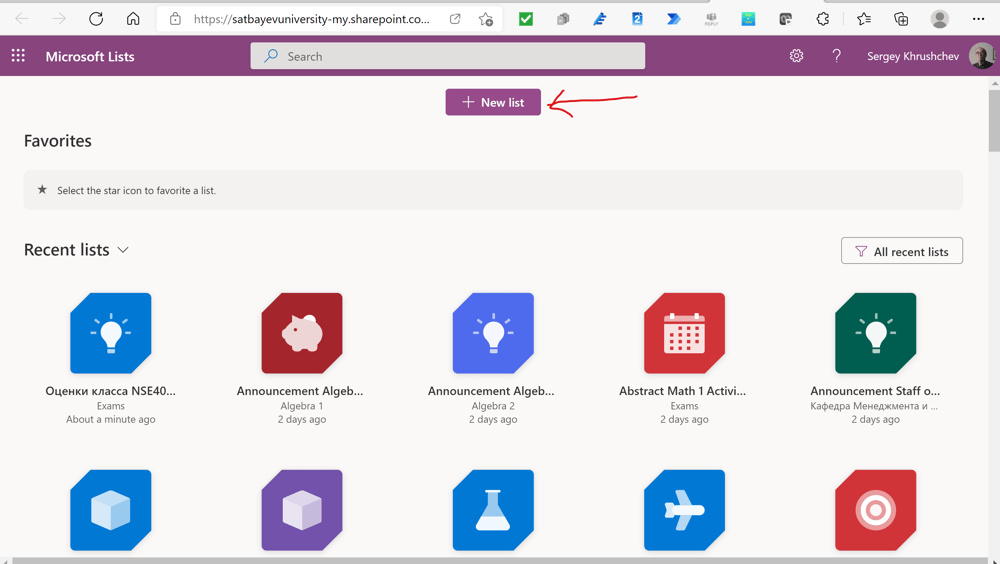
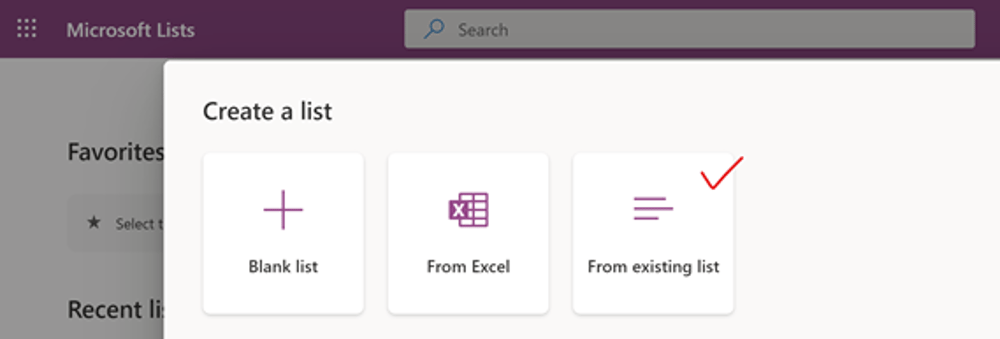
To find these apps, I either click Settings, see pic. 3 and then "Add an app," or the "+ New" button on the main page. In both cases, I get the page shown in pic. 4. I click "Classical experience", see the checkmark in pic. 4 and get access to applications, see pic. 5. Using the "Document Library" icon, I create libraries, see 1 in pic. 5, and with the help of "Links" I create groups of lists and libraries. For example, it is wise to keep copies of all faculty gradebooks on the department's website. This trick allows the head of a department to analyze the current progress of students using Power BI Pro. The original gradebooks are hosted on SharePoint team sites, which include only instructors as owners and no other members.
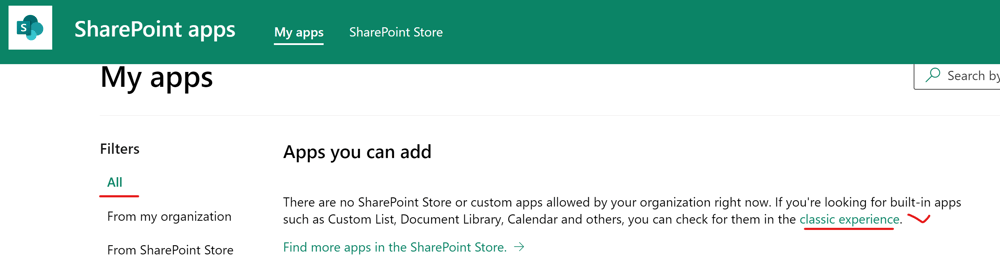
Pic. 4
Pic. 5
A Power Automate for SharePoint lists updates
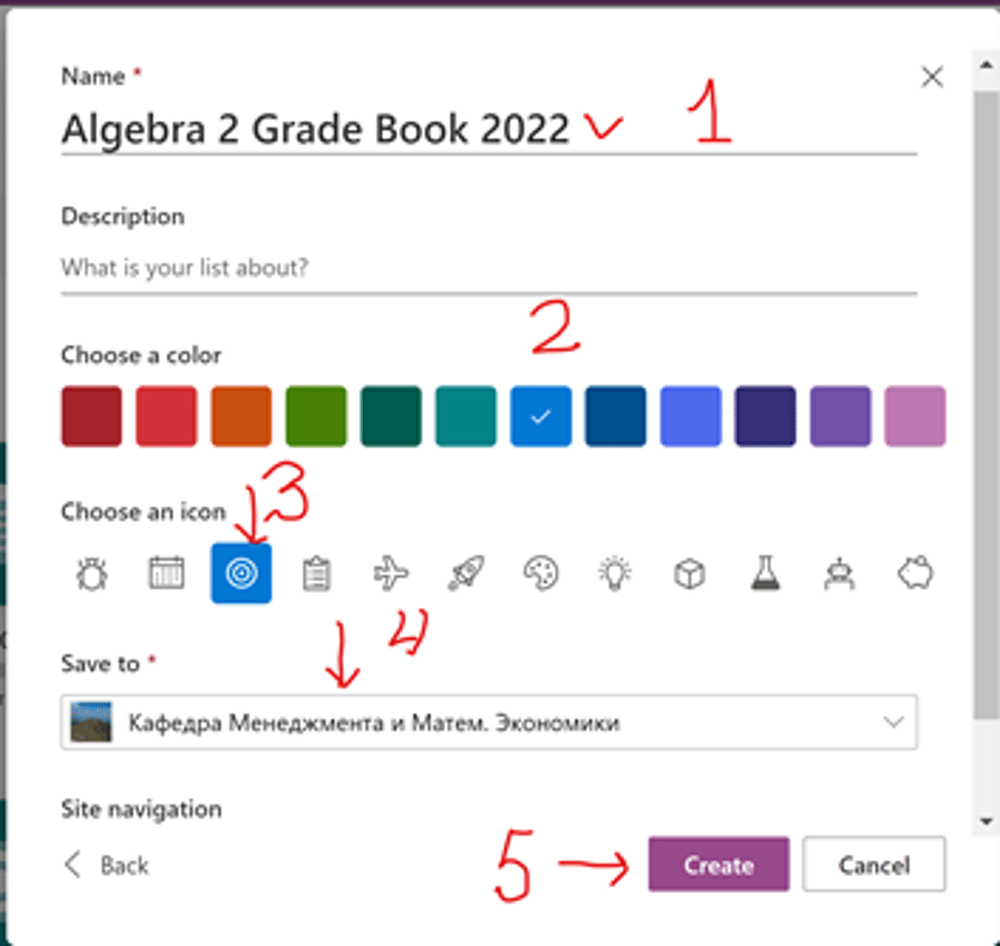
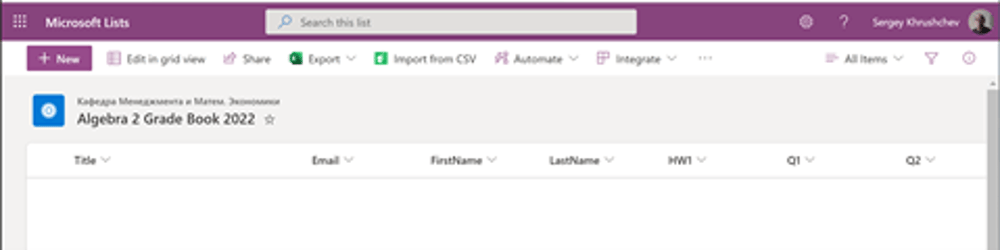
Following Microsoft’s instructions given here, I copy my grade book to the department’s SharePoint site. The Microsoft Lists program creates a new list in the destination using the source list as a template, see pic. 6-568. For a right transaction, I un-hide all important columns in the source list first for a correct transaction. As a result, I obtain a new list with the same names and types of columns. No data from the source list are transformed to the destination list.
To get the destination list with the data, you can export the source list of all data to an Excel file, and after that create from it a new list with data in the destination SharePoint site. However, in this case you will be forced inserting list formulas for each calculated column in the destination list and format rows’ style again. In my case, there are three such columns. Therefore, it is more reasonable to apply the first method. Then I just use the flow from §3.5 of my book to copy the source list data to the destination. Moreover, if a big group of new students appears, you may edit the source Excel file for this flow to remove already present students in the Grade Book and run the flow again. All students from this group will be added to the Grade Book with correct permissions.
Pic. 6
Pic. 7
Pic. 8

Pic. 9
Pic. 10
Pic. 11
AThere is a free SharePoint application “Import Excel or CSV to List.” It can be used to import data from an Excel CSV file to the SharePoint list even if it is filled with some data already. This application does not touch the computational columns. One can get it from the Microsoft AppStore here or directly from the SharePoint Store, see pic. 12. However, it does not transfer the permissions. Therefore, I think that the best choice is the Power Automate described in §3.5 of my book. The module granting access to the list can be dropped or used to restrict access for other teachers to the copies of my Grade Books. Then I obtain a ready list and can give access to it for any owner of the SharePoint site.
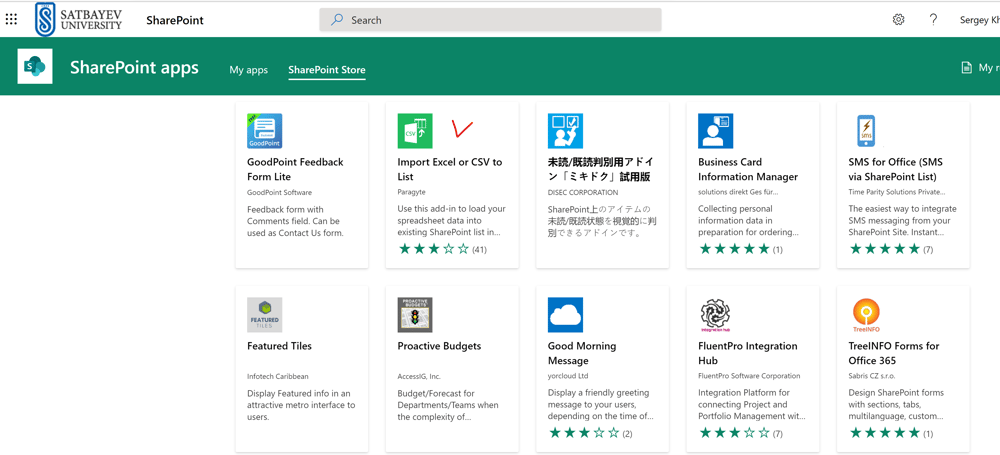
Pic. 12
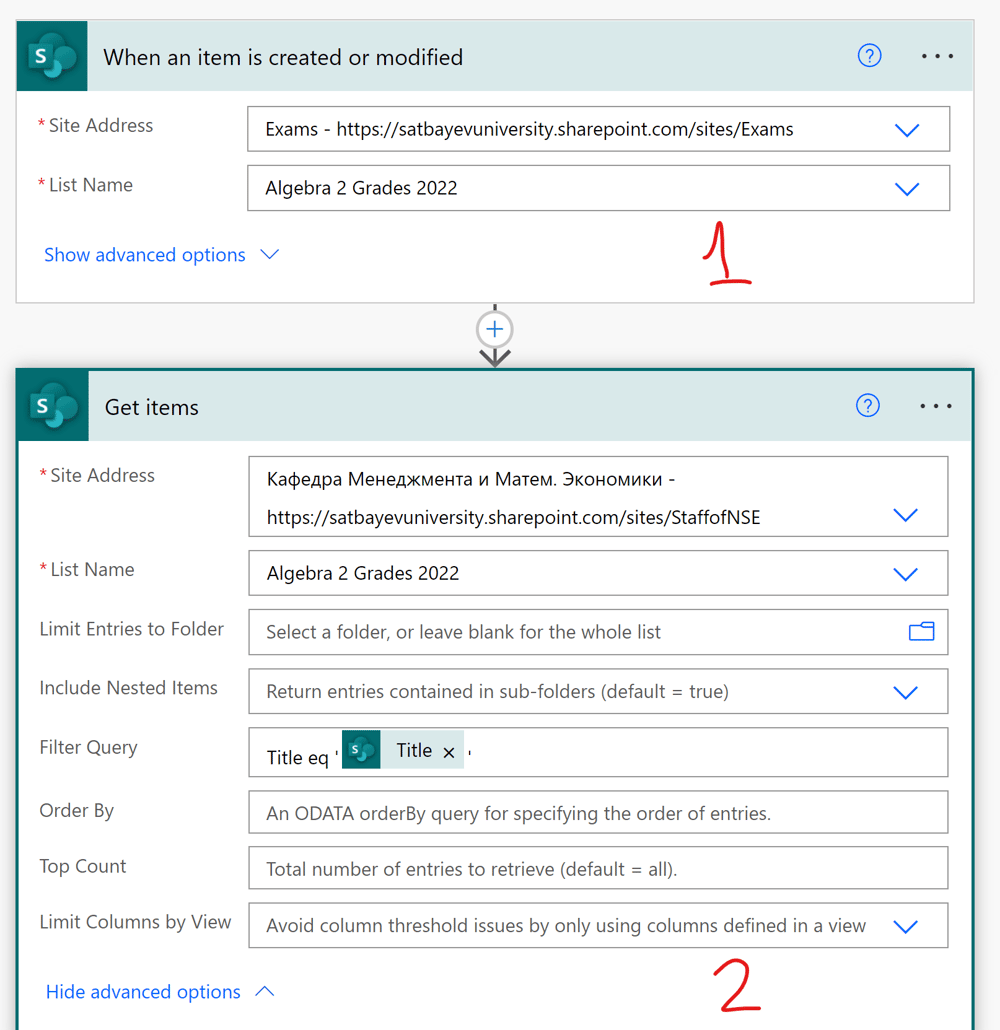
Now I can construct a flow updating the destination Grade Book in the department’s SharePoint site. It is an automatic cloud flow which is activated by SharePoint trigger “When an item is created or modified.” In general, the columns’ names in two lists are not necessary be the same. However, there must be at least one column in both lists, which uniquely identifies the lists’ rows. All Grade Books include the column “Title,” which lists all student’s IDs. Therefore, it suits for this purpose best. To create the flow, I press “+ Create” on the Power Automate Page, choose “Automated cloud flow,” and select in the opened window the required trigger.
The first box, see 1 on pic. 13, collects the modified rows (items) in the source list, whereas the second, see 2 on pic. 13, “Get items” form specifies the data to be transformed to the destination list. There is an important field in this form called “Filter Query.” It can be accessed through “Show advanced options” at the bottom of the form. When the data in some fields of the source list are modified, the flow calculates the value in the Title column of this row and keeps it in the dynamical icon  from the source list. When I type Title eq ‘ ‘in the “Filter Query” field of the second form, the flow gets the information which rows in the destination list must be updated. This formula shows to the flow that the modified data must be inserted at the proper place. The dynamical icon must be surrounded by the two single quote marks.
There are two possibilities: either the row in the destination list already exists or there is no row with such a title. The latter happens if you add a new student to the Grade book manually. One can drop this, but then a teacher will be forced to add a student ID to the Title column of the destination list manually. Later, if the teacher inserts any grade, for instance, for the first homework, the flow recovers all cells for this student automatically.
In 2019, Microsoft introduced important changes to the interface of the “Condition” action. Therefore, the recommendations given here are not valid anymore. The option “Edit in advanced mode” just does not exist. To get the flow described by the Microsoft support, I select “Compose” as this action follows the “Get items” box, see pic. 14. The input of the “Compose” box must be filled through the “Add dynamic content” option, see 1 on pic. 15. It has two tabs. I choose the Expression tab, see 2, pic. 15. I select the “length(collection)” in the drop-down menu, see 3 on pic. 15.
Pic. 13
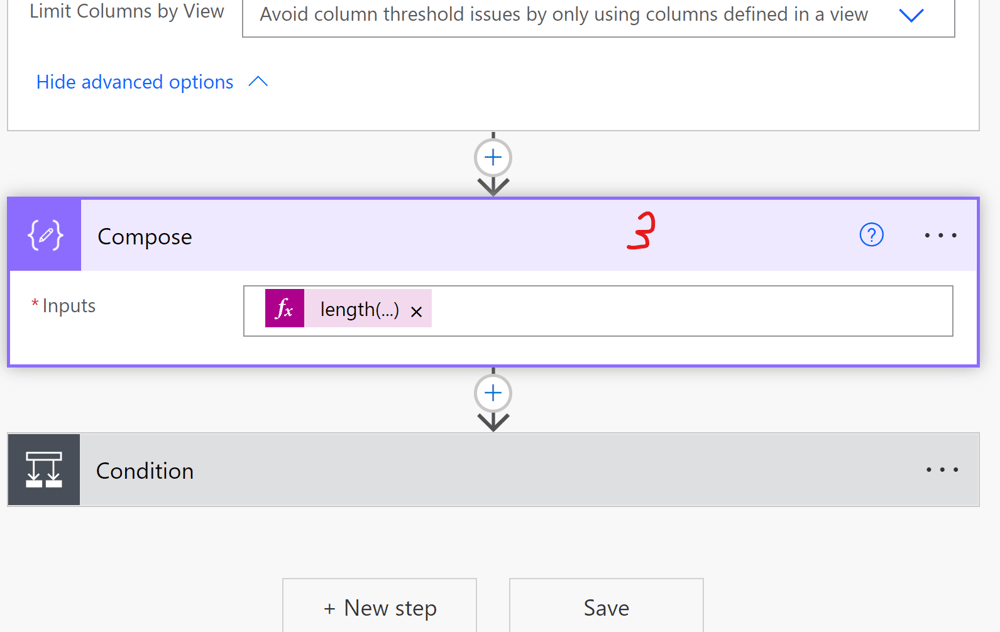
Pic. 14
Add a description here.
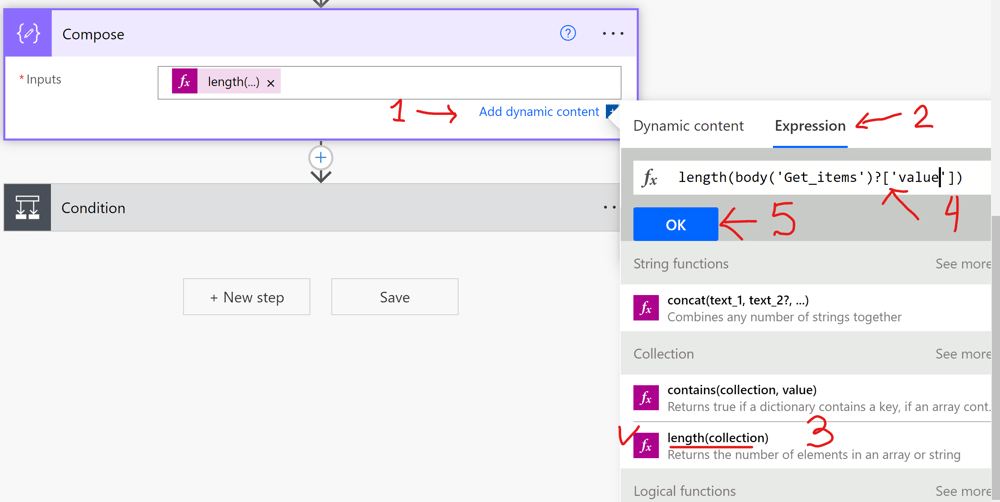
Pic. 15
A complete guide on using functions, including “length” and “body,” in expressions can be found here. I insert codes between the parenthesis of “length” to obtain the following code, see 4 on pic. 15:
length(body('Get_items')?['value'])
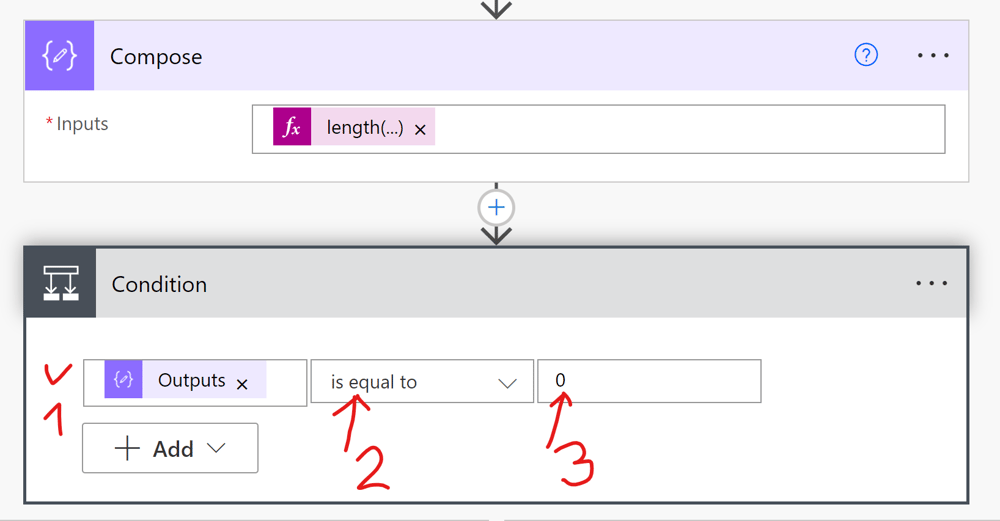
Finally, I press the “OK” button. After that I add the “Condition” action and insert in its left box the “Outputs” icon from the dynamical interface, see pic. 16.
Pic. 16
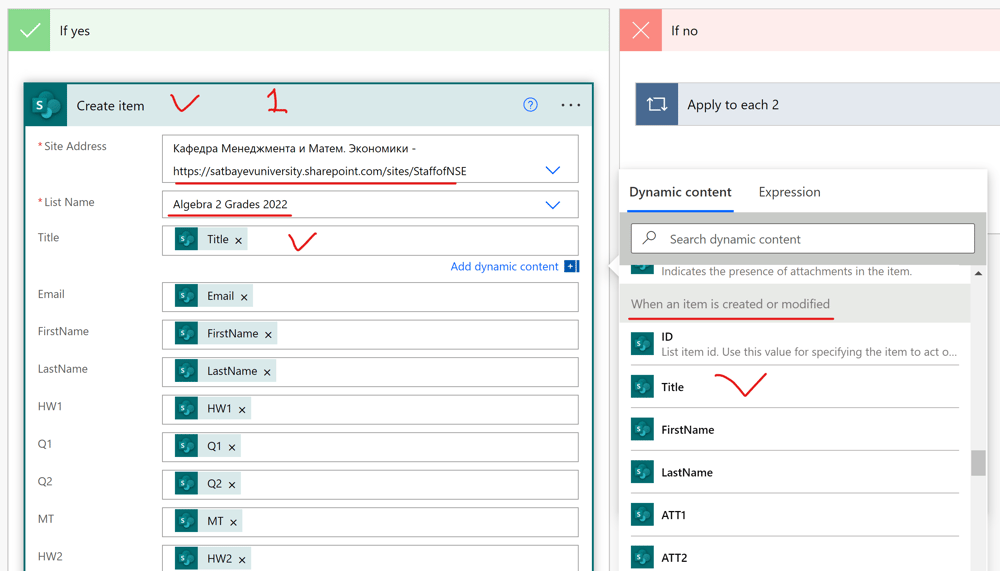
This icon appears in the drop-down menu as soon as you put the mouse cursor in this box. Using the check mark in the middle box, I select “is equal to,” if it is not present. Finally, I type the zero symbol in the third field. If the output of the “Compose” box is zero (it is the case if a new student is added to the source Grade Book), then the flow activates its “If yes” section. In this section I added the “Create item” action, see pic. 17. I include the destination site and its list. There are two sets of icons in the drop-down window. I fill the table with the dynamical icons from the second set which is below the row “When an item is created or modified,” see pic. 17.
Pic. 17
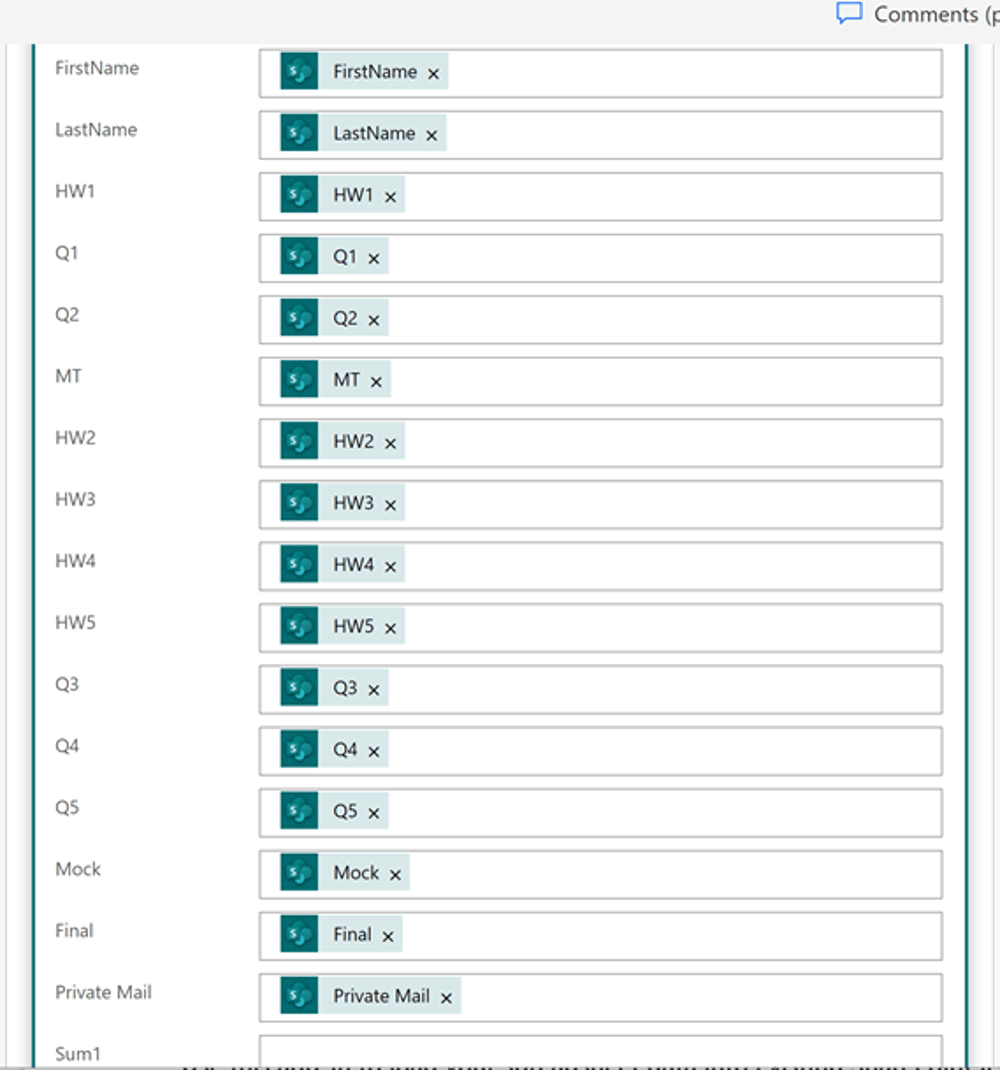
If the output of the “Compose” box is not zero (students’ grades were updated in the source list for students already present in the destination list), then the flow runs the “If no” section. I press “Add an action” in the “If no” box and select the “Update item” action. This automatically includes this form into the “Apply to each” action. I select “value” in the “Get item” part of the proposed icons and insert into the “Apply to each” box. Then I fill the “Update item” form. The ID field corresponds to the destination list. Other fields are filled with the icons corresponding to the source list similar to the first case, see pic. 18. The flow is saved and can be tested.

Pic. 18
The simplified flow excluding the possibility of updating new students from the source list is shown on pic. 19-20.

Pic. 19
Pic. 20

A Power Automate to Announce new OneNote Pages
Pic. 21
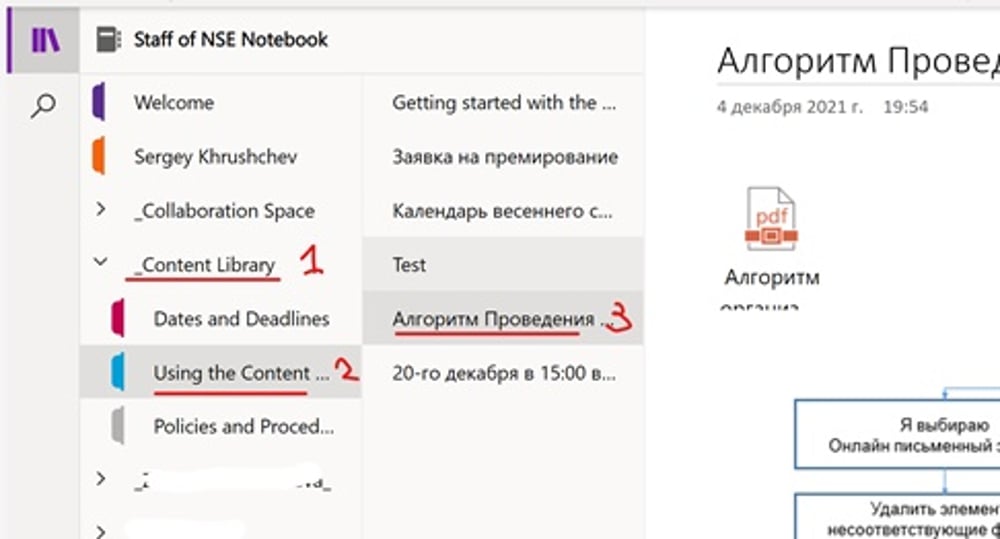
This flow informs the staff (students) on new pages added to the Class Notebook of a team, Usually, these pages are added to the section “_Content Library,” see pic. 21.
Pic. 22
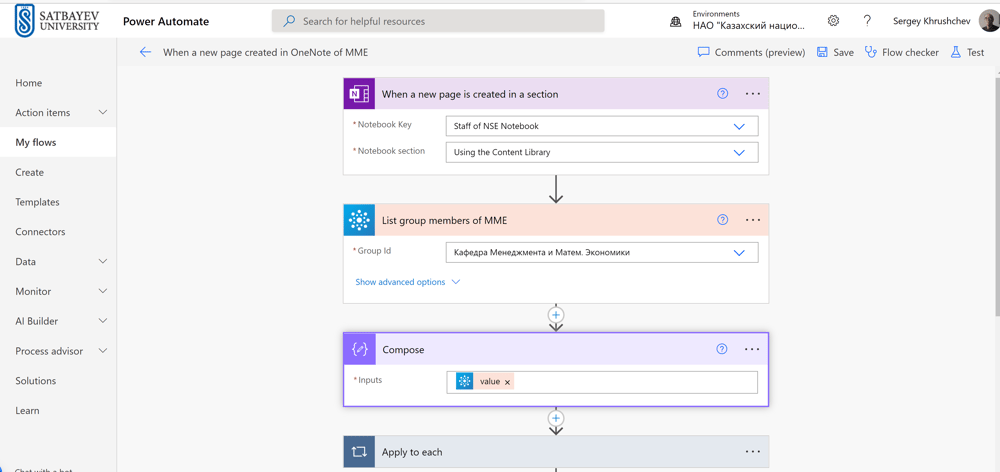
The first part of this flow is shown on pic. 22. It is an automatic cloud flow, which is started by the OneNote trigger “When a new page is created in a section.” The first box indicates the desired Notebook and its section. The second box gets the list of group members. This box is followed by “Compose,” where the “Input” field is filled with the dynamical icon “value.” The third box is followed by “Apply to each” section, see pic. 23.
Pic. 23
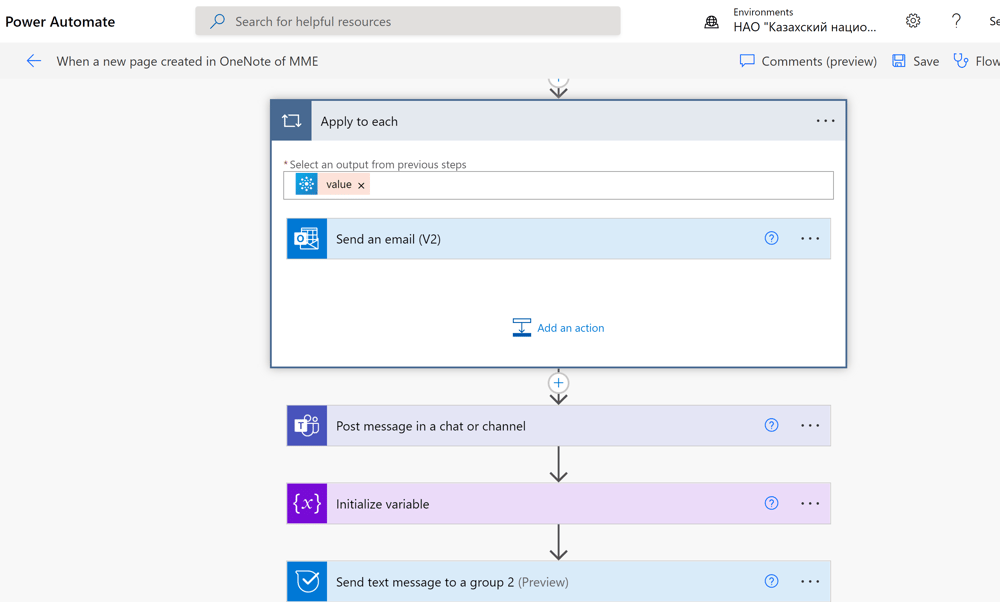
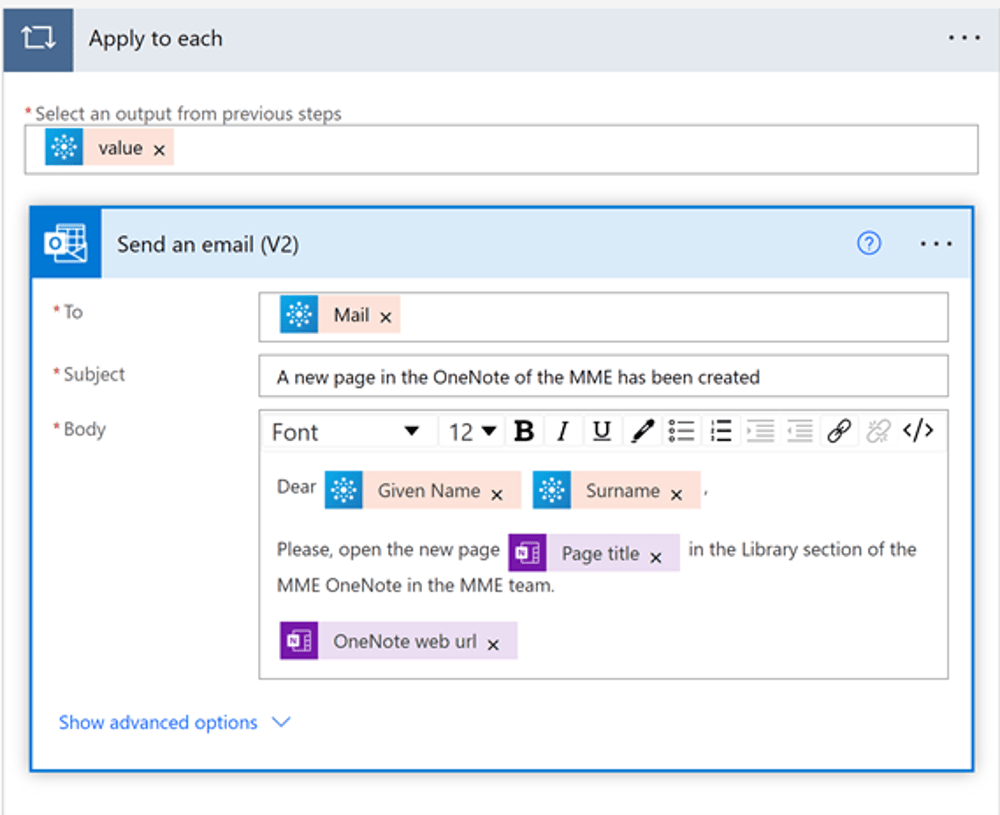
The output from the previous step is again the dynamical icon “value.” This cycle sends messages to Outlook with information about the inserted page.
Pic. 24
One can fill in this box following the example shown on pic. 24.
Pic. 25
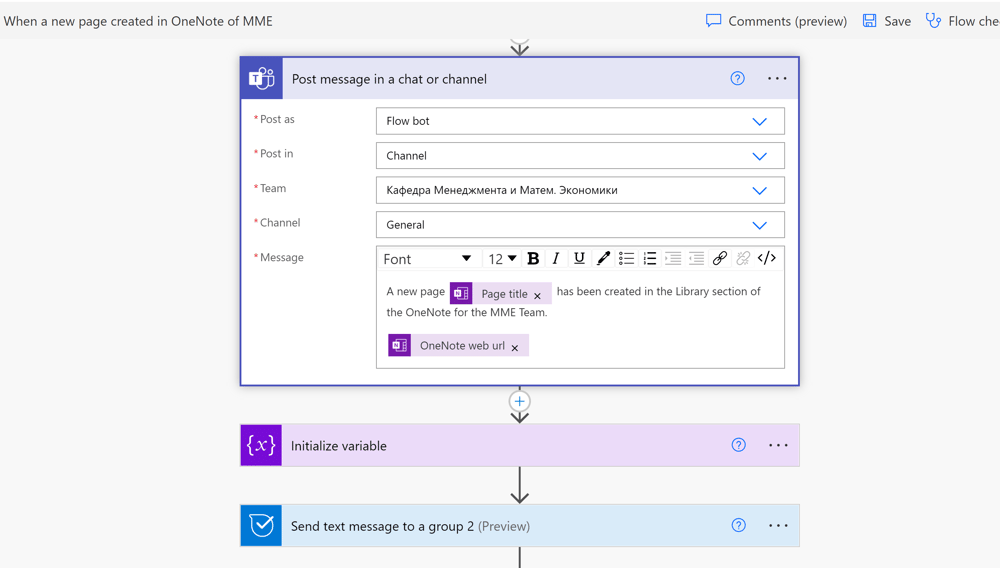
The box “Post message in a chat or channel” must be outside the box “Apply to each.” It is filled as it is shown on pic. 25.
Pic. 26
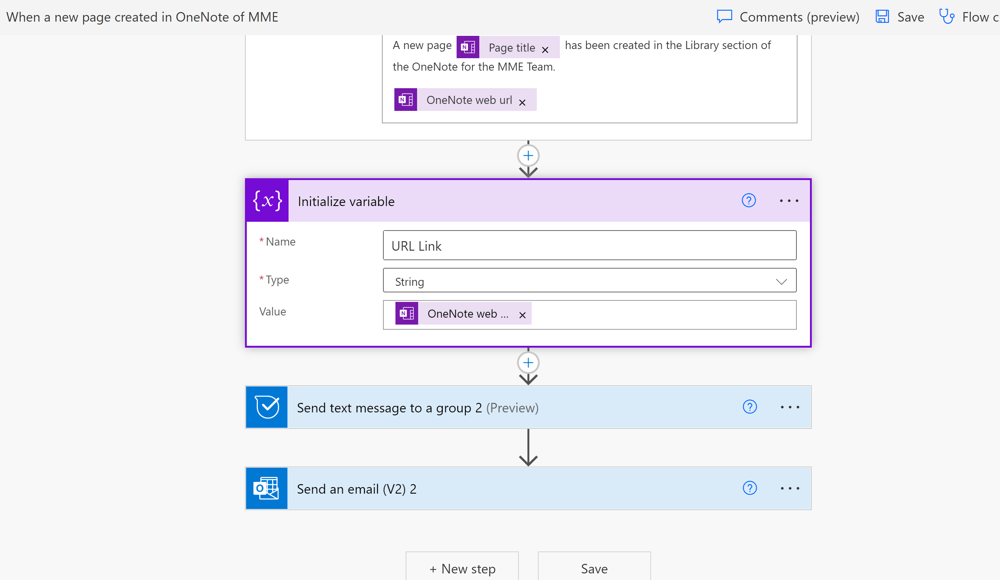
Then we initialize variable, see pic. 26. Its name is “URL Link,” its type is “string,” and its value is given by the dynamical icon “OneNote web url.”
Pic. 27
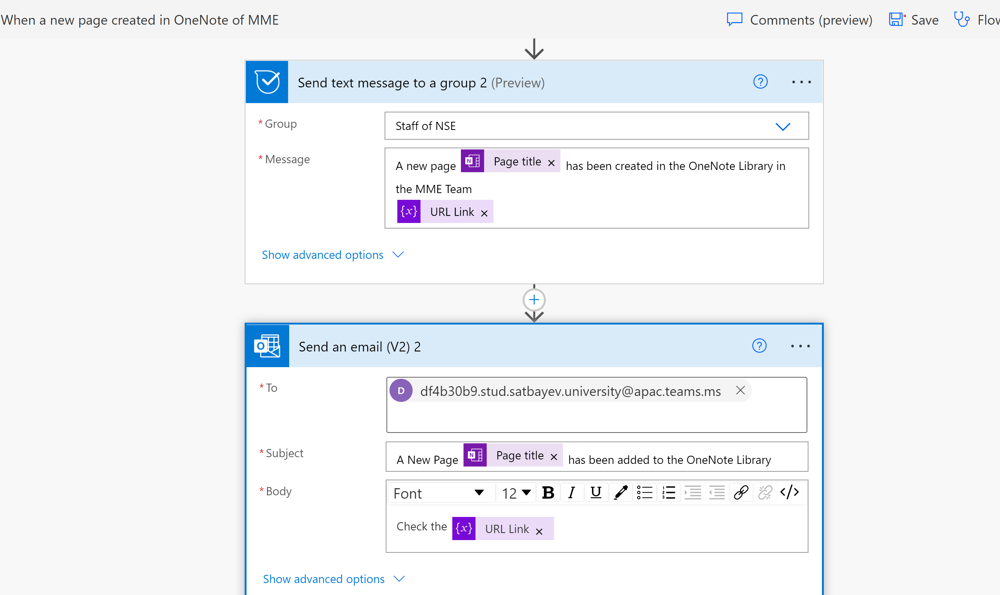
The two last boxes initiating messages to Kaizala and to the group mailbox of the team are shown on pic. 27. As soon as a new page in the specified section of the Class Notebook is added, this flow sends individual messages to Outlook for every member of the team, posts a similar message to the “Publications” tab of the team, sends a message to Kaizala group and to the class. The last box requires the email address of the team in Outlook. I explained how one can find it in § 4.8 of my book, see pic. 375-376.
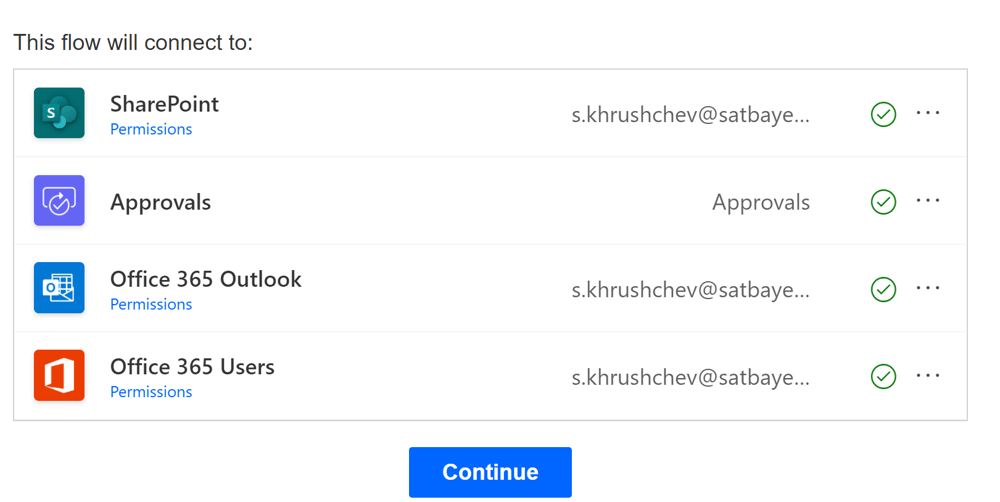
Welcome to Approvals
When a file is added to a document library
Pic. 28
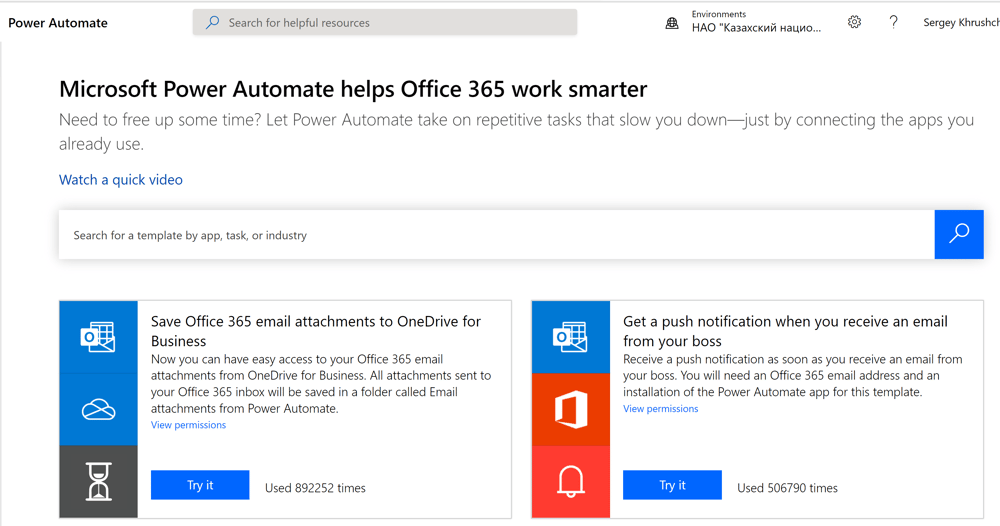
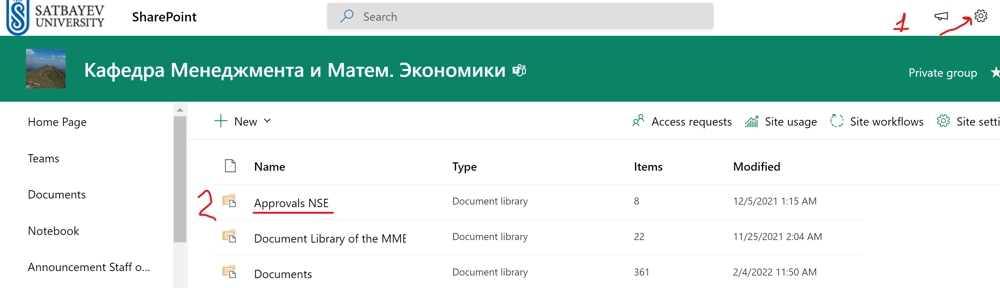
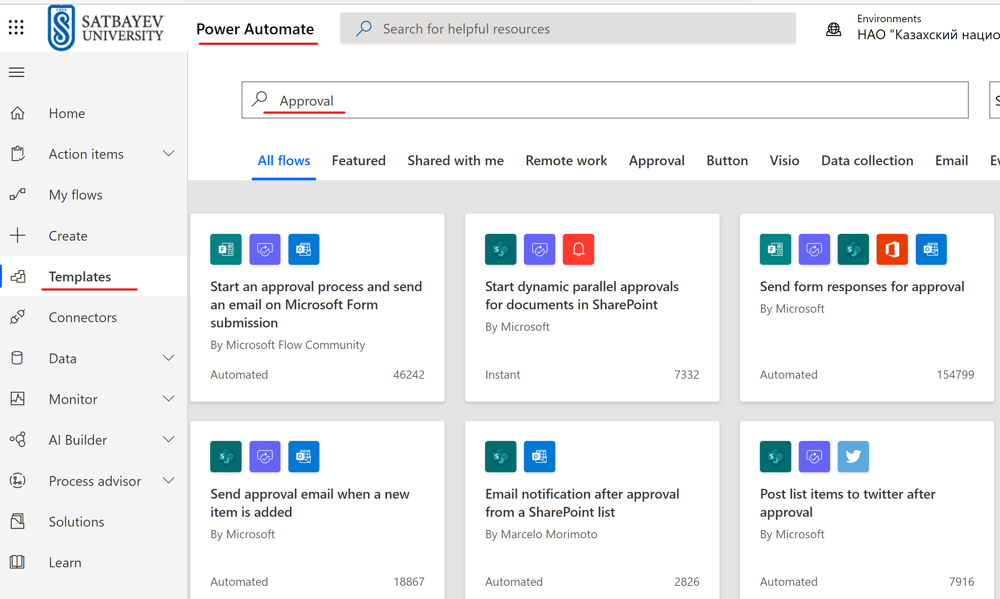
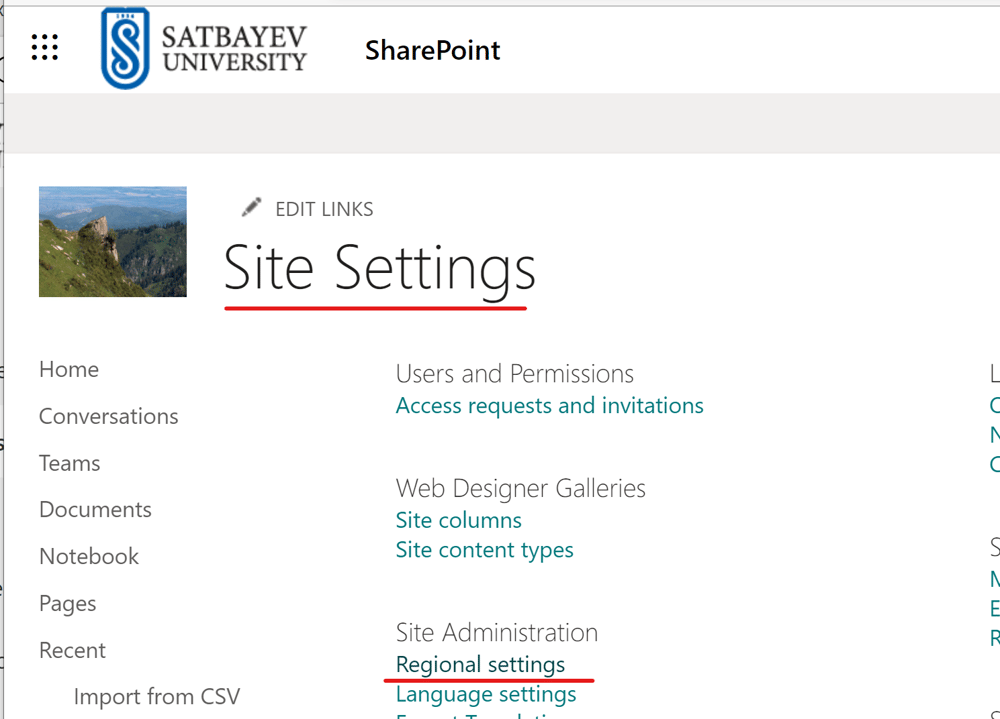
This flow watches document library “Approvals NSE,” see pic. 28, created in the SharePoint site of the department’s team and sends any document added to this folder for the approval by the head of the department. To find this document library, I press “Settings,” see 1, and select “Site contents.” I create an automatic cloud flow from the template available in the “Templates” section of the “Power Automate” site, see pic. 29.
Pic. 29
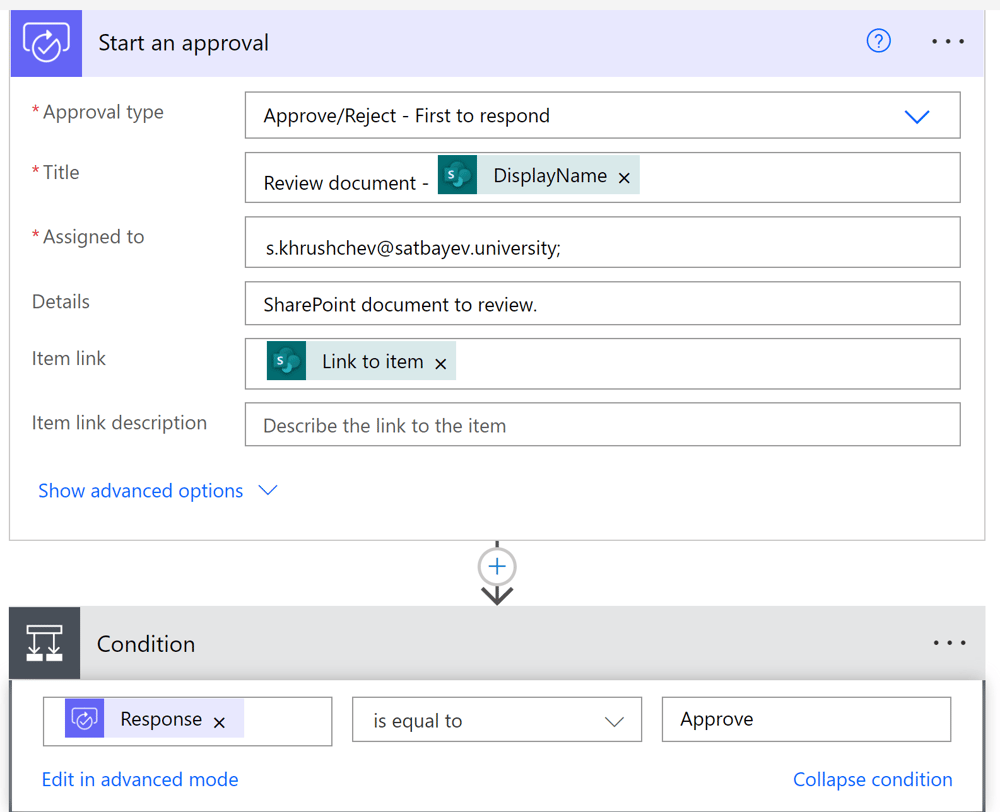
I enter “Approval” in the search list and get a long list of different flows which use the Approval program. Scrolling down the list, I find the required template, see pic. 30. It is a Microsoft modern template “Start an approval when a file is added to SharePoint.”
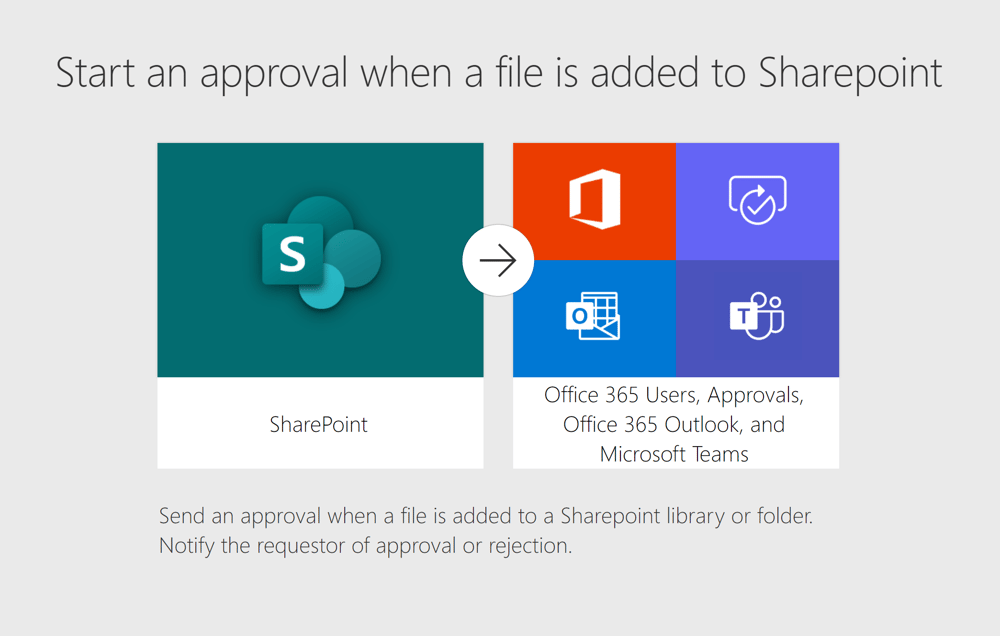
Pic.30
Pic. 31
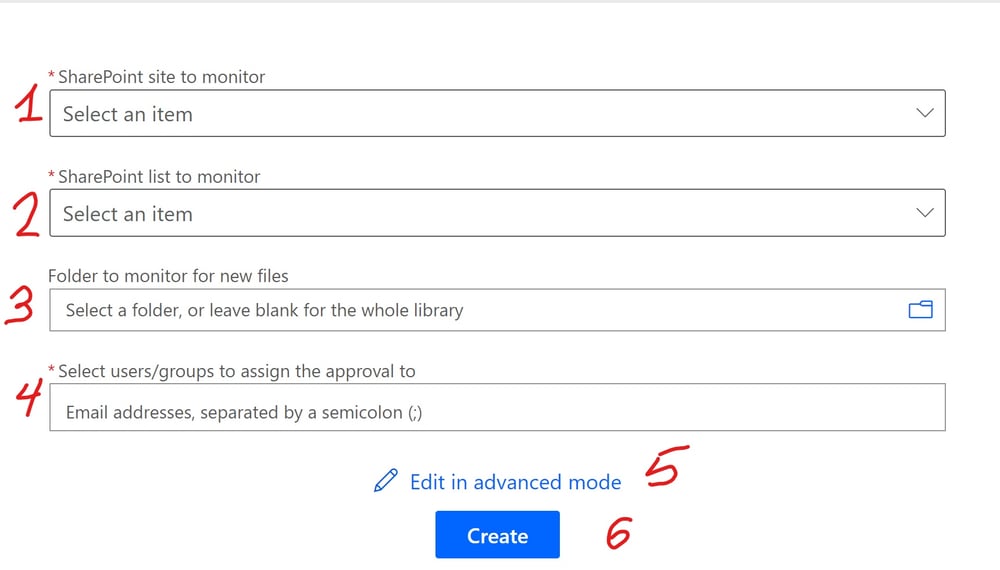
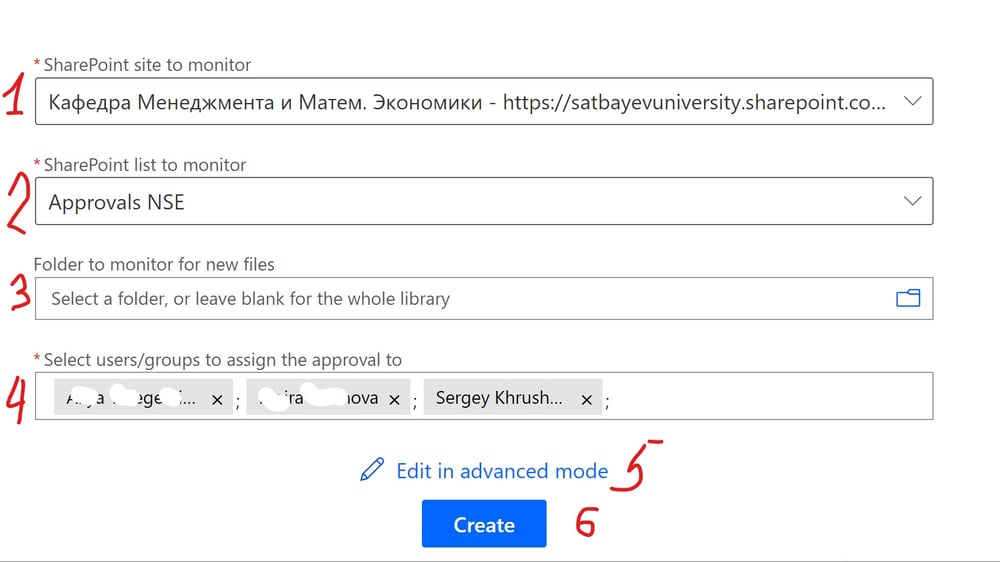
In my case I do not have any folder in the "Approvals NSE" document library. Therefore, I leave field 2 blank. In field 4, I insert the email addresses of all approvers. I obtain the form shown on Pic. 32.
Pic. 32
The advantage of this flow is that its creation reduces only to the choice of an approval document library in the SharePoint of the department’s team and filling three or four fields shown on pic. 31, see pic. 32. It is possible to edit the flow’s template in advanced mode, see 5 on pic. 32. If I press “Create,” see 6 on pic. 32, the flow is ready for use. Anytime a member of the department’s team uploads her or his document for the Department’s approval the flow sends the document to the authorities indicated in field 4 of pic. 32. All of them are warned that they get a document to approve or reject. It is a good flow to approve syllabuses.

Pic. 33
Pic. 34
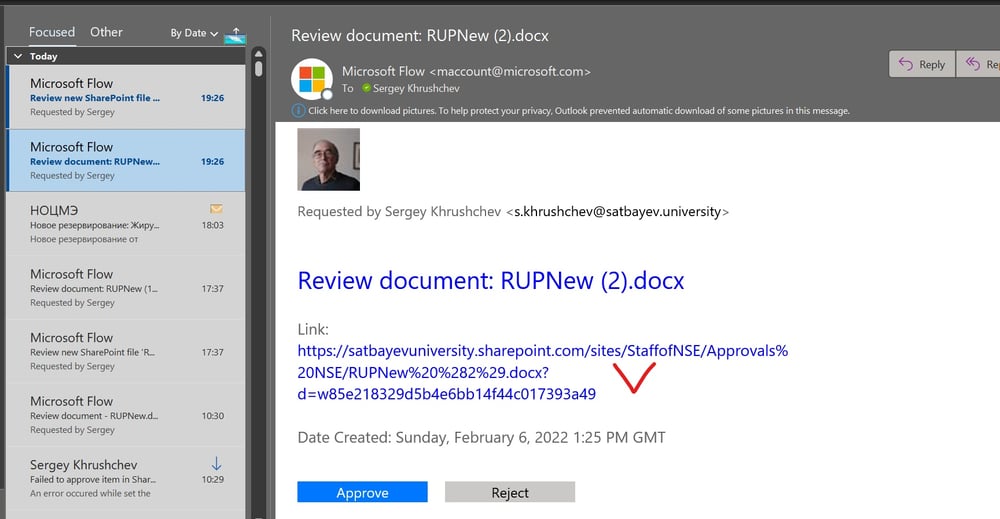
The information arrives to upload windows on personal computers/smart phones of approvers, see pic. 33 as well as to the mailboxes of Outlook, see pic. 34. To open the arrived document to Outlook for approval, I click onto the link, see the check mark on pic. 34.
Pic. 35
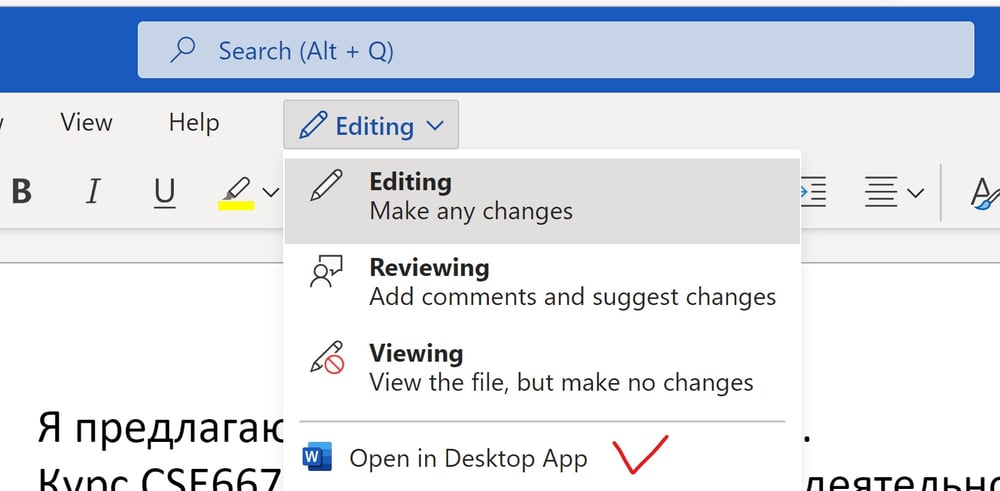
This action opens the document in Word Online, see pic. 35. If my signature is required for the approval, I open Word in Desktop App, see the check mark on pic. 35.
Pic. 36
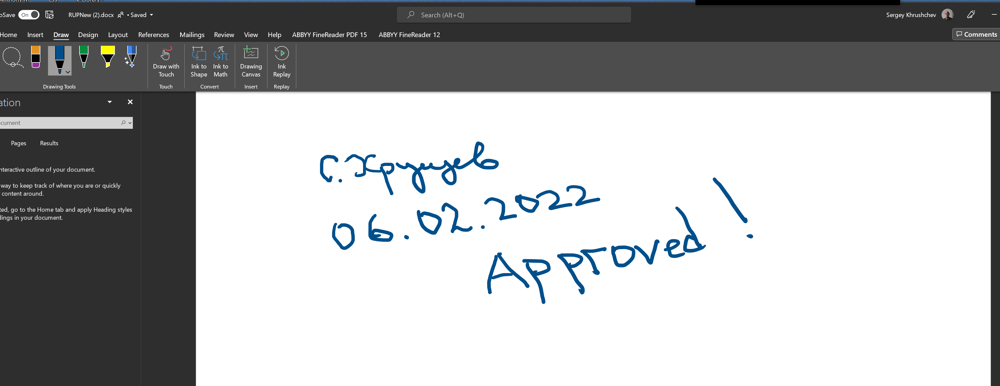
I place my signature using the tab “Draw,” see pic. 36, wait when the document is automatically saved in my OneDrive and close both versions of Word. This signature is automatically transferred to the Word Online file, see pic. 37. I can check this in Online Word, see pic. 37.
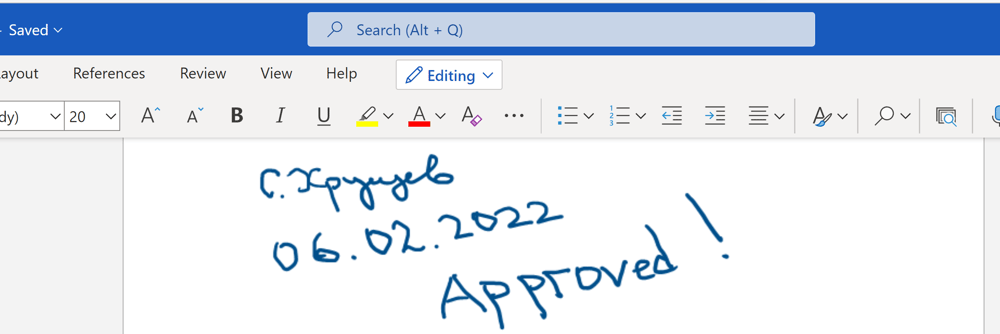
Pic. 37
Pic. 38
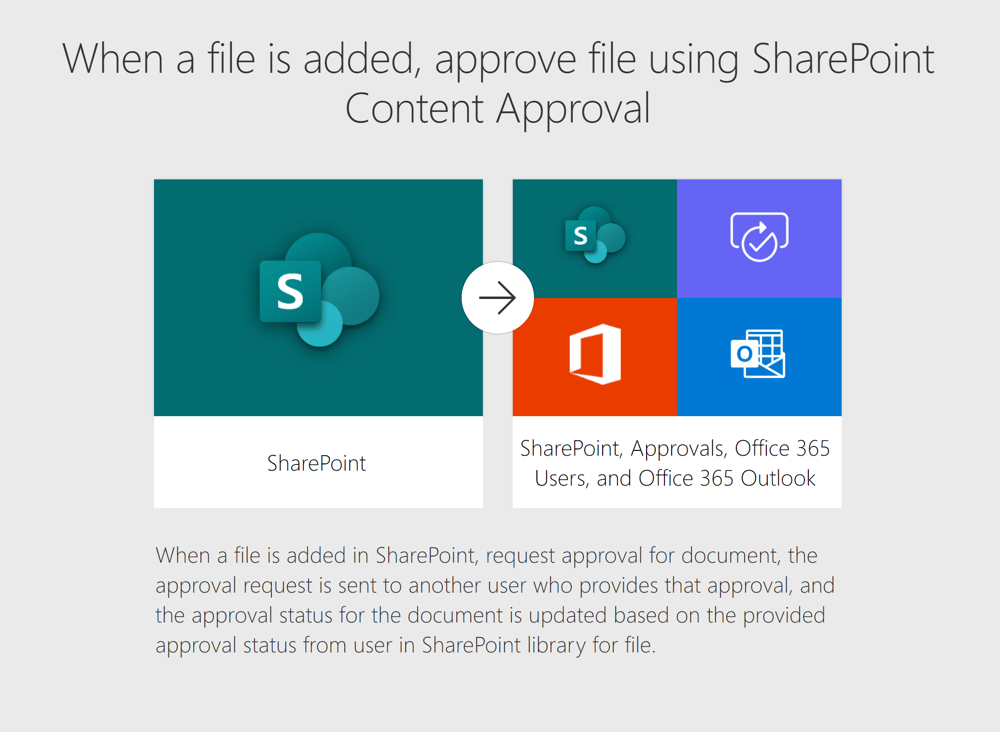
When a file is added, approve file using SharePoint Content Approval
I find this template, see pic. 29.
Pic. 39
This picture appears if I start this template.

Pic. 40
This flow watches files in a document library created for it and sends requests for approvals both to Microsoft Approvals and to Microsoft Outlook. This version of approvals shows the state of documents in this document library, see pic. 40. As in the case of the flow described above, I create a document library in the page of the “Site settings,” either through “Add an app,” or through the “+ New” button, as it is shown on pic. 41.
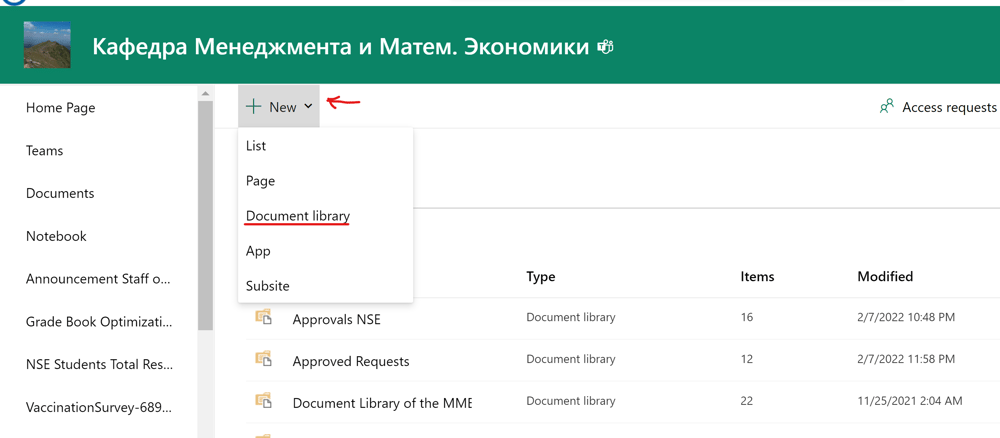
Pic. 41
Pic. 42
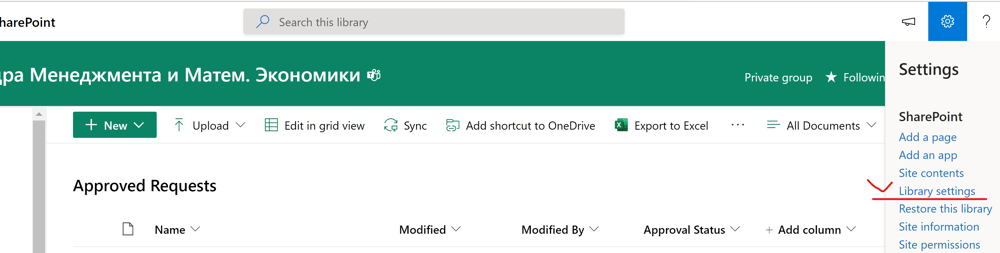
In this case, the name of the library is “Approved Requests.” To fit the flow requirements, I must adjust some settings. Being in the document library, I click settings and chose “Library settings,” see pic. 42.
Pic. 43
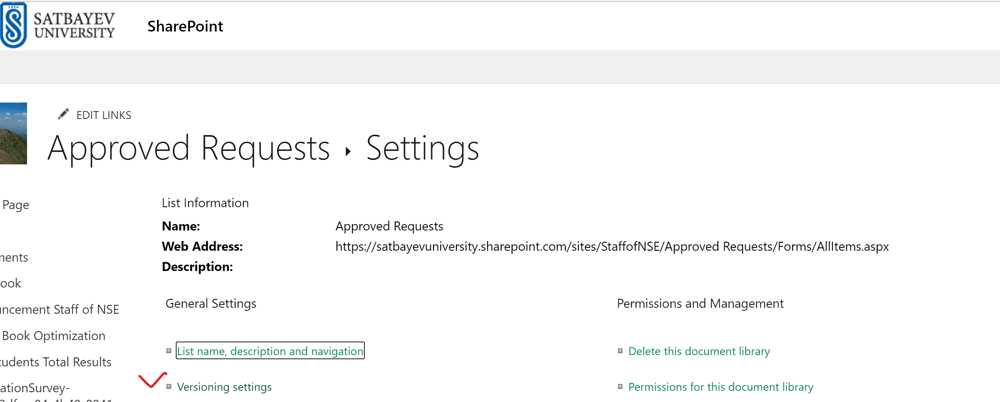
Then I open “Versioning settings,” see pic. 43, and change the default settings to those, shown on pic. 44.
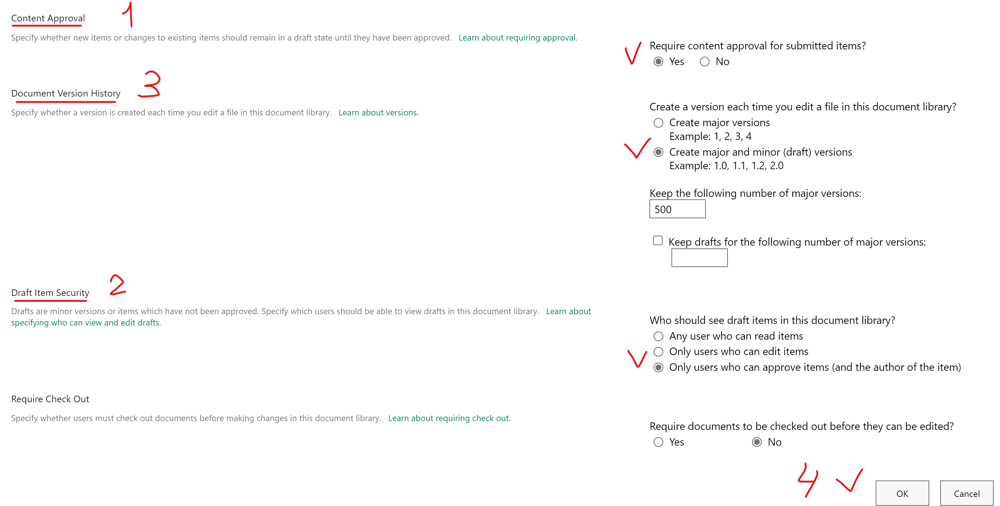
Pic. 44
This Power Automate will not work if I just insert the standard data to its boxes, since some changes were made after this template was published. The problem is solved in the following reference
How to set Content approval status with Power Automate (tomriha.com)
Let us study the structure of our flow. It is a cloud automatic flow.
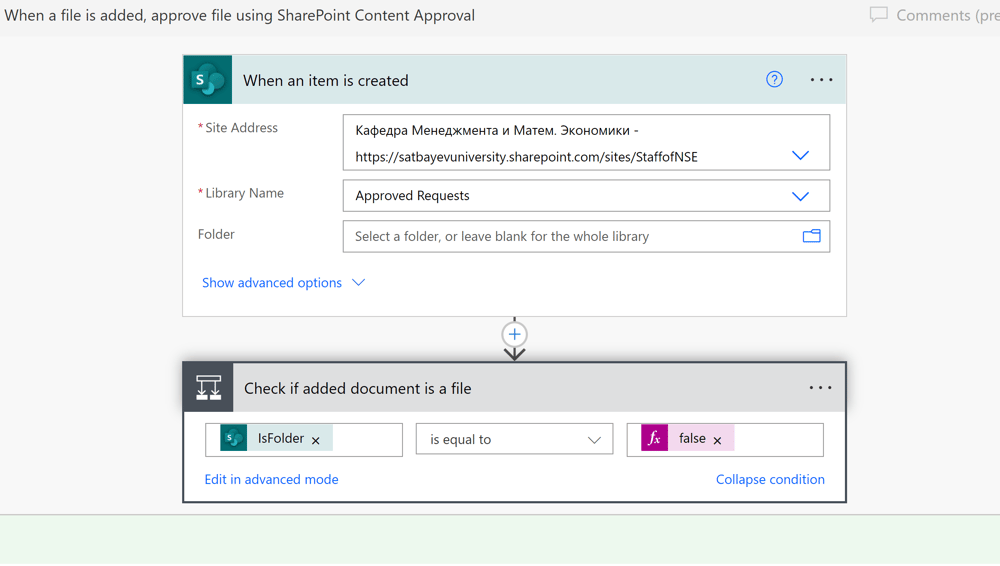
Pic. 45
The first box is a trigger. The second one checks if the item created in the document library is a folder or file. If the item is not folder, see pic. 46 (IsFolder is equal to false), then the flow follows the “If yes” option. Otherwise, it is terminated.
Pic. 46
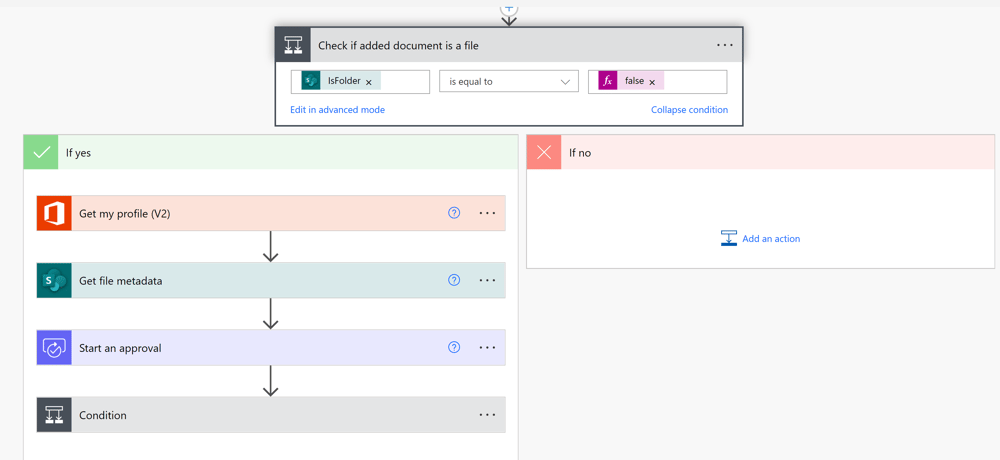
Pic. 47
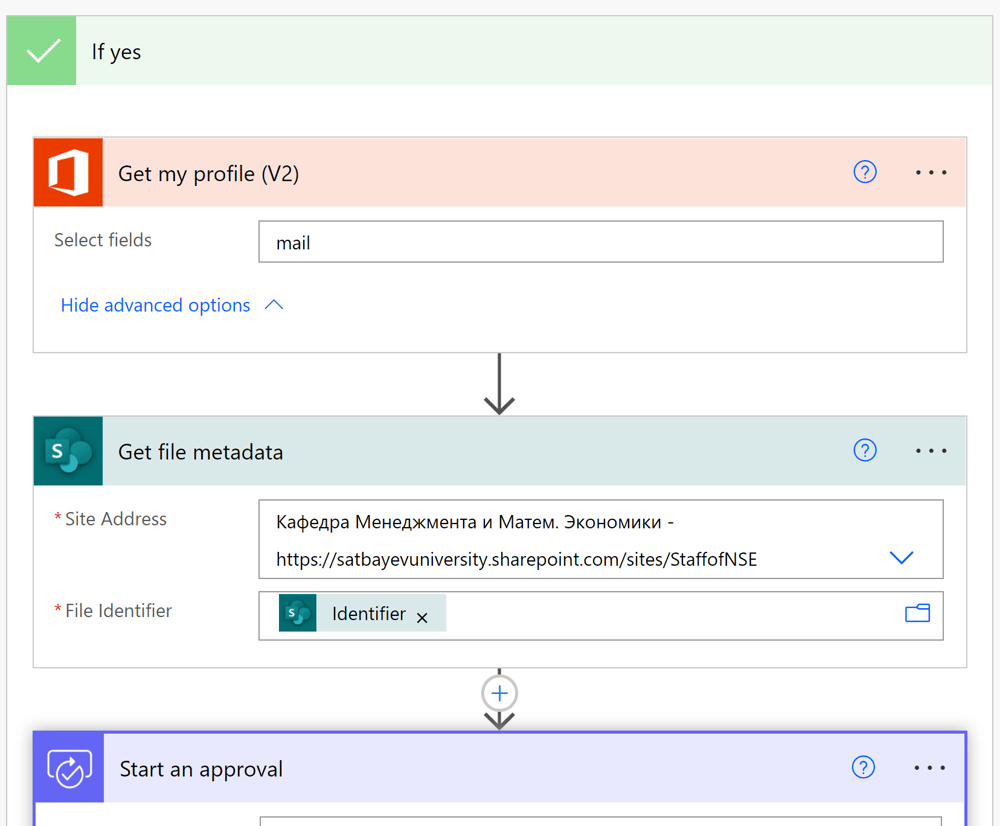
In the “If yes” part, I only fill the fields of “Site Address,” and “File Identifier.”
Pic. 48
The “Start an approval box” is filled as shown on pic. 48. I assign the approval for myself. I can include anyone in the list of approvers by including the corresponding email addresses in Outlook. The “Condition” box checks the result of the approval action.
Pic. 49
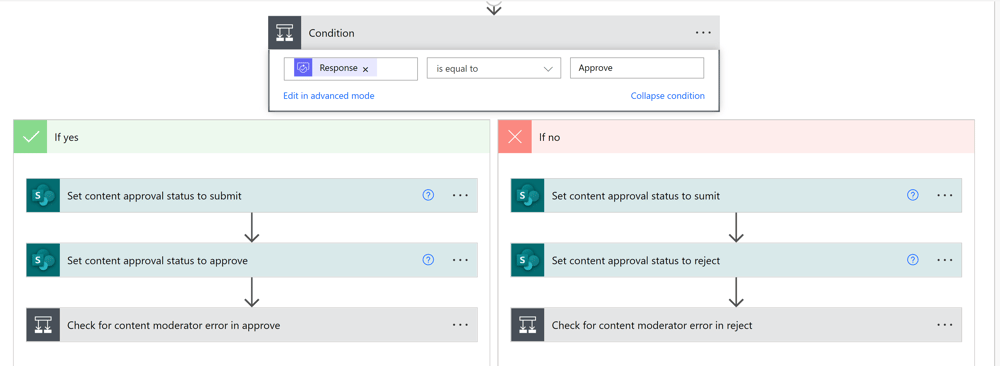
This time both branches “If yes” and “If no” are similar. We adjust our flow exactly at this place. Namely, in the “If yes” branch I change the title in the first box “Set content approval” to “Set content approval status to submit.” This can be done through the ellipses of the box. Then I add to this box another one with the approve status. The “If no” part has the same structure with the difference that "approve" is changed to "reject." The result is shown on pic. 50.
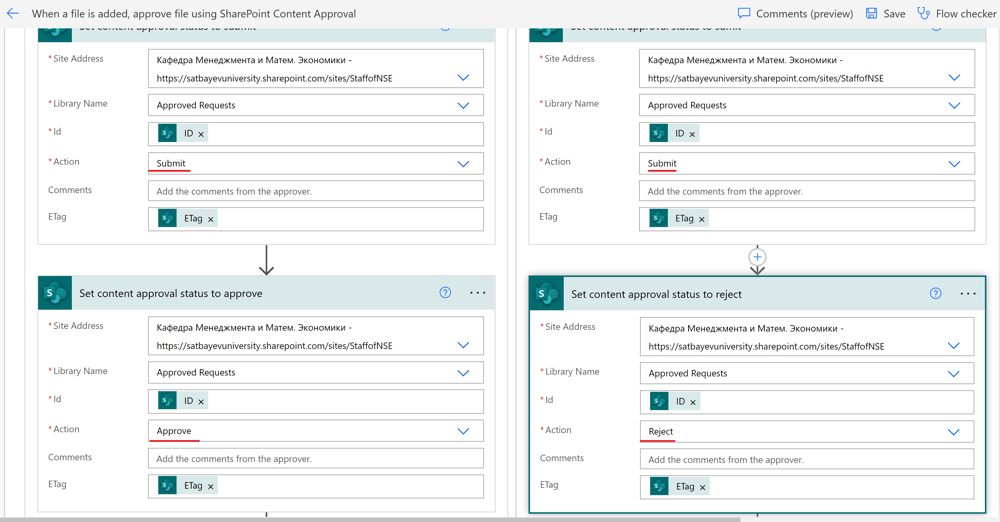
Pic. 50
Pic. 51
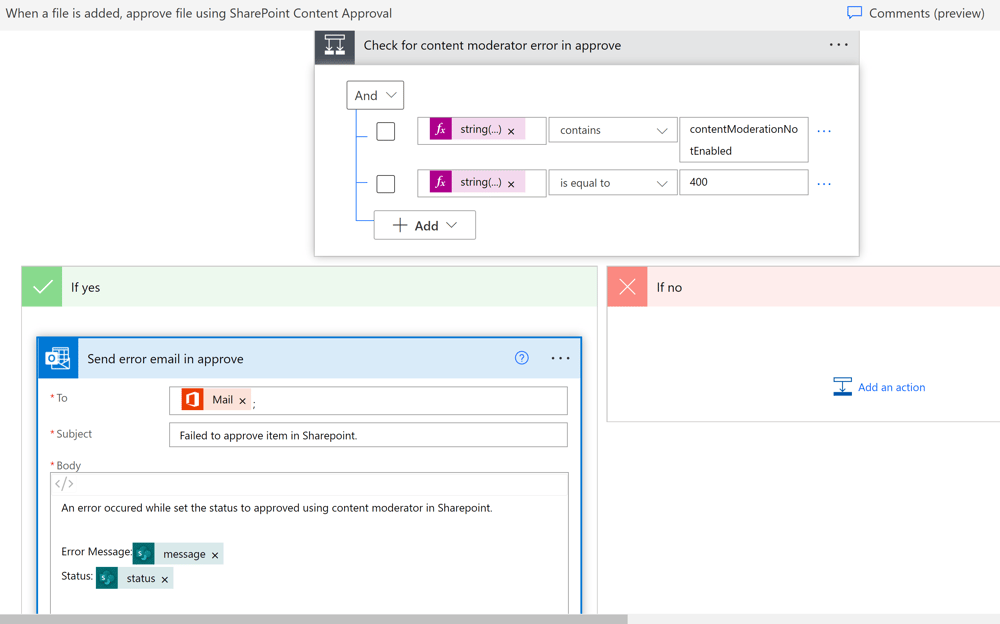
This is "Checks for content moderator error in approve."
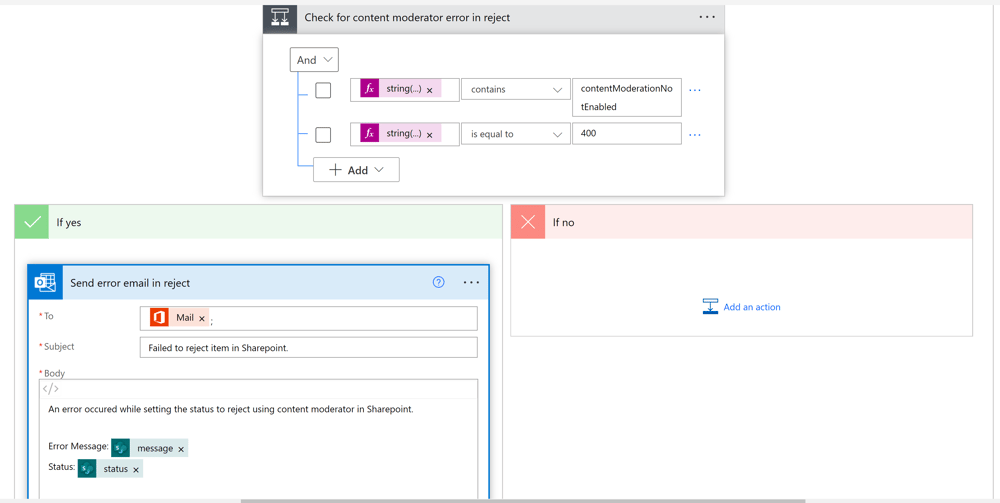
Pic. 52
This is "Checks for content moderator error in reject."
One shouldn’t change anything in the boxes “Check for content moderator error in approve,” see pic. 51, and in “Check for content moderator error in reject,” see pic. 52. I save the flow and run the test. When a file is added to document library “Approved Requests,” it takes two or three minutes for the upload window of Approvals app to appear, see pic. 53. The approver may not be at the PC. Moreover, it is better to wait until the email message arrives, see pic. 54.
Pic. 53
Add a description here.
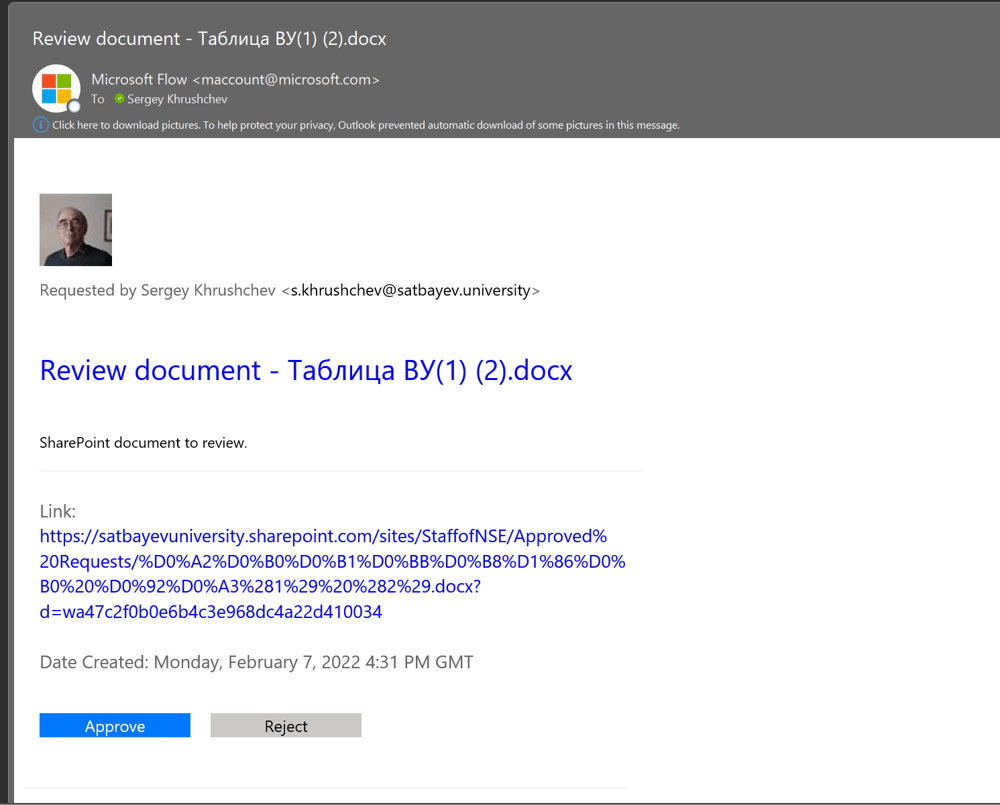
Pic. 54
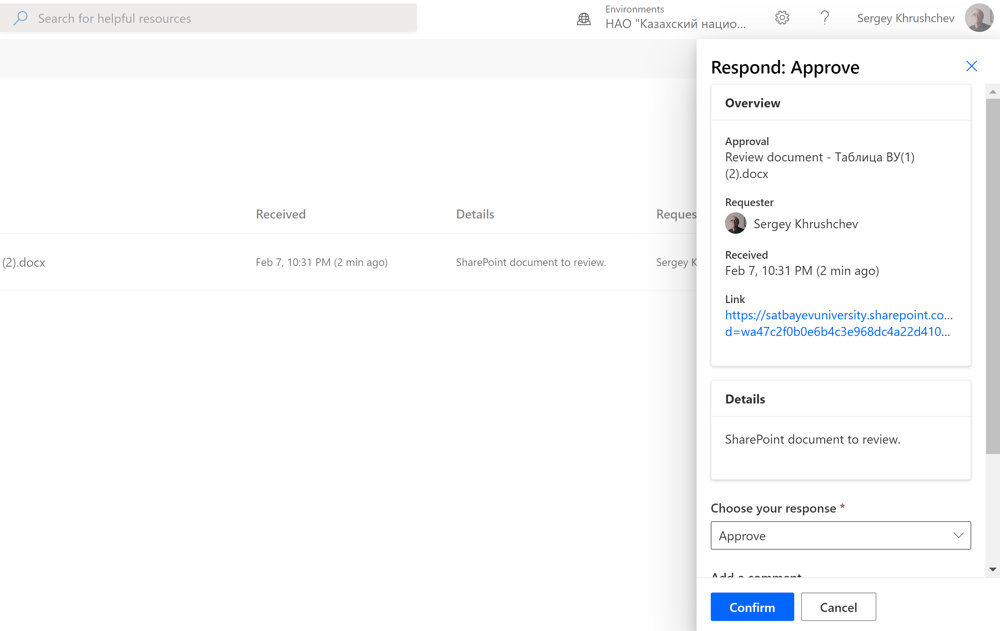
Pic. 55
I can change the approval status here, write a comment. I press the “Confirm” button and the status of the document is changed to “Approved.” If I change “Approve” to “Reject,” then after refreshing of the library, see 1 on pic. 56, I get the list of the documents with the approved/reject status. In particular, the rejected document is underlined in red. This flow is very convenient since both the applicant and approver see the current state of every document.
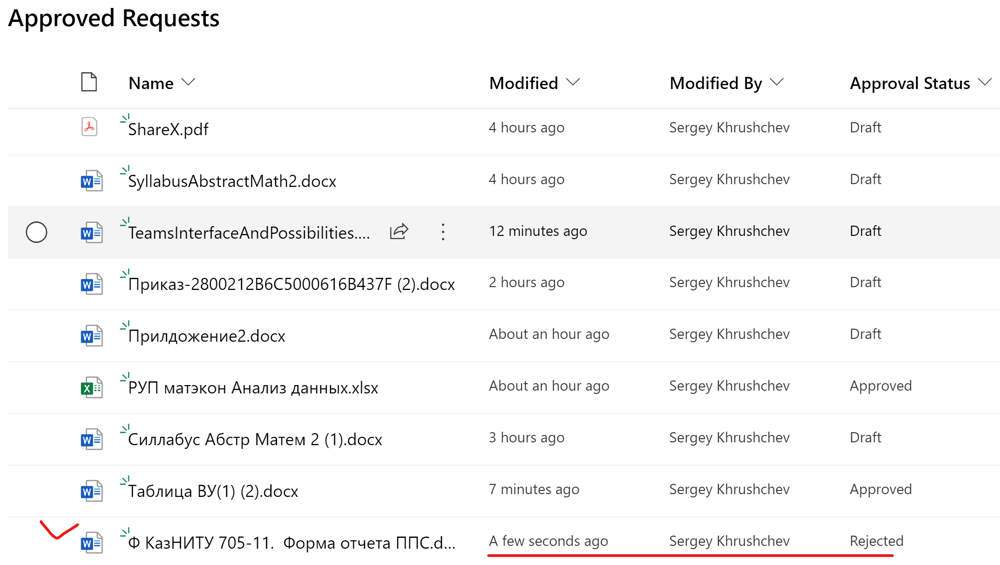
Pic. 56
Pic. 57
Welcome to a Power Automate registering incoming emails
Pic. 58
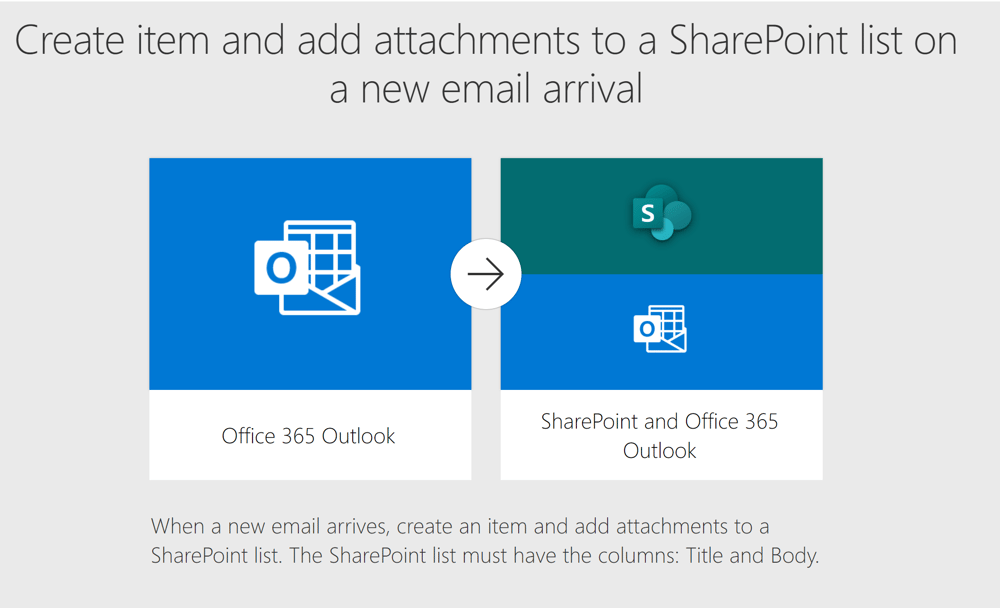
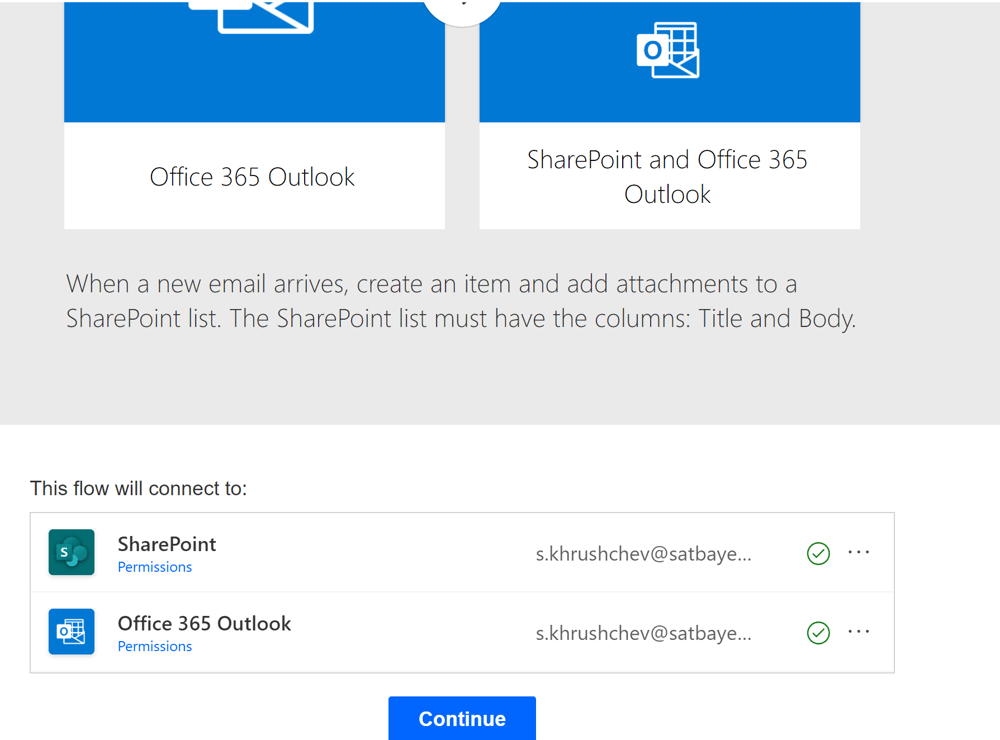
I search template "Create item and add attachments to a SharePoint list on a new email arrival."
Pic. 59
Pic. 60
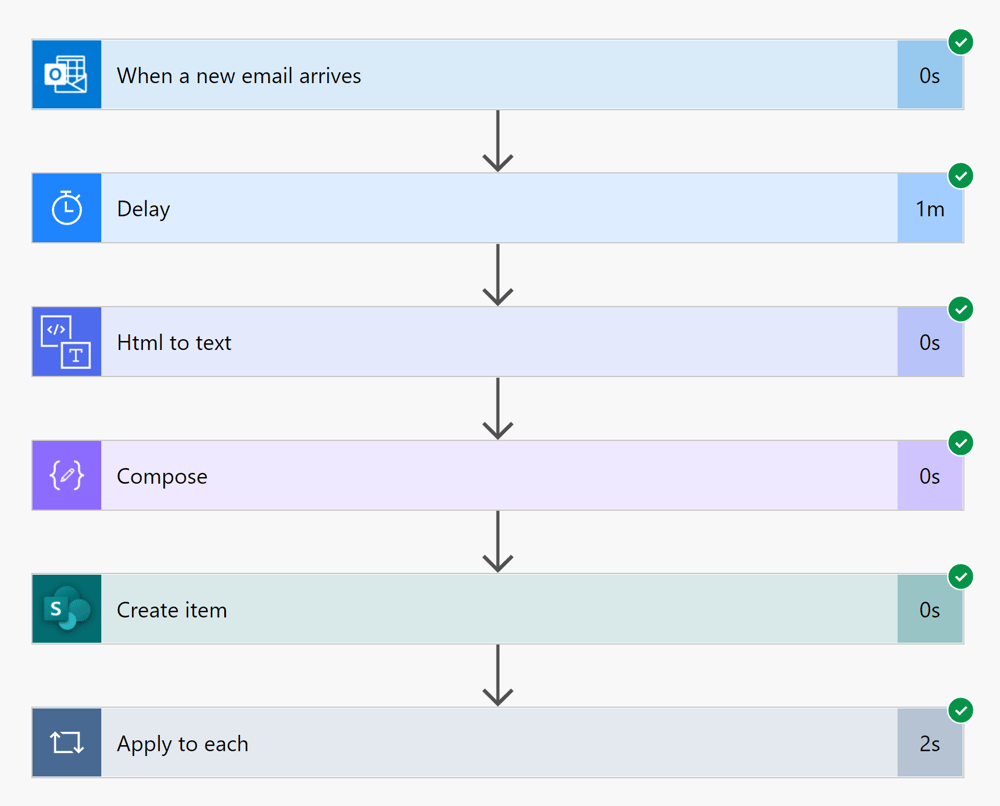
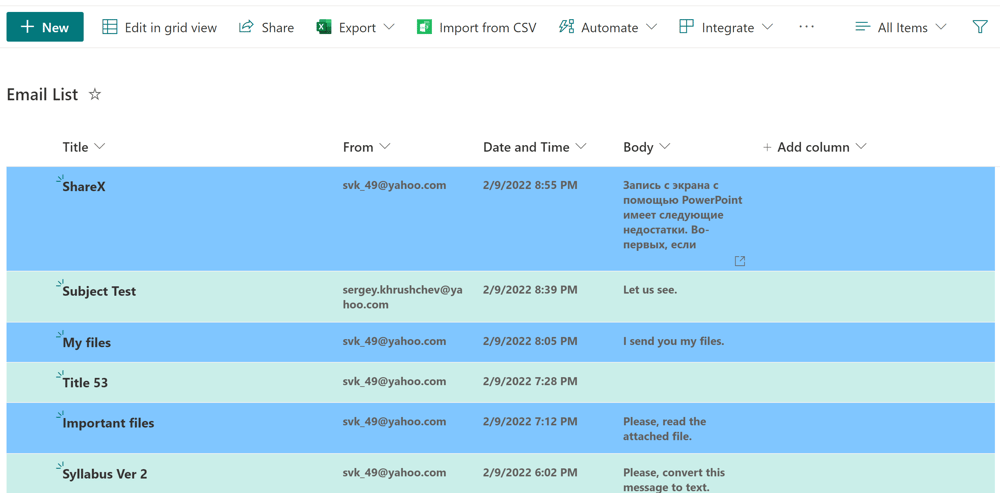
The scheme of this flow is shown on pic. 60. It is an automatic cloud flow with a "When a new email arrives" trigger. Before designing it, you must create a Microsoft list with the columns shown in pic. 61. The “Title” column is an immutable column in the Microsoft list, which in this case contains the subject lines of emails. The "From" column is of type "Single line of text" and is intended for email addresses of senders of letters. The "Date and Time" column is intended for specifying the time when the letter was registered in the list. Finally, the "Body" column contains the body of the email and stores all attachments. Its type is "Multiple lines of text." In order see the full text of the letter and get access to the files attached to the messages, mark the required line of the list, and click the pencil icon at the top left, see pic. 61. After viewing, you must click on "x Cancel" to return to the view of the list of messages.
Pic. 61
Pic. 62
Pic. 63
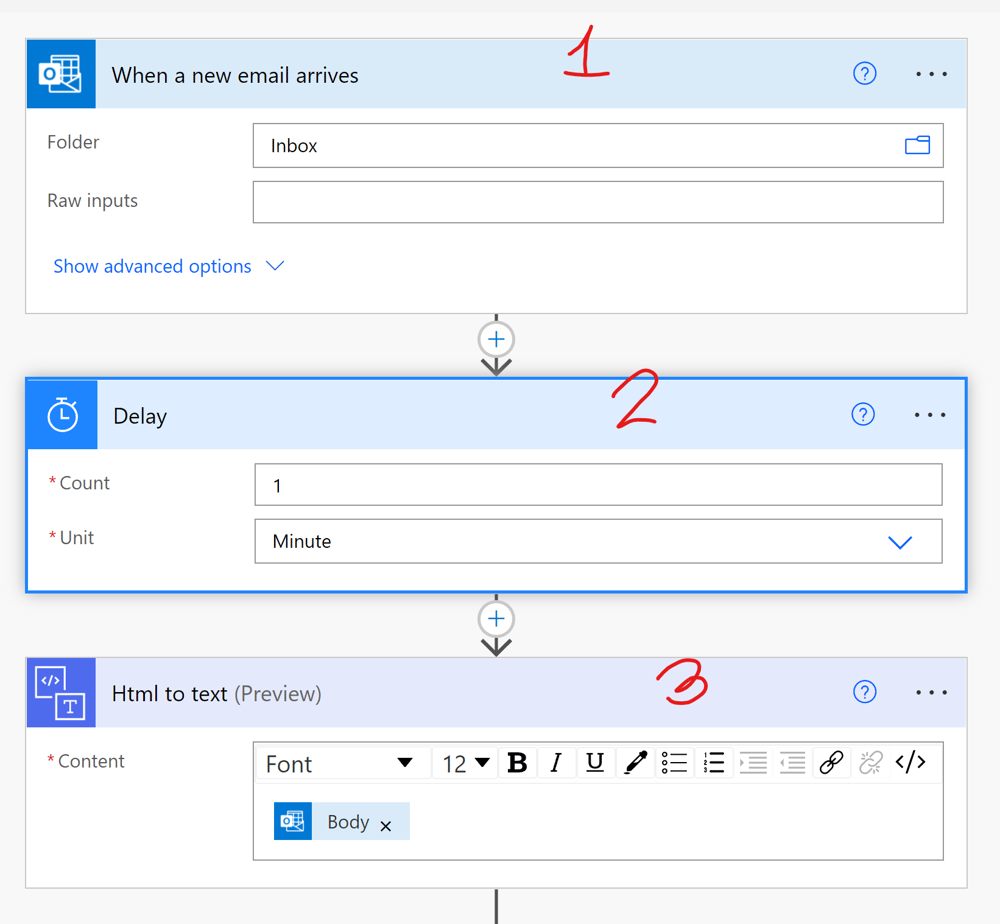
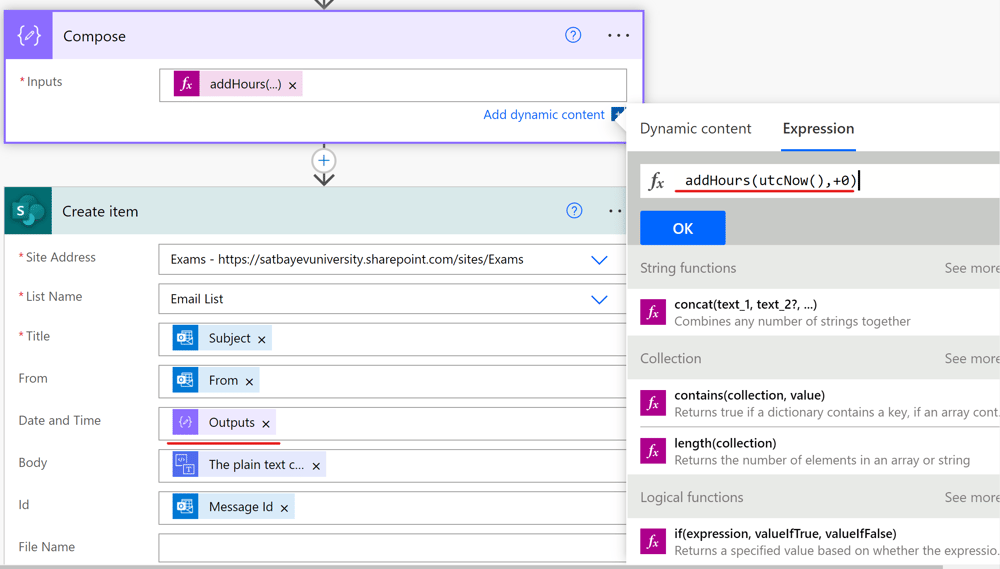
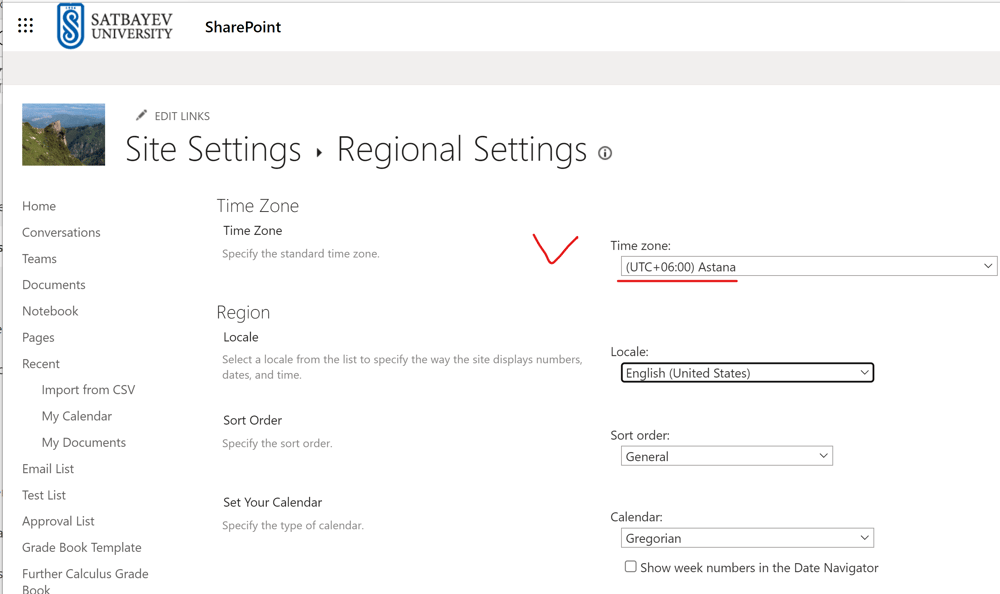
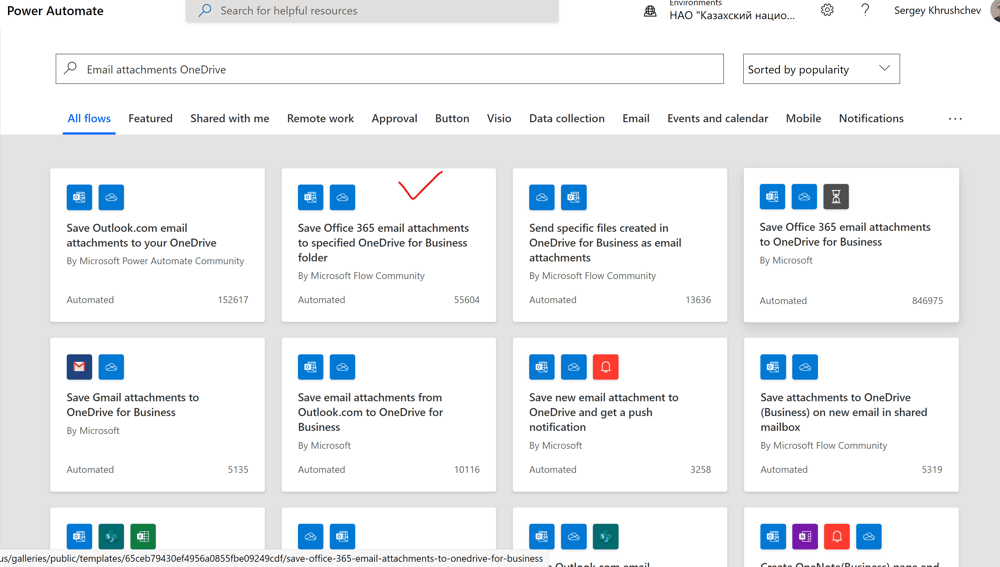
In the “Folder” section of the “When a new email arrives” trigger, I select my mailbox “Inbox,” but in its place can be any other mailbox that Outlook automatically redirects business mail by using the appropriate filter. In the “Delay” action, I set the delay to one minute, see 2 in pic. 63. This is necessary so that the flow has time to record all the output data of the action “When a new email arrives.” In mail systems, messages are recorded in the Html format. To avoid codes in the “Body” column, it is necessary to convert the message text from Html to Text. This operation is performed by the action “Html to text,” see 3 in pic. 63. I fill the conversion field with the dynamic Outlook icon “Body.” To be able to select the current time icon, I insert the action “Compose,” see pic. 64. In the “Body” field, you must place the icon for converting from Html to Text. In the “Date and Time” field, we place the dynamic icon “Outputs.” To get this icon, I insert in the “Inputs” field the expression “addHours(utcNow(),+0).” Then the “Outputs” icon contains the UTC time, The “Apply to each” section is filled in as shown in pic 65. The flow is ready for operation. However, you must configure the correct time in the SharePoint site since by default it is set to the time zone of the corresponding server. The sequence of actions is shown on pic. 66-69. Notice that the output of the formula “addHours(utcNow(),+0)” is the UTC time. Pic. 69 shows another formula “(UTC+06:00) Astana,” which inserts the current local time into the column “Date and Time.” You should check your spam folder daily. Some messages from outside may end up there. When redirecting them to Inbox, the flow does not consider them as having arrived by mail. Internal mail messages rarely, if ever, end up in the spam folder. The manager can open and save the files received in messages in any folder. Those that need to be sent to other employees can be added to the Microsoft List of sent messages. There is another very popular Power Automate. It automatically saves all files attached to messages in a specially created folder on the manager's OneDrive. Using the search field in Power Automate site, you can find many templates for such flows, see pic 66.
Pic. 64

Pic. 65
Pic. 66
Pic. 67
Pic. 68
Pic. 69
Pic. 70
Pic. 71
Welcome new team member
Pic. 72
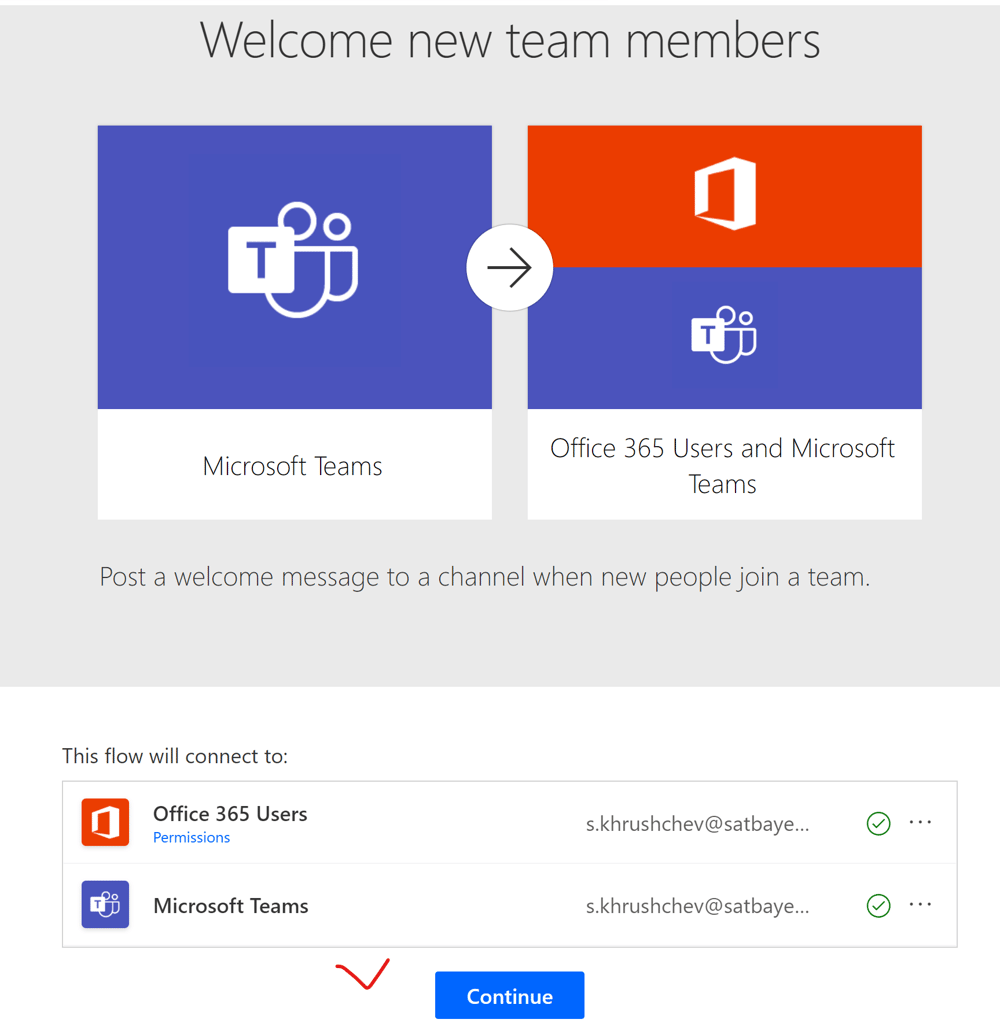
Using the search field, I find the template "Send a welcome message for a new team member."
Pic. 73
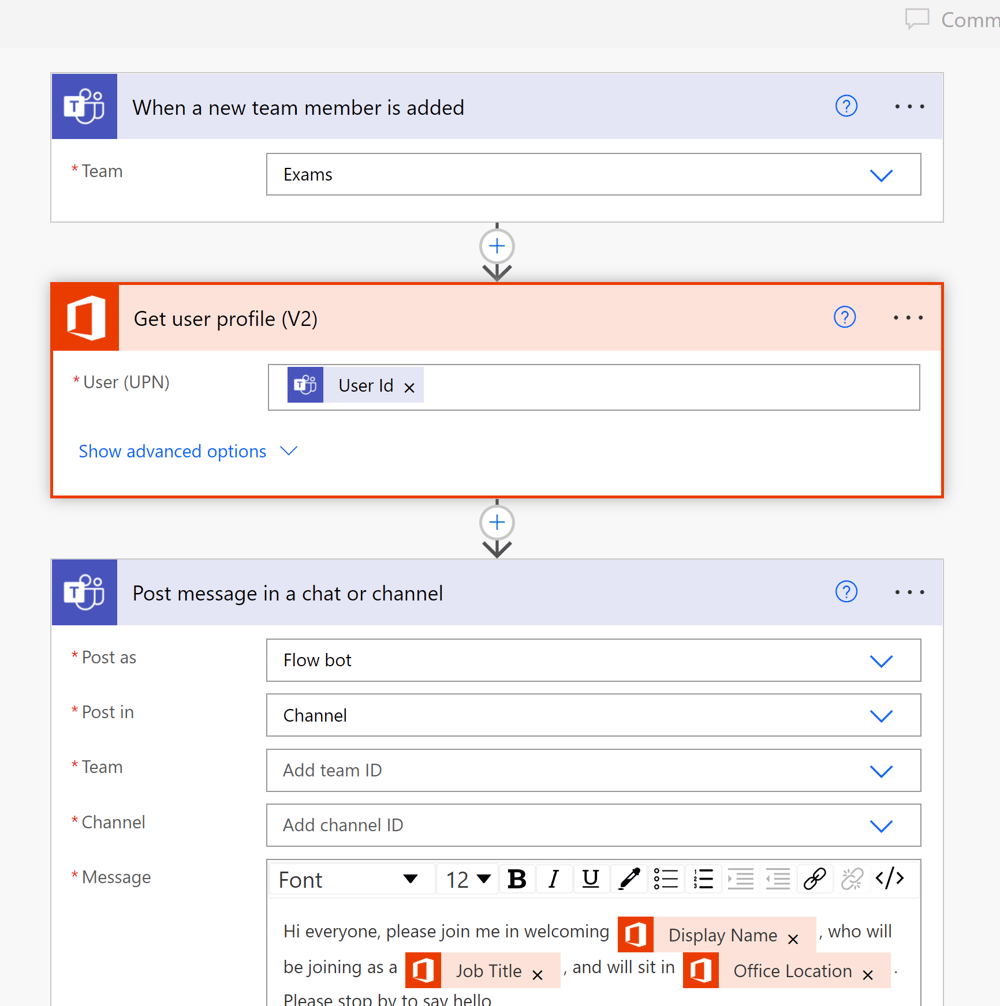
I select the required team in the first box and insert the dynamical icon "User Id" again to connect it to the team chosen. It is possible to change the welcome message in the third box. The flow can be saved and is ready for use.