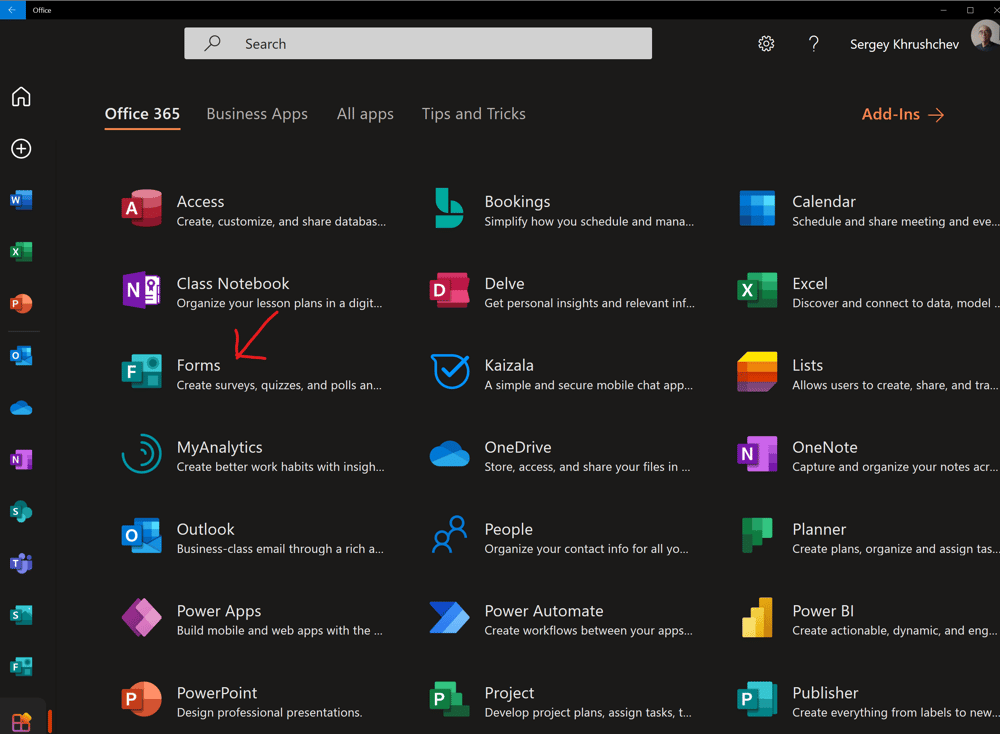
Power Automate
Countdown to the New Year
Power Automate Reminder for Teams
Important applications of Power Automate in education are automatic reminders. The simplest one is the Coundown Reminder in the SharePoint of the class. There is a number of ready Power Automates in the Web Site of Power Automate.
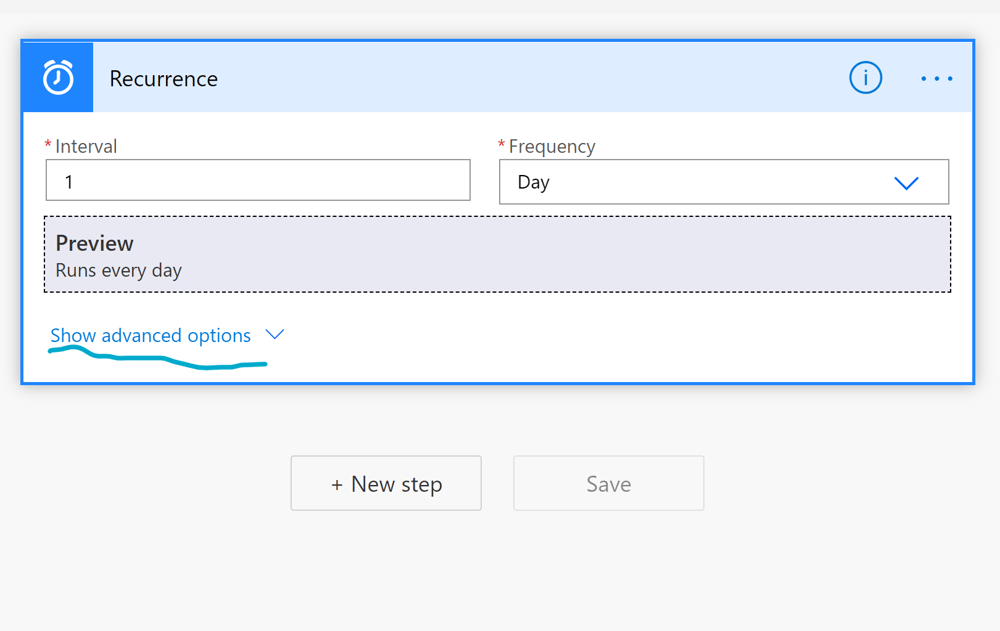
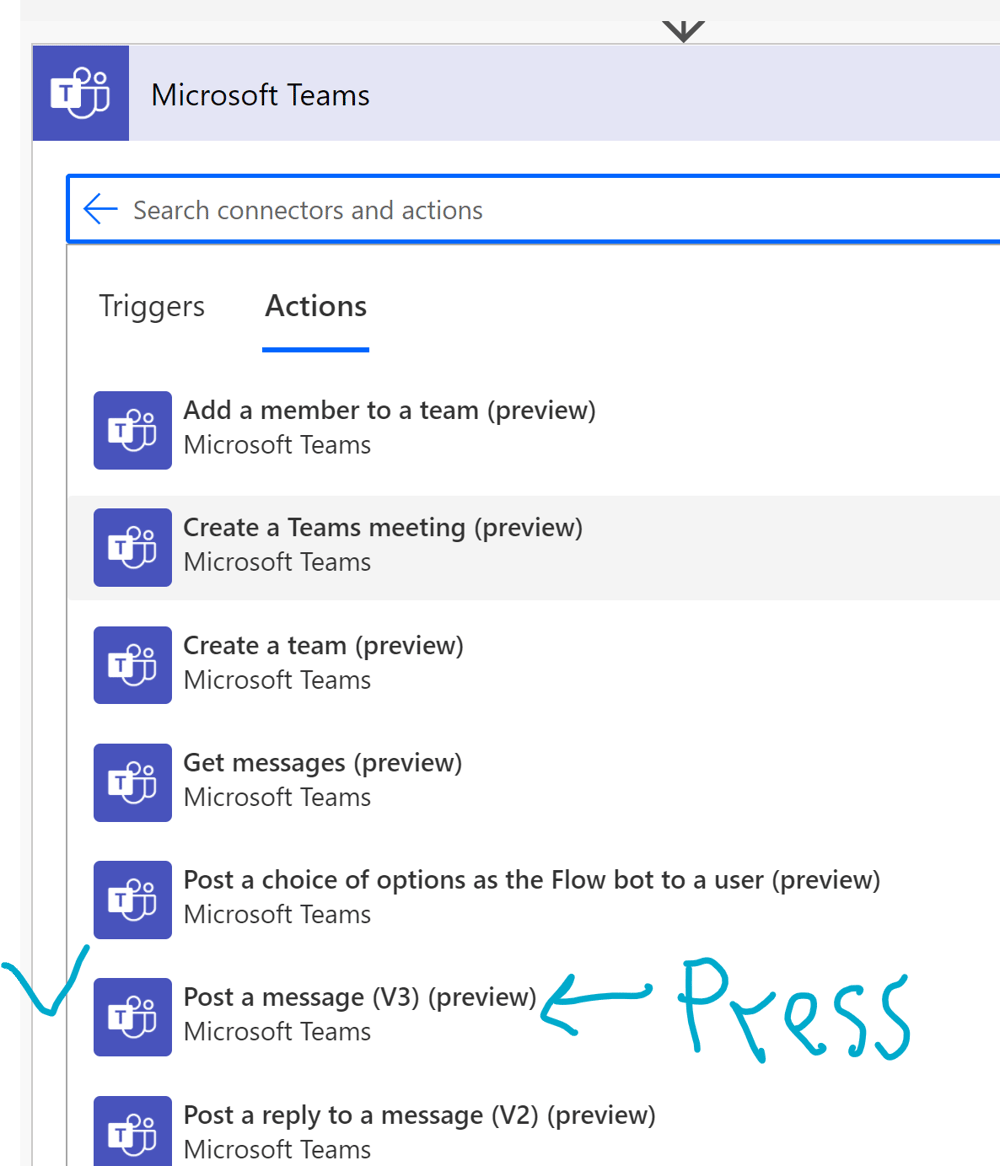
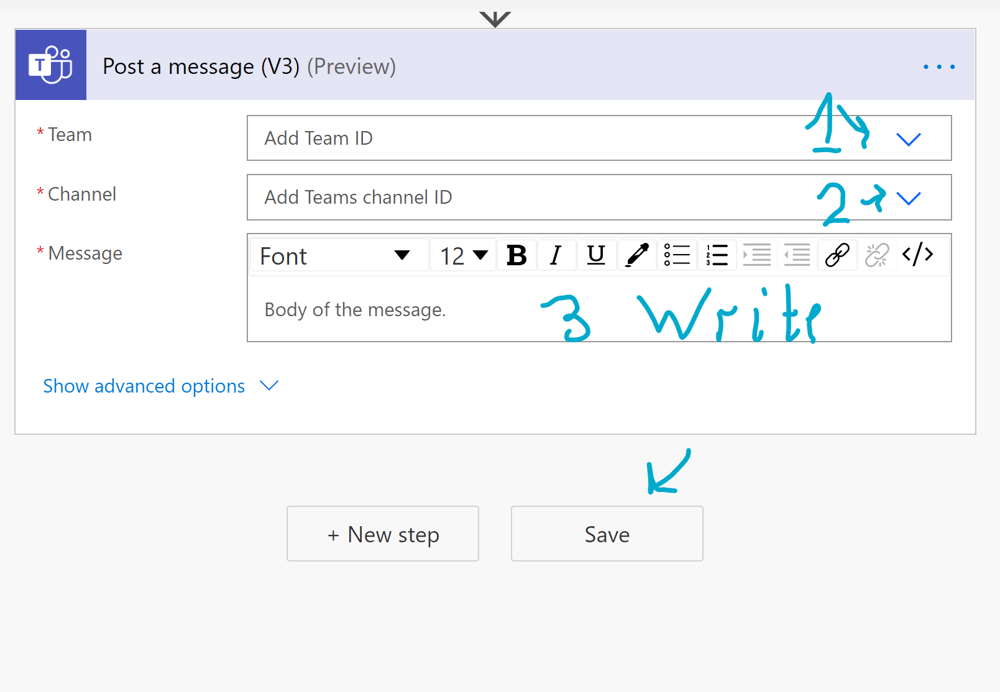
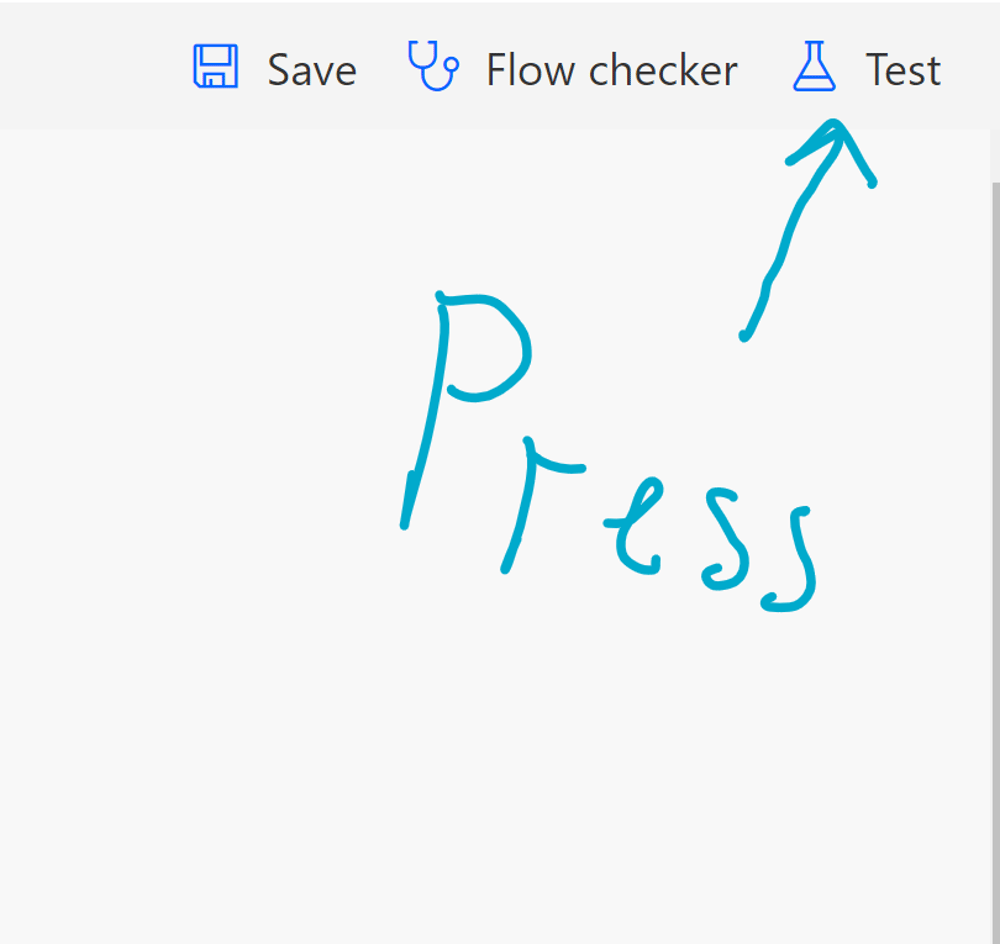
I begin with reminders. The practice shows that it is a good idea to remind students about the deadline for a home work at least three times before it. Pictures 1-4 below demonstrate how to start your work on this automate. Pictures 5-6 show the first panel. Since the default time in this service is fixed for the Main Office Time zone, I usually change the starting time so that it is already passed in my zone (Pic. 7.) In this case we press "Day" (Pic. 7). The Time zone is fixed in the first field (Pic. 9-10.) If you click on it, a new window will appear to make a right choice. We press "Next step" and make a choice of the connector "Microsoft Teams" (Pic. 11.) Then we find the action "Post a message (V3)," see Pic. 13. In the menu of this action, see Pic. 14, we press the first field and choose the correct Team (it is "Algebra 1" in our case). Then we choose the General channel. Finally, we fill in the Subject field (press "Advanced options" to see it) and the body of the message. The Reminder is ready, and we save it. Pictures 16-19 demonstrate how to test it and Pic. 20 shows the result of the test. If you leave it as it is, it will publish this message every day at 9 AM. If you want to stop the automate, then turn it off. For this go to "My flows page", click the vertical dots and press "Turn off". Later, you can similarly turn it on. I usually run only one automate of this type per class. To edit it for a new task mark it in the left circle and press the "Edit" at the top of the menu. Then you just edit the second box since the time when the announcement appears may be left the same.
Pic. 1
Power Automate Reminder for Teams
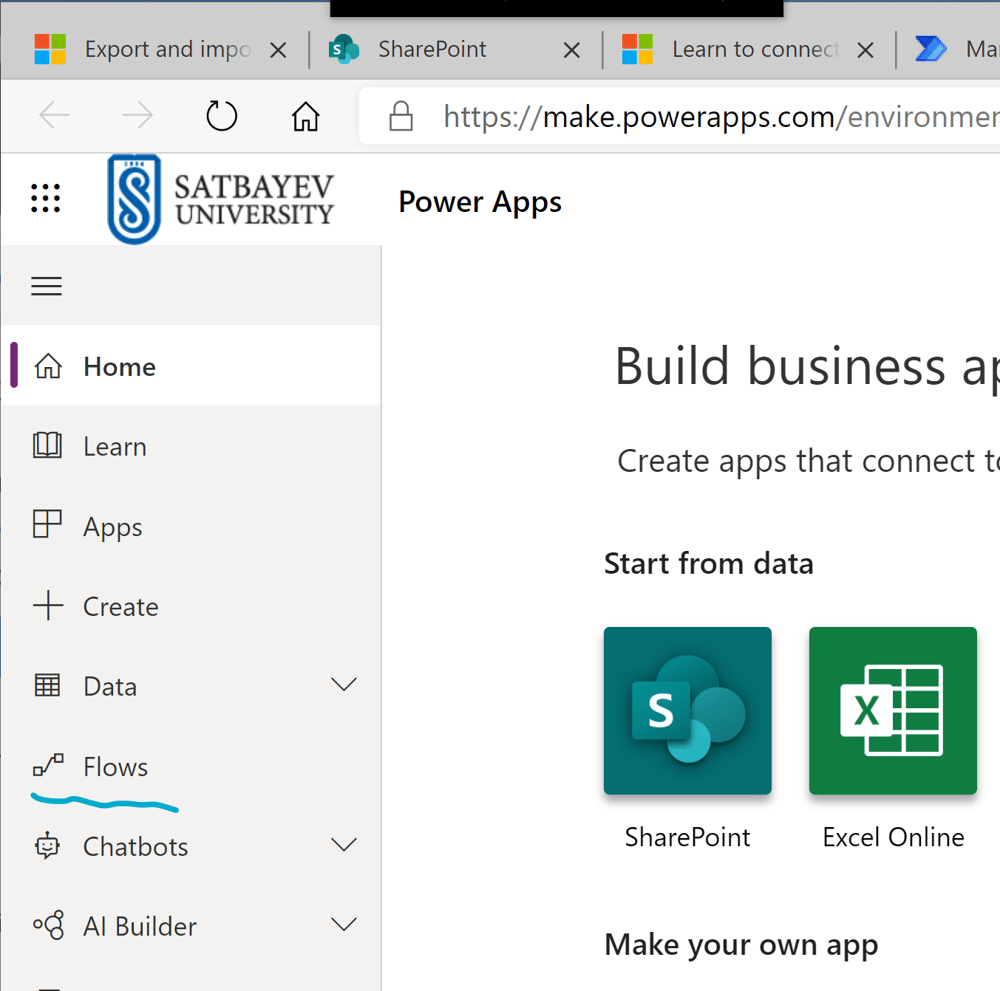
I press "Power Apps" in Office 365.
Power Automate Reminder for Teams
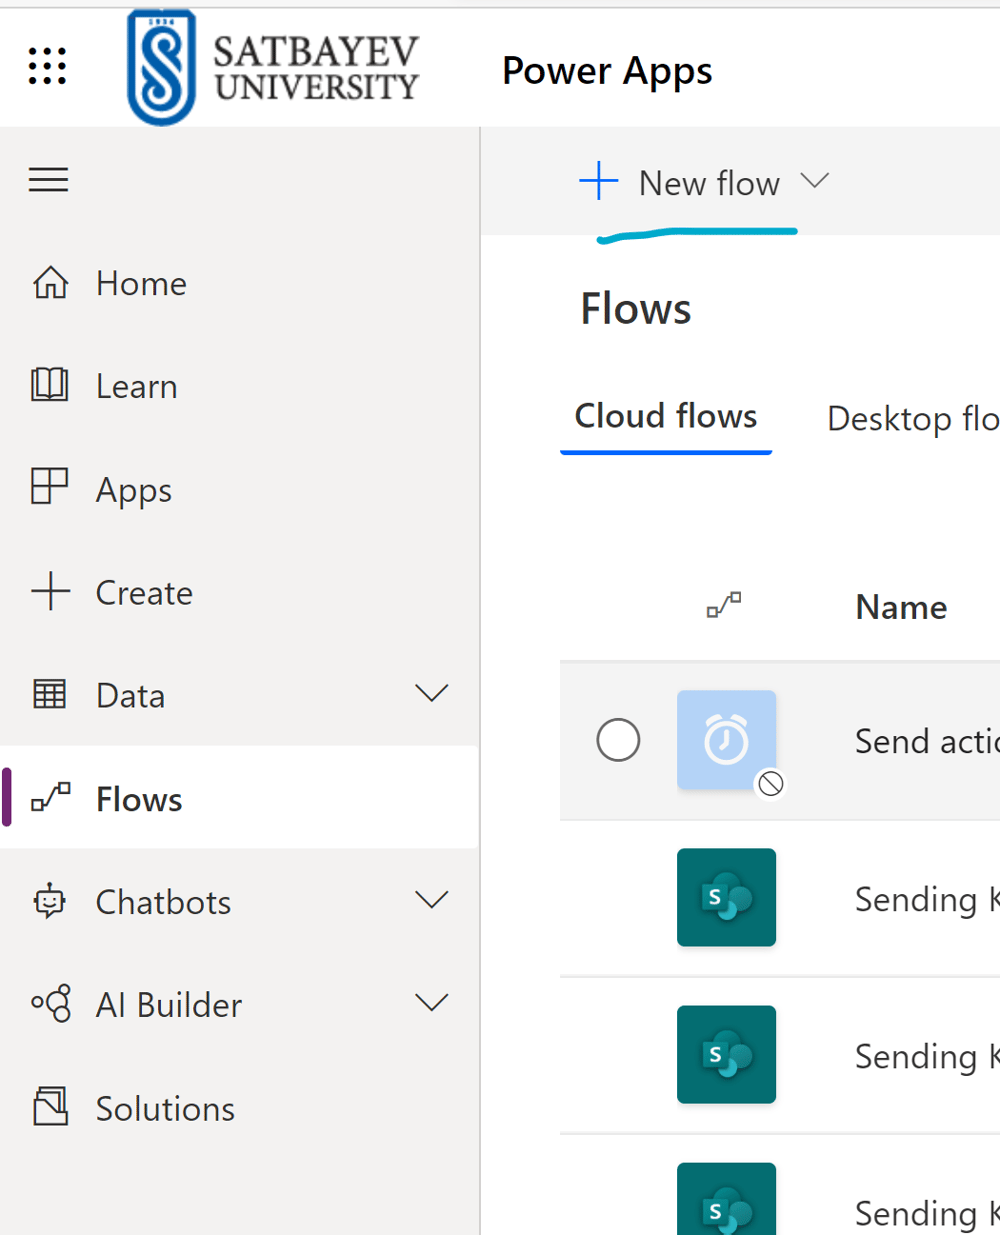
I press "Flows" on the left pane.
Pic. 2
Power Automate Reminder for Teams
I press the button "+ New flow" at the top of the window.
Pic. 3
Power Automate Reminder for Teams
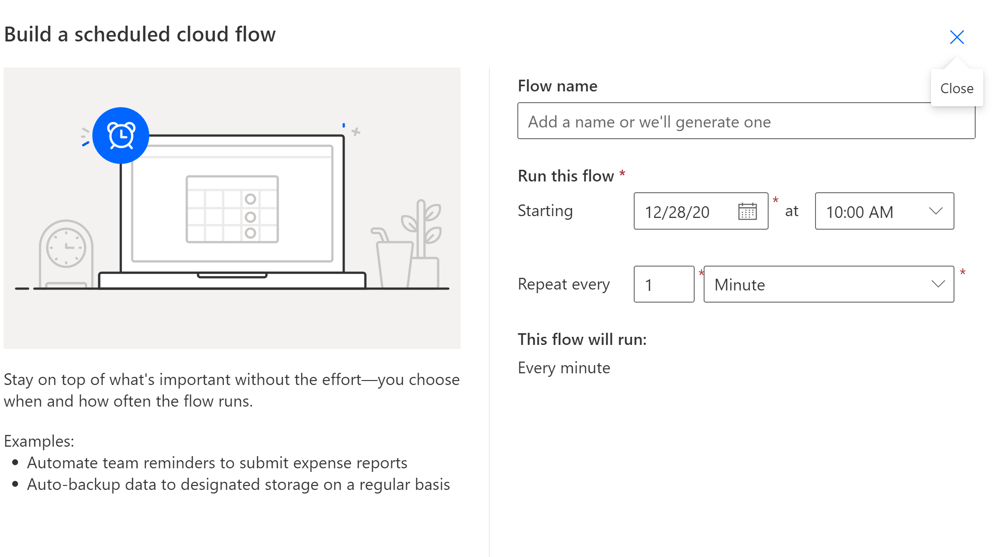
In the drop-down menu, I click "Scheduled cloud flow."
Pic. 4

Pic. 5
Power Automate Reminder for Teams
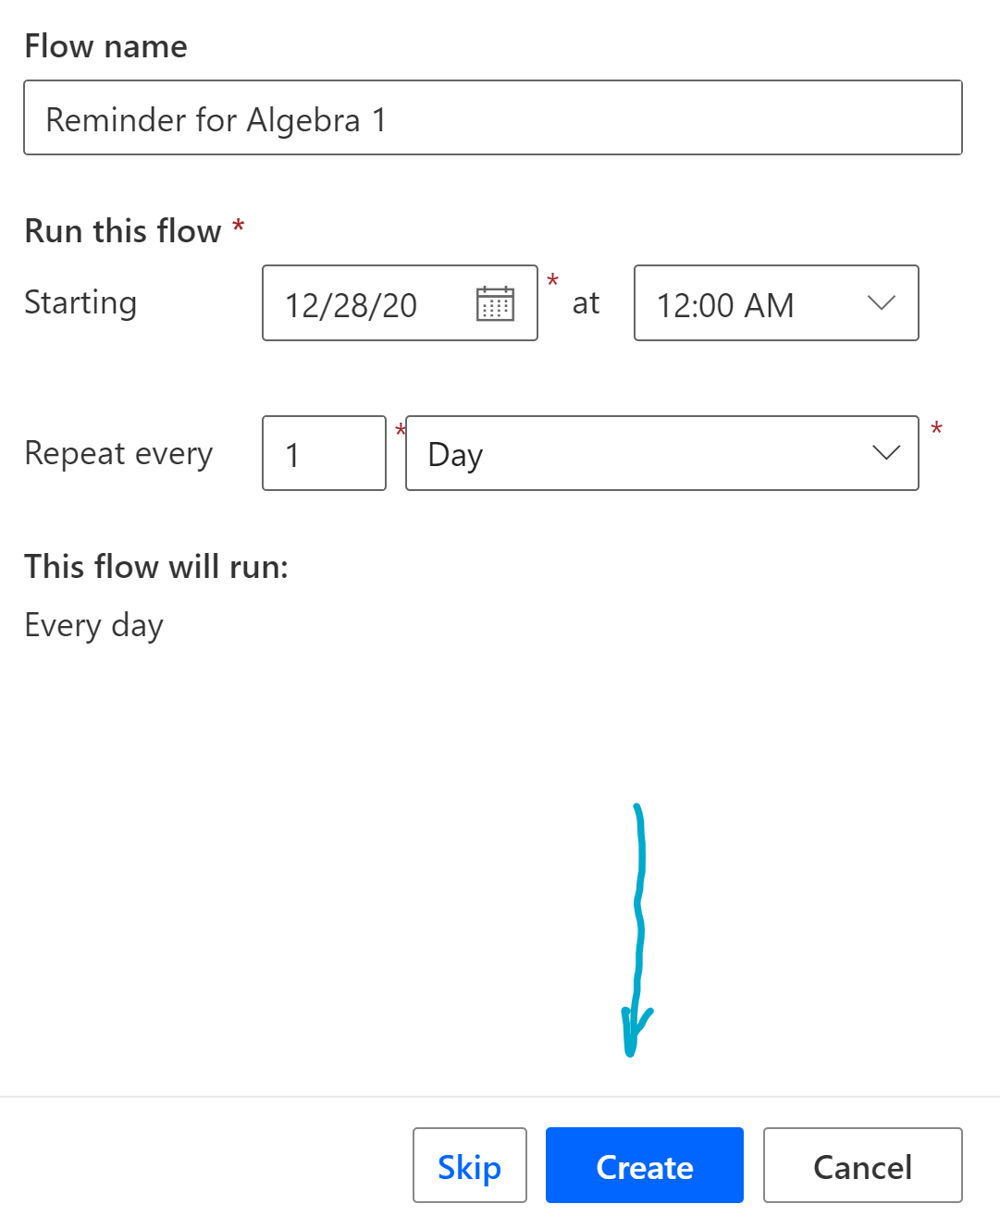
The above form is used to name the flow, indicate the date and the exact time to run, and the periodicity.
Power Automate Reminder for Teams
Do In this example the choice is "Day". In real practice I use "Week" for periodicity, and some time before the lecture.
Pic. 6

Power Automate Reminder for Teams
I press "Create."
Pic. 7
Pic. 8
Power Automate Reminder for Teams
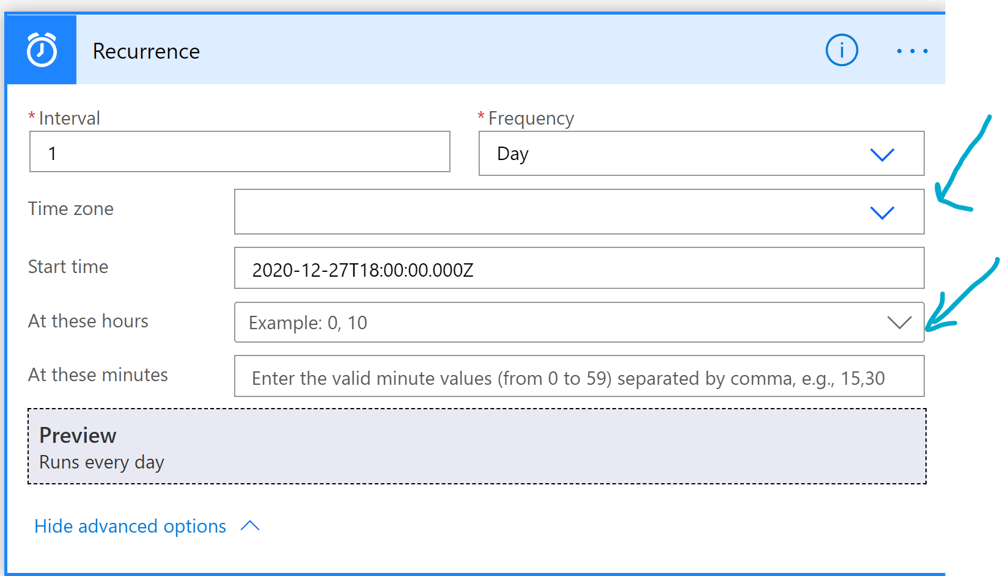
To chose the Time Zone I press "Show advanced options." The Time Zone must be equal the Time Zone of the teacher's location.
Pic. 9
Power Automate Reminder for Teams
The start time must be less than the scheduled time of the reminder.
Power Automate Reminder for Teams
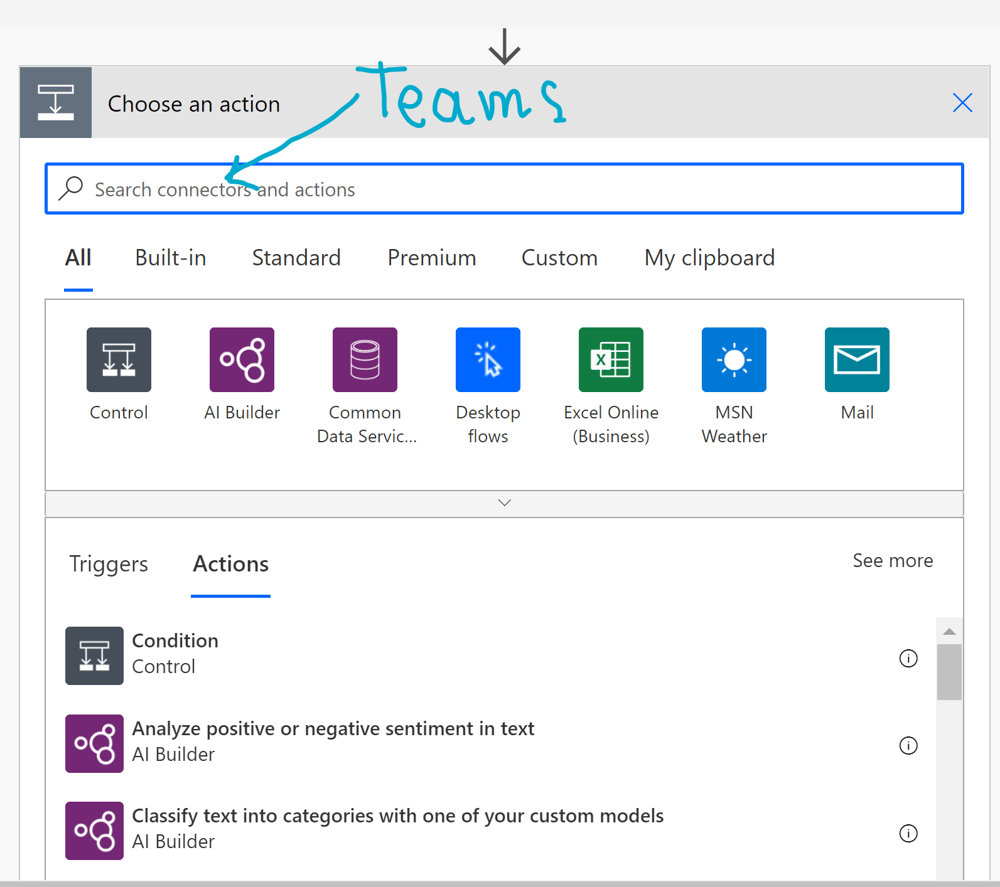
I press "+ New step" and type "Teams" in the search window.
Pic. 10
Power Automate Reminder for Teams
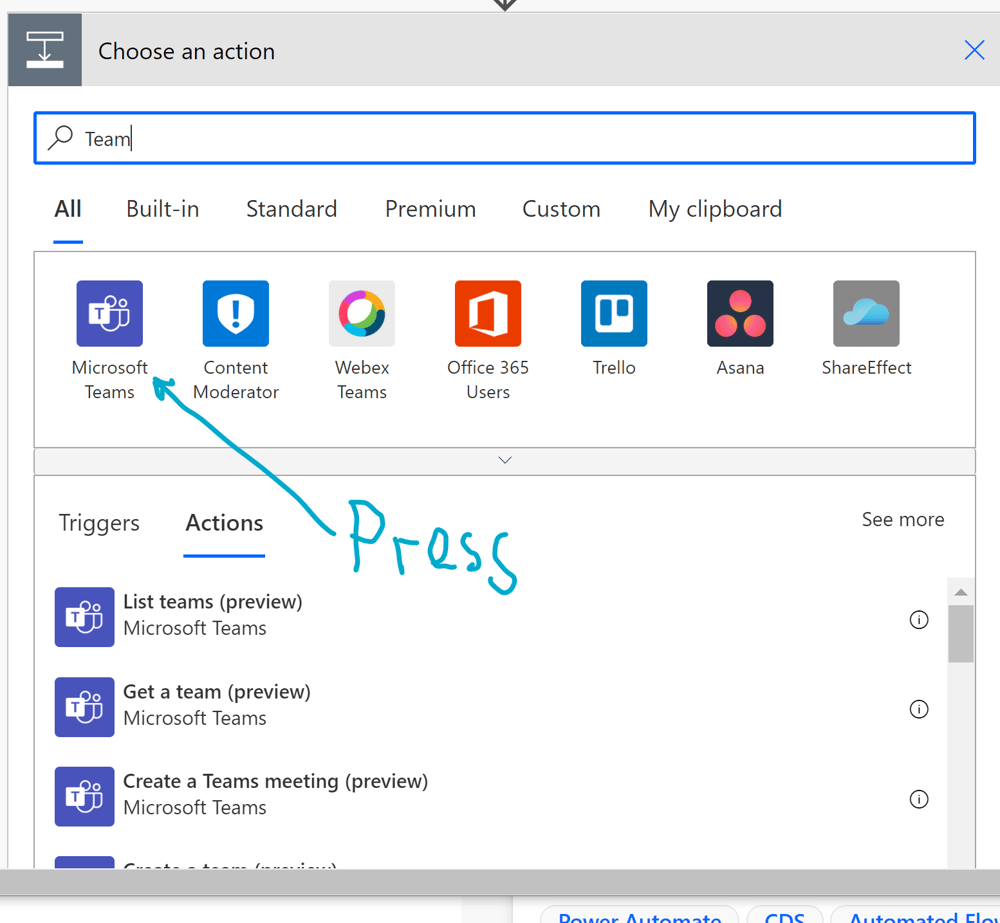
I click the icon "Microsoft Teams."
Pic. 11
Power Automate Reminder for Teams
I press the action "Post a message (V3) (preview)
Pic. 12
Pic. 13
Power Automate Reminder for Teams
I choose the correct values from the drop-down menus and fill in the message and the subject.
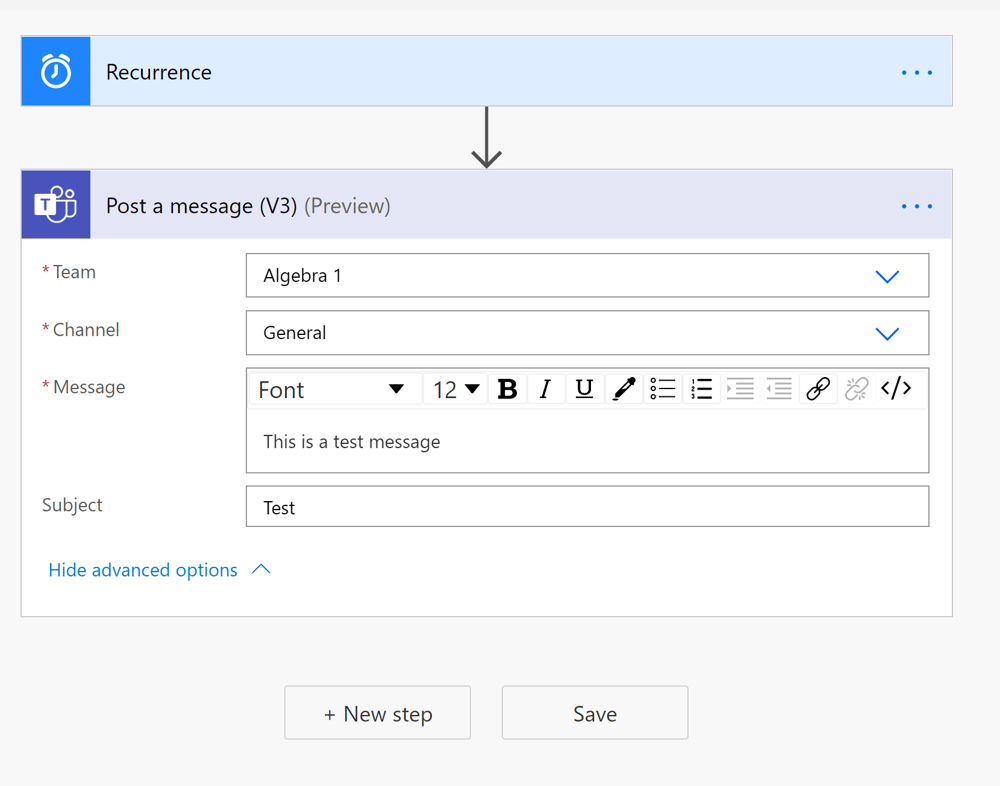
Pic. 14
Power Automate Reminder for Teams
I click "Save."
Power Automate Reminder for Teams
It is necessary now to run a test.
Pic. 15
Power Automate Reminder for Teams
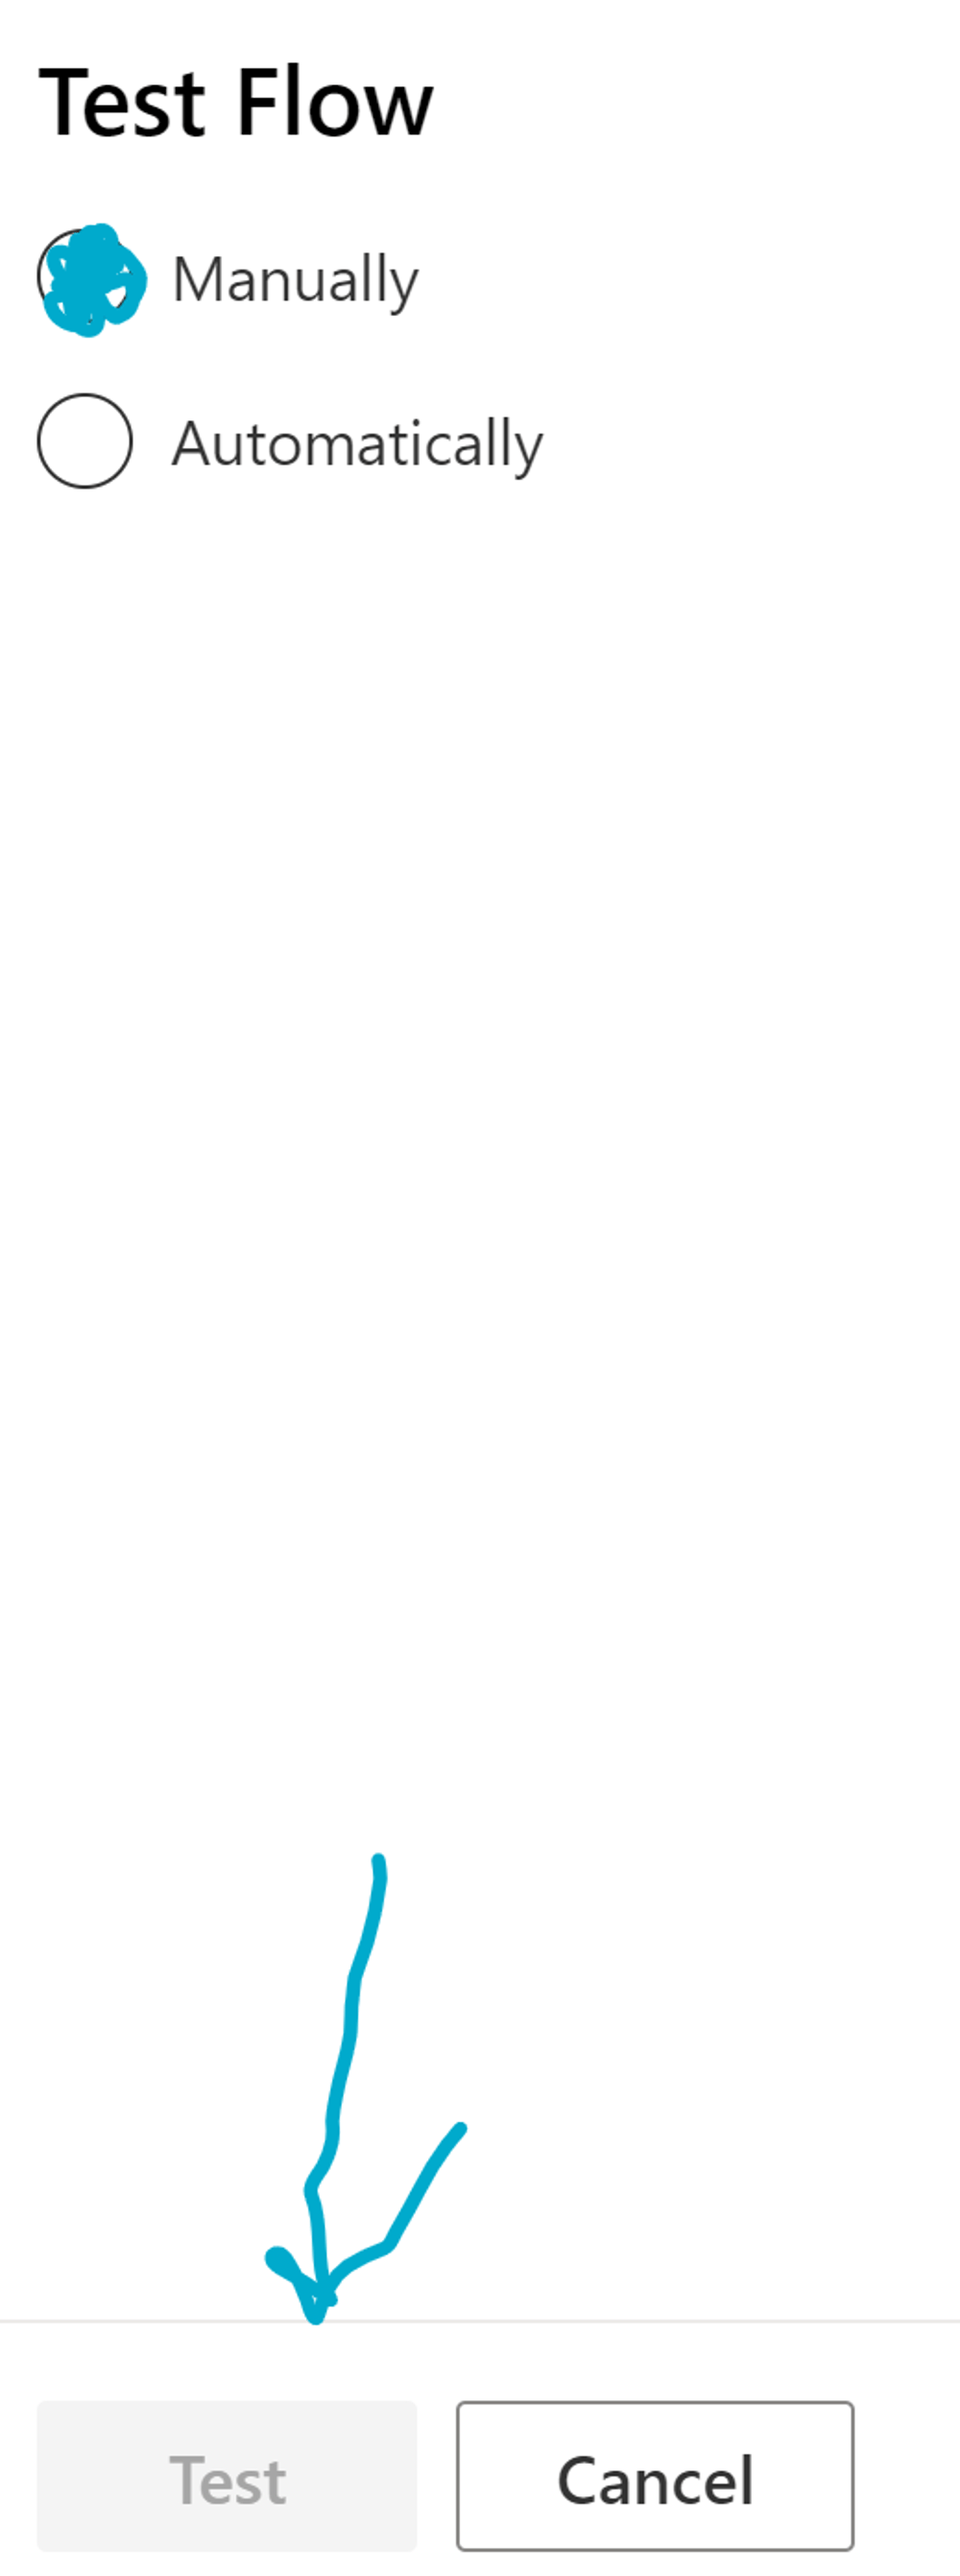
The test should be run manually.
Pic. 16
Power Automate Reminder for Teams
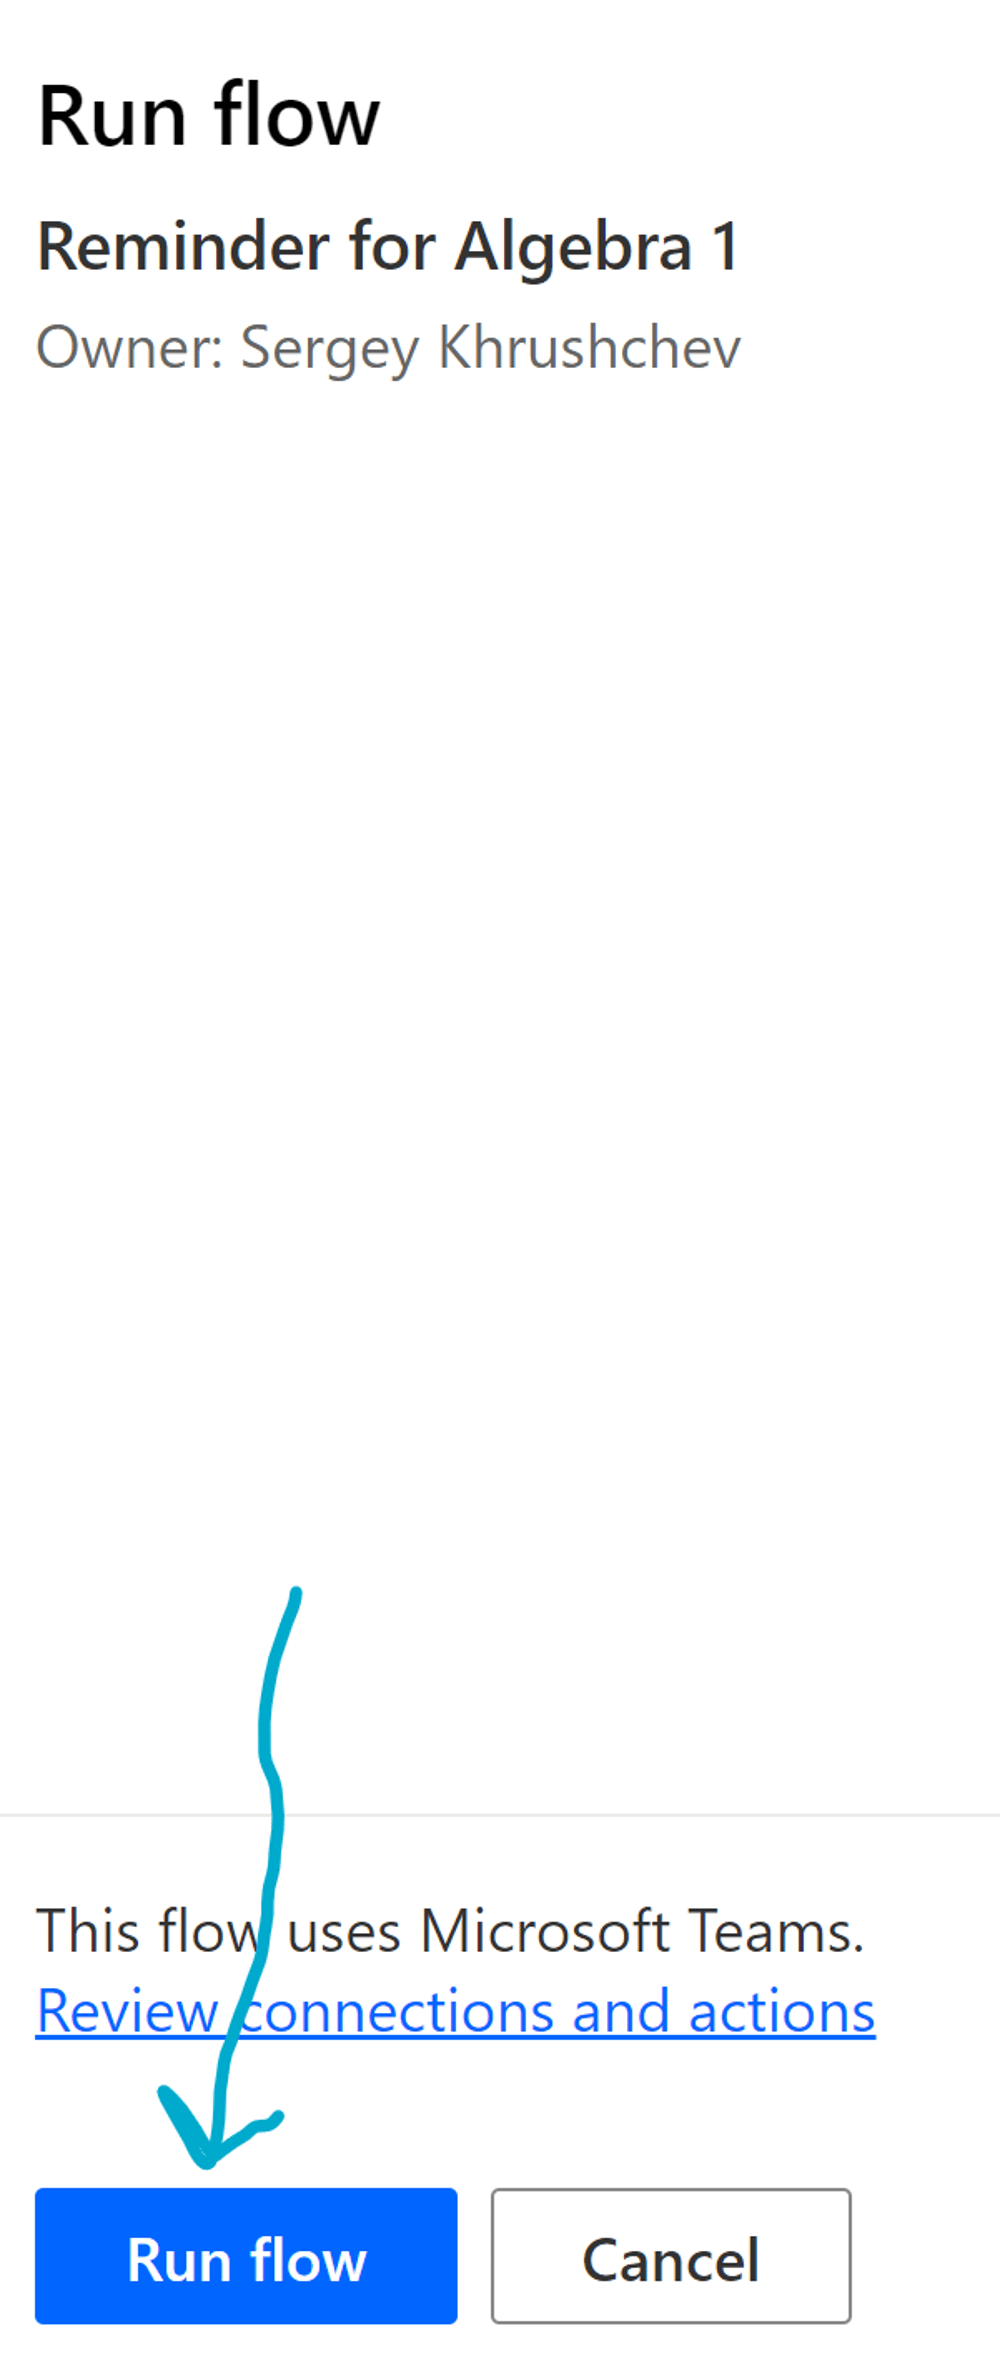
I confirm that I am going to run this flow.
Pic. 17
Power Automate Reminder for Teams
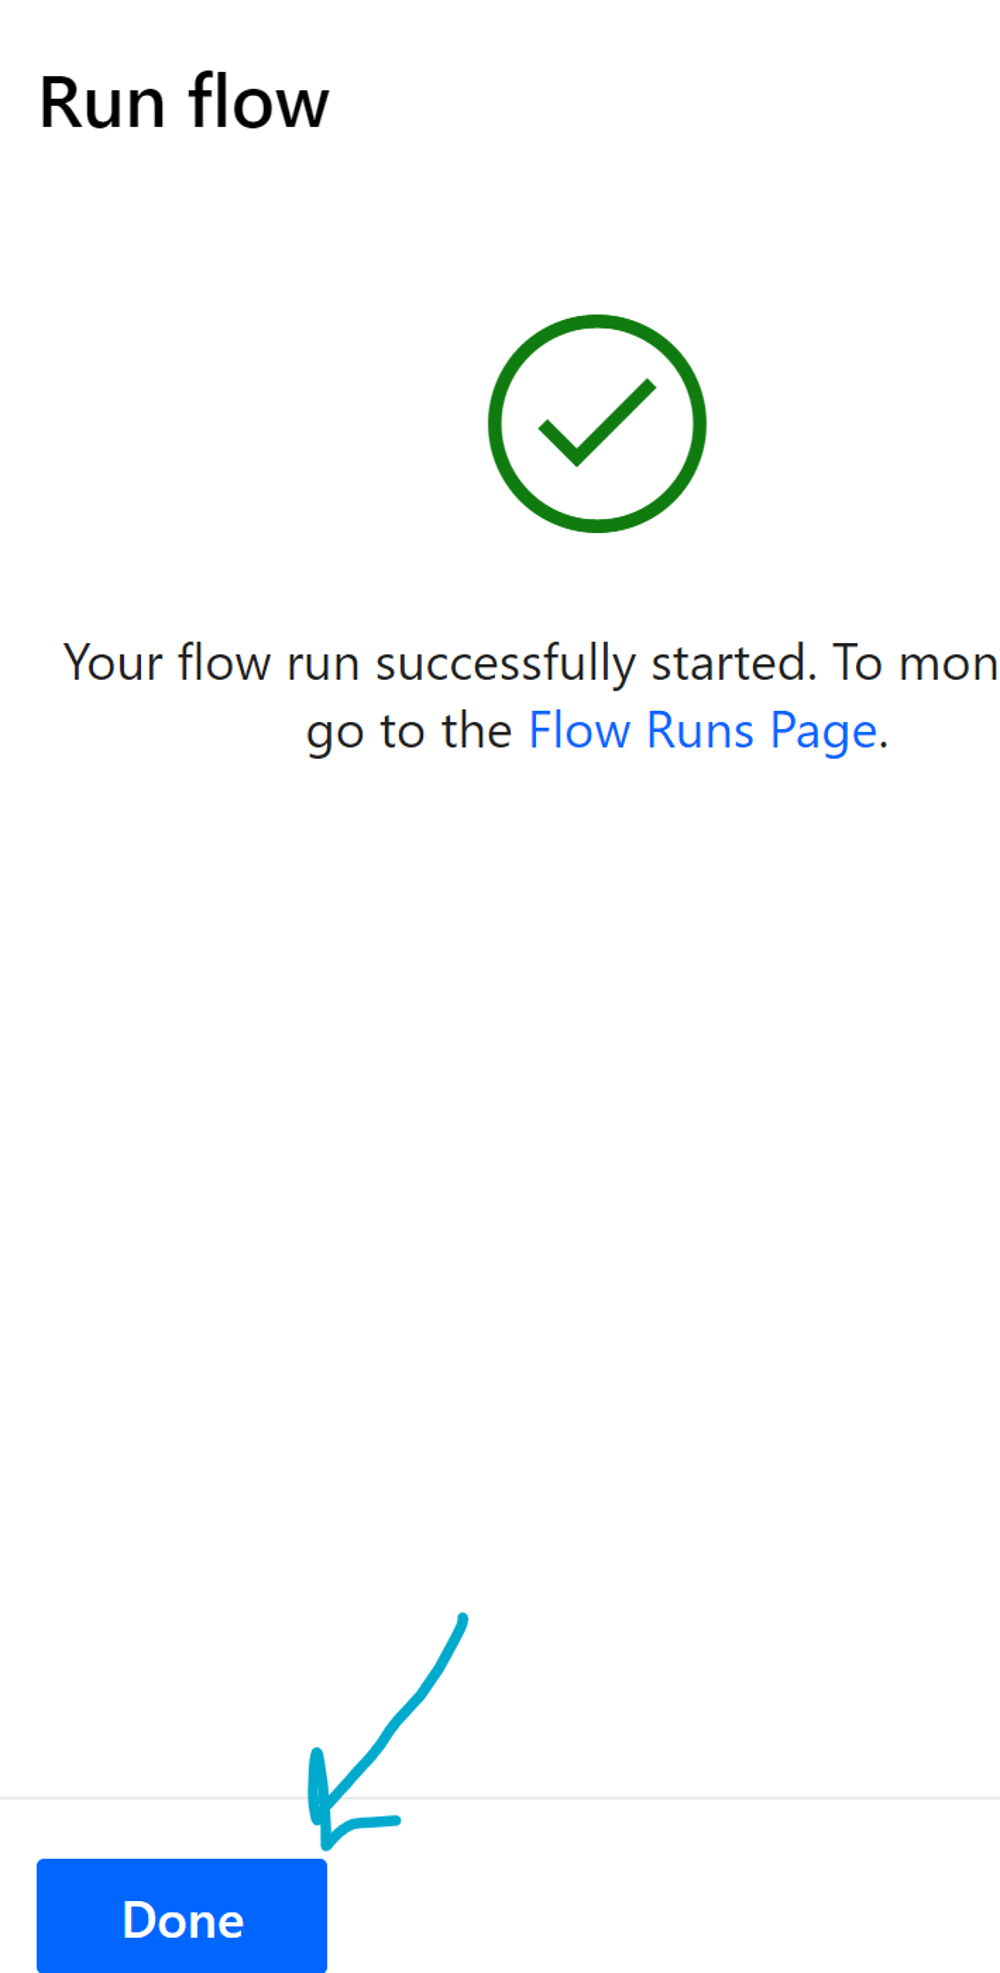
Since the flow was successful, I press "Done."
Pic. 18
Power Automate Reminder for Teams
The Team got the message, which was sent by my flow.
Pic. 19
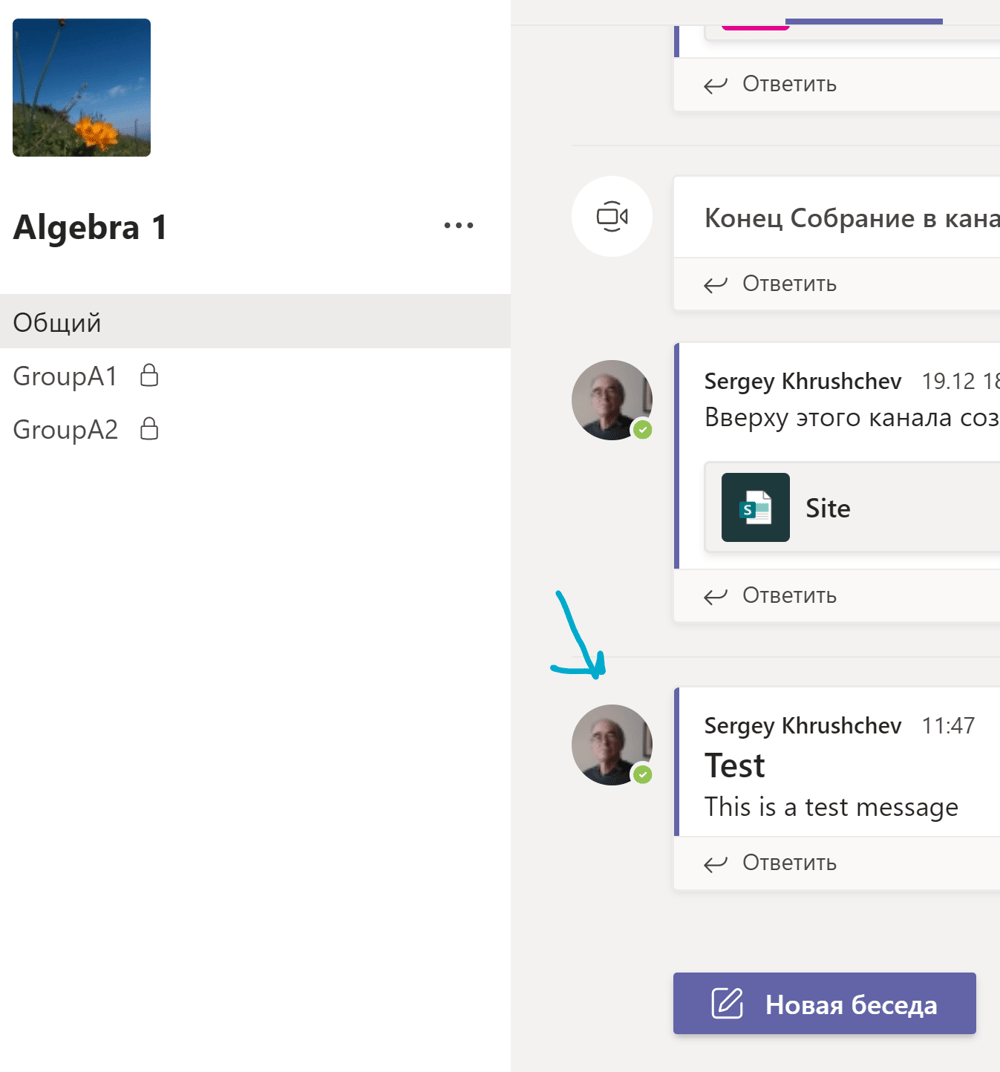
Pic 20.
Power Automate Reminder for Teams
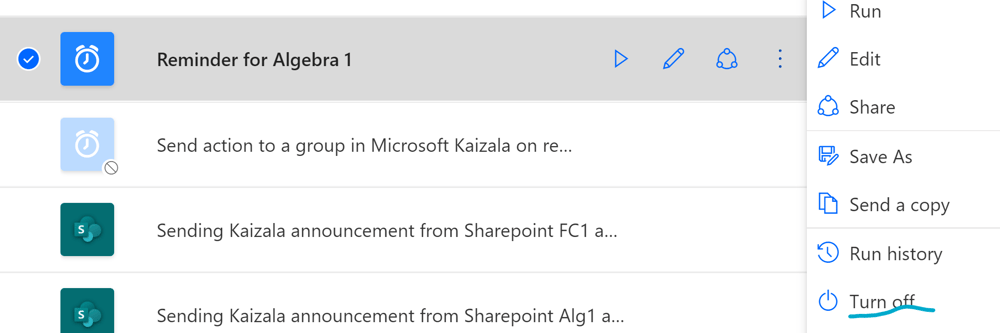
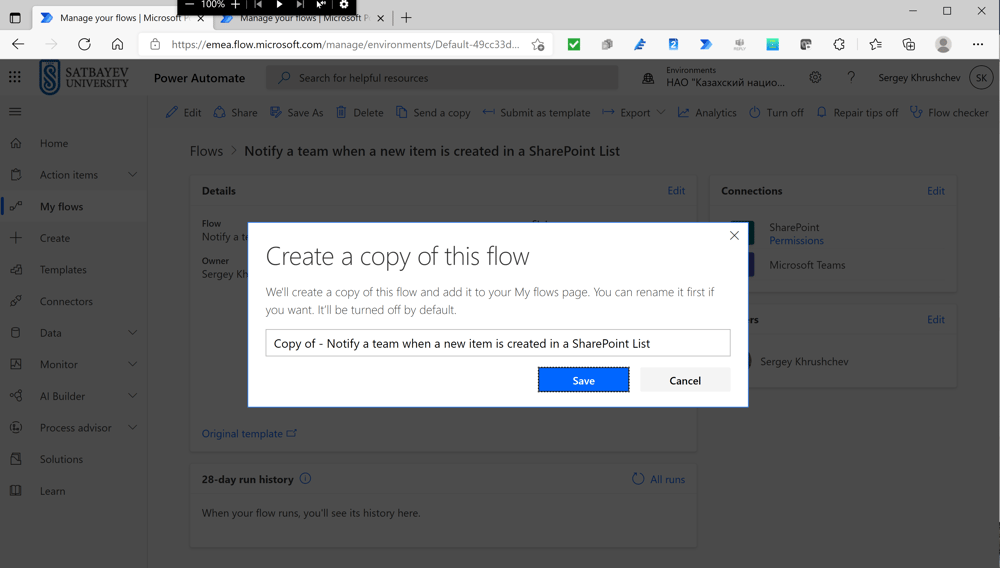
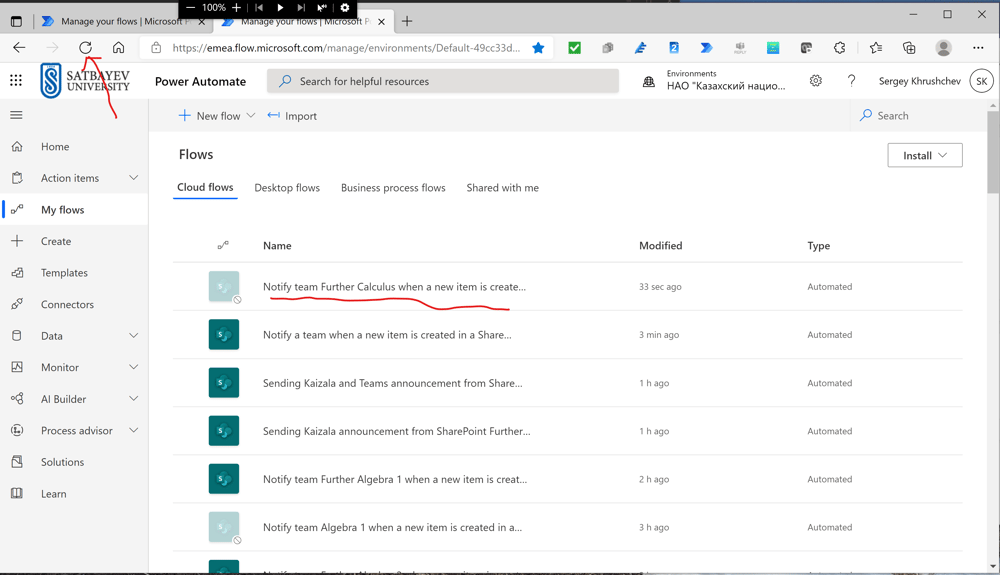
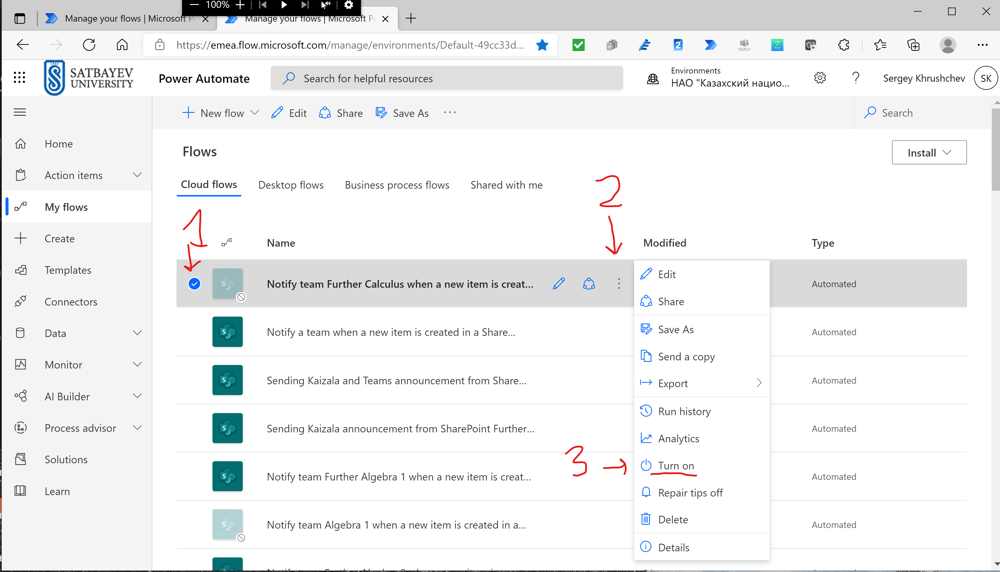
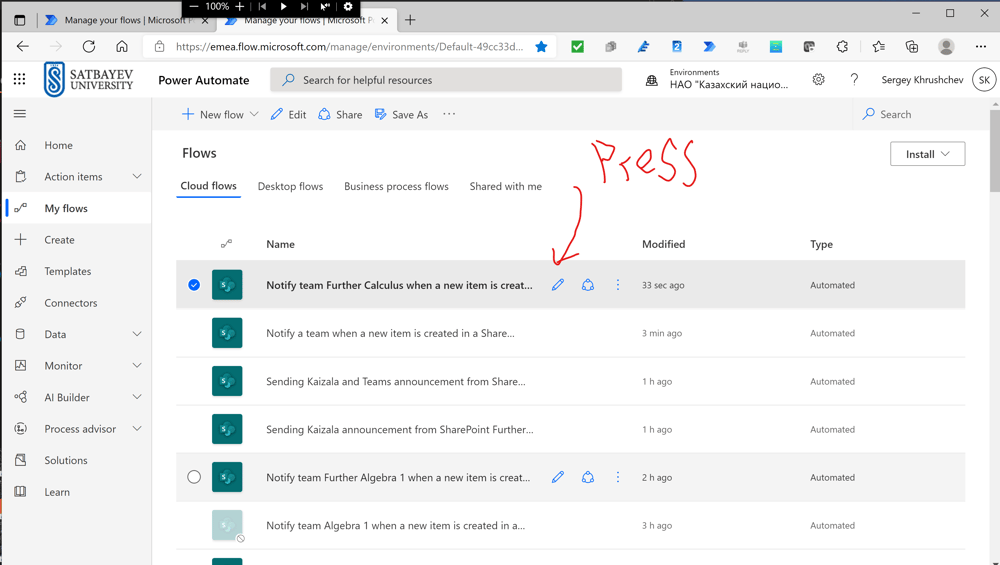
My flow appears at the top of my flow's list. If I click the vertical ellipsis, then I get a long list of the options available. In particular, I can save this flow with a different name. This is convenient if I have a number of classes to arrange reminders. Then I can just edit a copy of my flow. I can run the flow and turn it off and on.
Power Automate Reminder for Kaizala
In Online Teaching which models the Full-Time one, there must be three important components - Classes, a Site and Messenger. Microsoft Teams, and more generally Office 365, provide everything required for the full education in classes. The SharePoint is the unique site associated with every Team. A teacher can place here some news, including the Countdown Timer for the next important event in the class. Both these services have a number of facilities for the correspondence with students. However, the fastest way is a messenger. The messenger Kaizala Pro, which is included in the A3 license, exceeds by its functionality any other messenger on the market. Kaizala Pro is defended by Azure, has video and audio Internet calls, and has special functions called actions. One of them is called Announcements. I describe here how to create an automate which delivers announcements to the Kaizala group by adding a row to a special Microsoft List in SharePoint of the class.
Step 1. We create a Microsoft List in the SharePoint of the class.
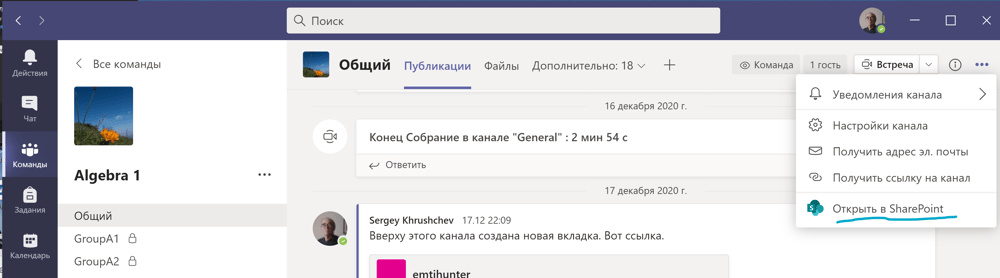
Pic. 22 Open the Team, in this case "Algebra 1," and in the top menu click on ellipsis, then click on "Open in SharePoint."

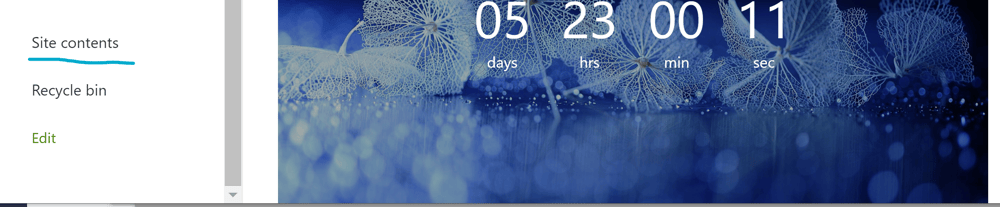
Pic. 23 Once in SharePoint, go to the "Home" tab (see Pic. 23) and then to "Site content" (see Pic. 24.)
Pic. 24
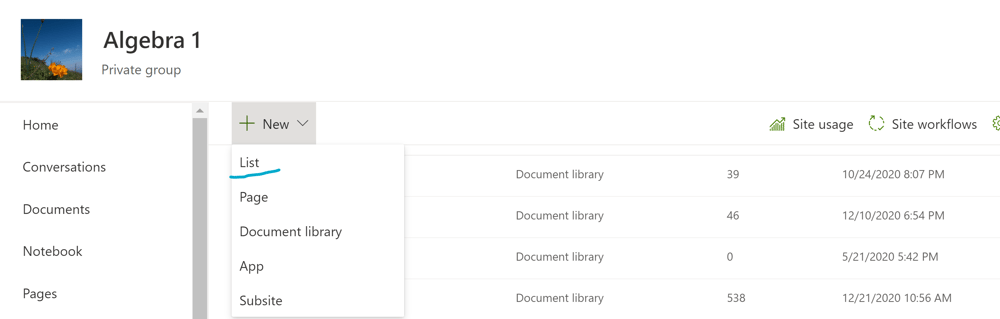
Pic. 25 Click on "+ New" and select "List" in the drop-down window (see Pic. 25.)
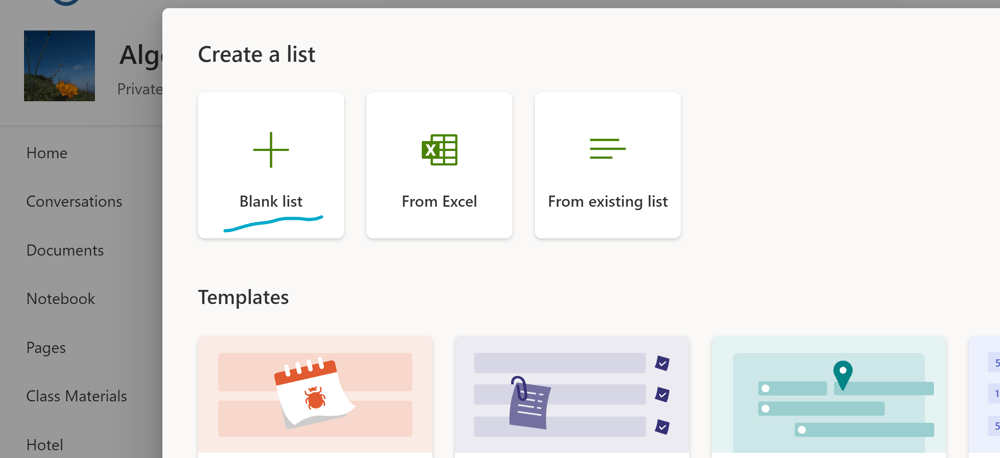
Pic. 26 In the "Create a list" window, click on "+ Blank list" (see Pic. 26) and in a new window in the first line "Name" enter a matchless name for the list, in this case "Announcement Algebra 1" (see Pic. 27.)
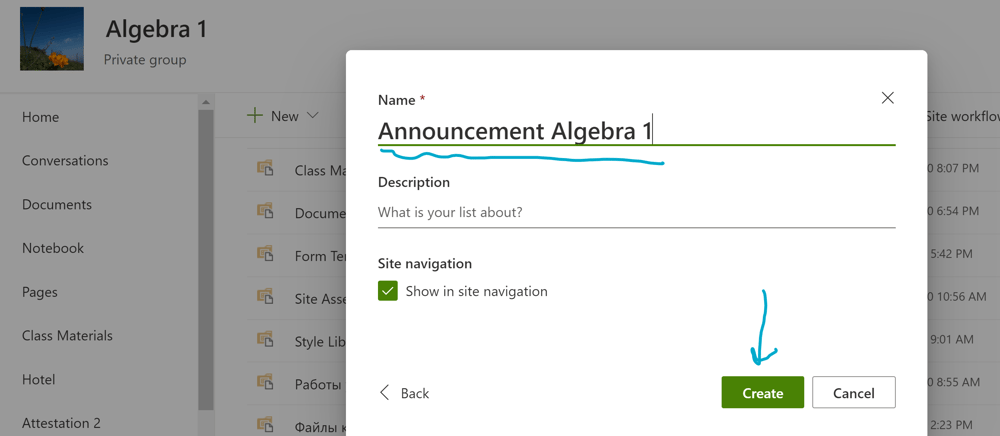
Pic. 27 Microsoft Lists contain all lists and therefore, the name of the list must be unique. This requirement existed before the launch of Microsoft Lists, as lists were used to export data to Excel. Press the "Create" button and get into the template for creating lists, which contains a non-movable column "Title" (see Pic. 28.)
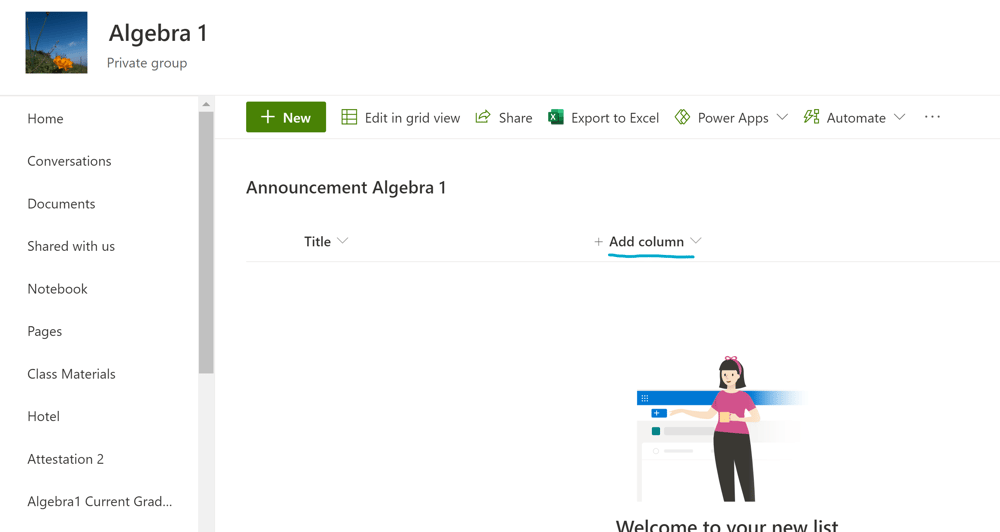
Pic. 28 By successively clicking on "+ Add column" create two columns named "Attachments Alg1" (see Pic. 29), "Announcement body (description)" (see Pic. 30), and "Date and time" (see Pic. 31).
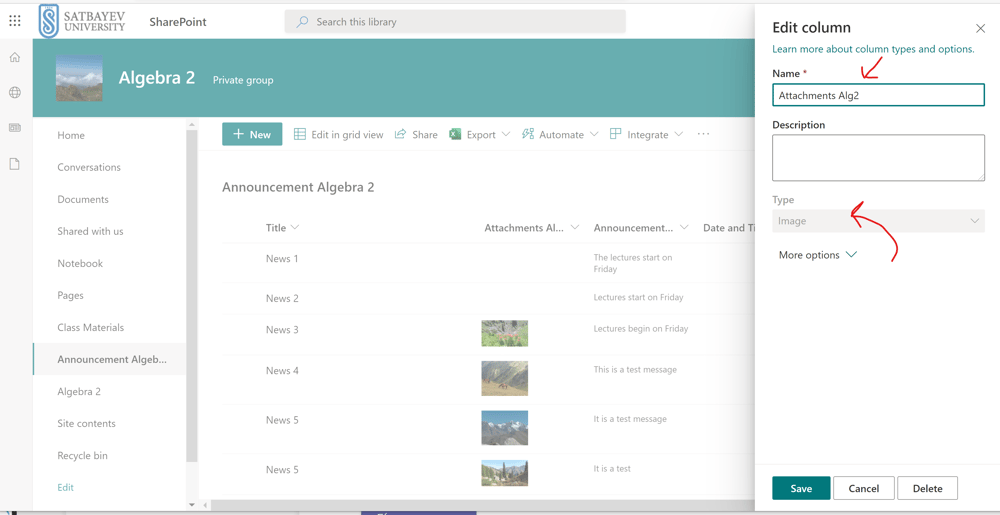
Pic. 29 This is a picture of a class created later. The name of the second column is "Attachments Alg1" and its type must be "Image." This image will not be sent. Instead it is used to to mark the rows.
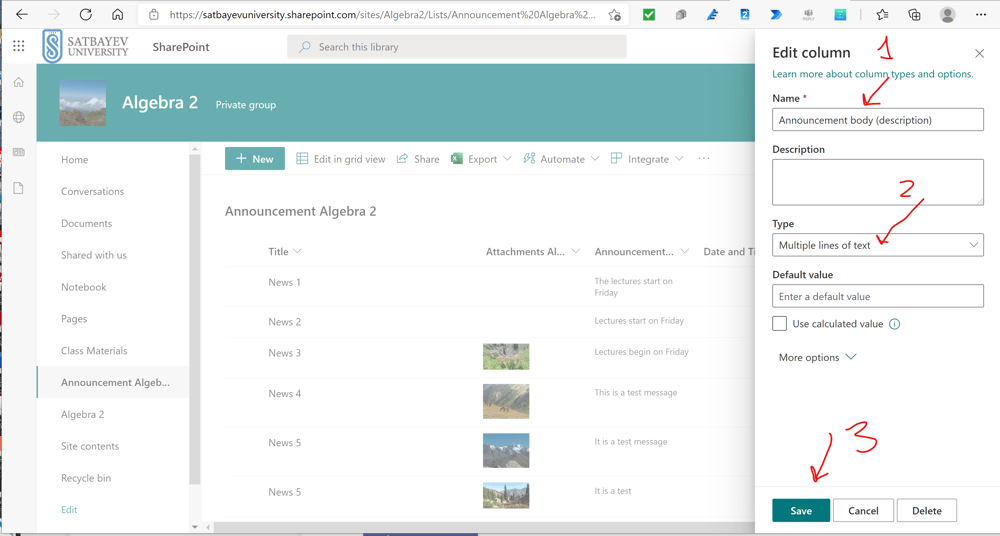
Pic. 30 The name of this column is "Announcement body (description)." Its type is "Multiple lines of text." I write messages in this column. In addition, I can add pictures or files to it.
Pic. 31 The name of the column is "Date and time." It has the type "Date and time." This column is used to fix time when the message was sent. We check that the switches requiring the presence of information in the columns should be in the off position. The switches are visible if you click on "More options."
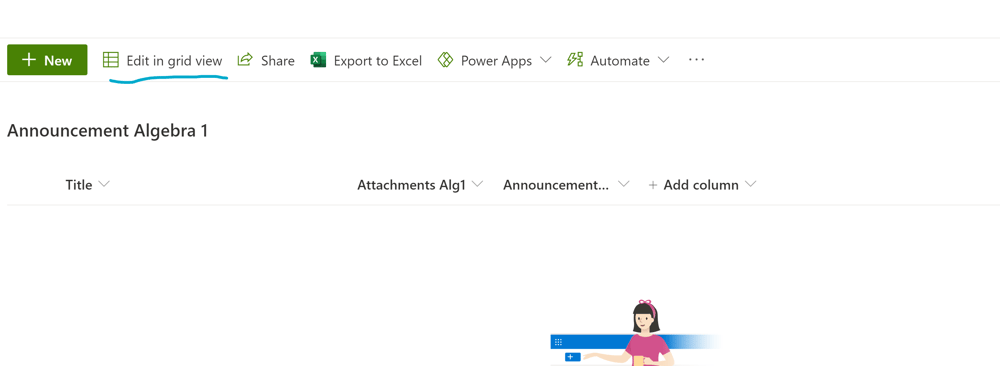
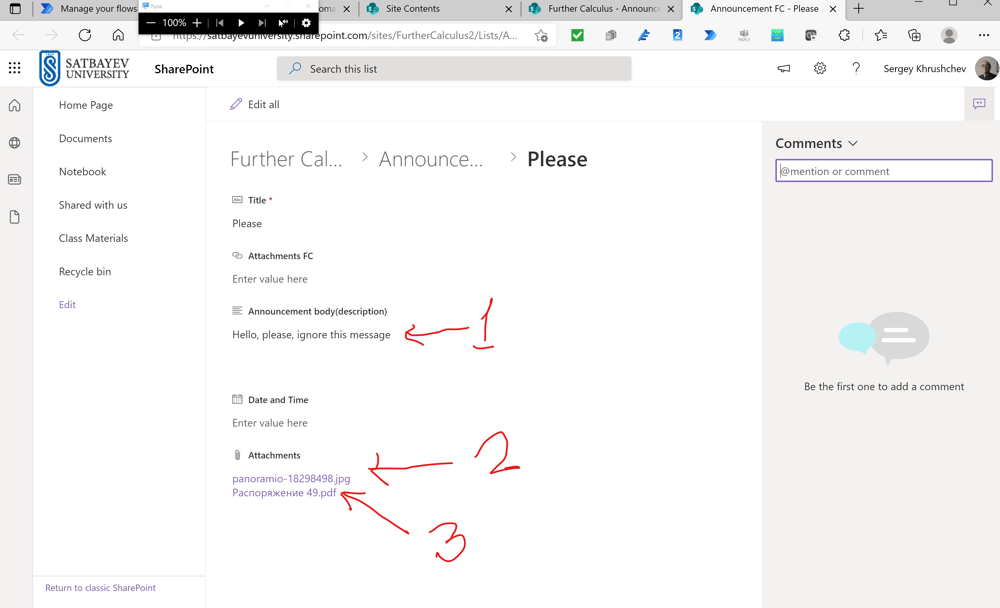
Pic. 32 Lines are added to the resulting list by clicking on "Edit in greed view." Another possibility is just to press the green "+New" button at the left top corner of the list. In this case you can add several pictures to your announcement (see separate picture below). At the end of editing, which consists in filling the opened rectangles in the line or changing the data in the previous lines, you need to click on this place again to save the changes and exit the editing.
This picture shows that you can add photos or documents to your announcement to Kaizala group. It is especially useful if you plan to describe students actions. You may attach several pictures which will be demonstrated if students press arrows on the delivered card in Kaizala group.
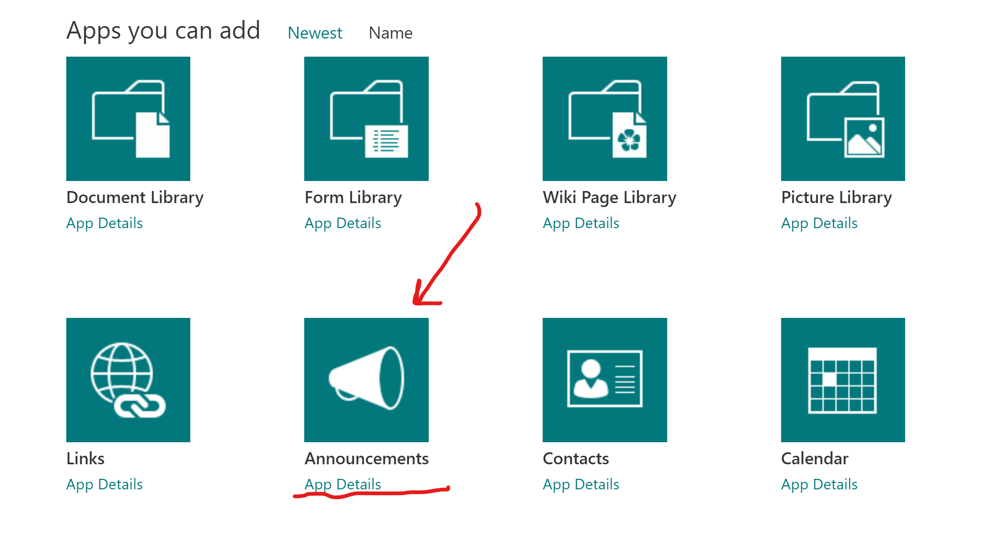
Step 2. Announcement app
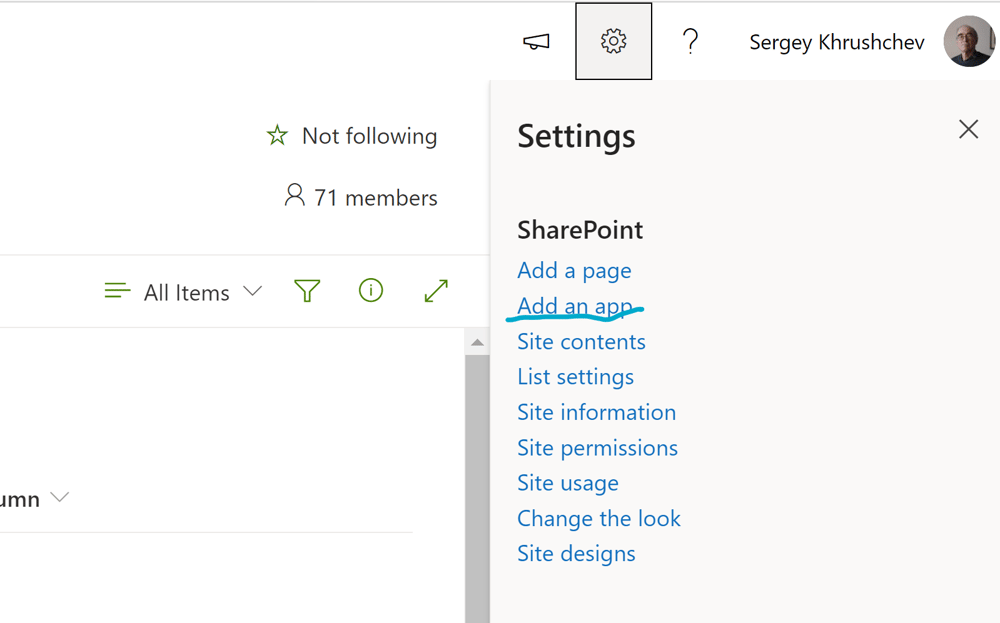
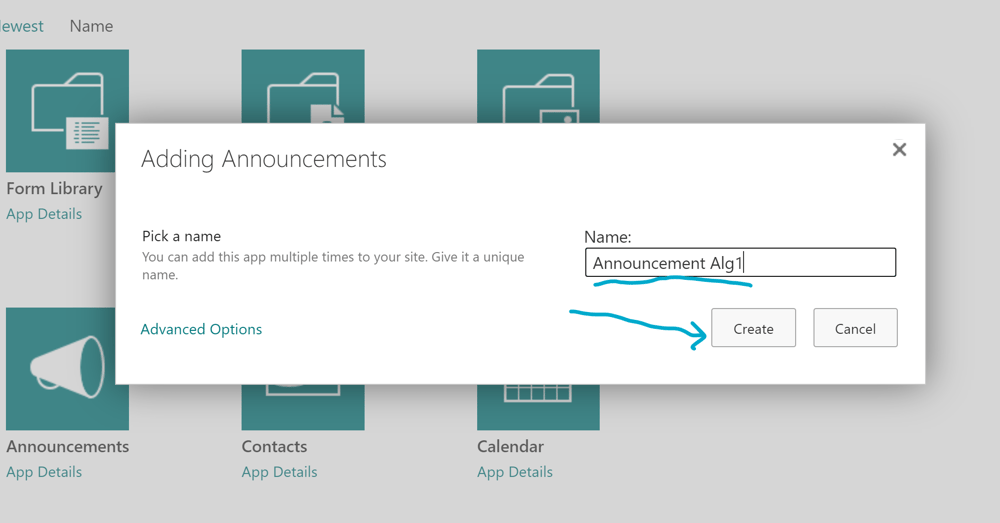
To add an application, open the "gear" at the top of the site and click "Add an app" (Pic. 33.) Then among the applications we find the application "Announcement" (Pic. 34), click on it and give it a new name (Pic. 35.)
Pic. 33
Pic. 34
Pic.35
Step 3. A Special Application
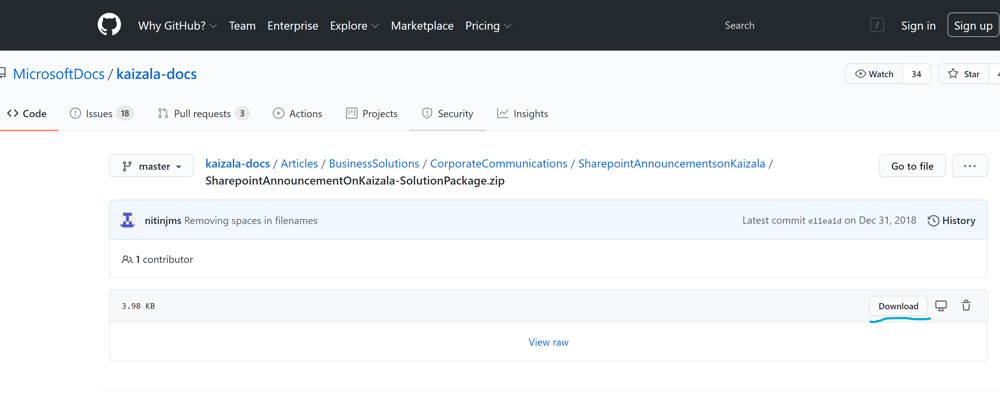
The application can be downloaded from this link (Pic. 36.)
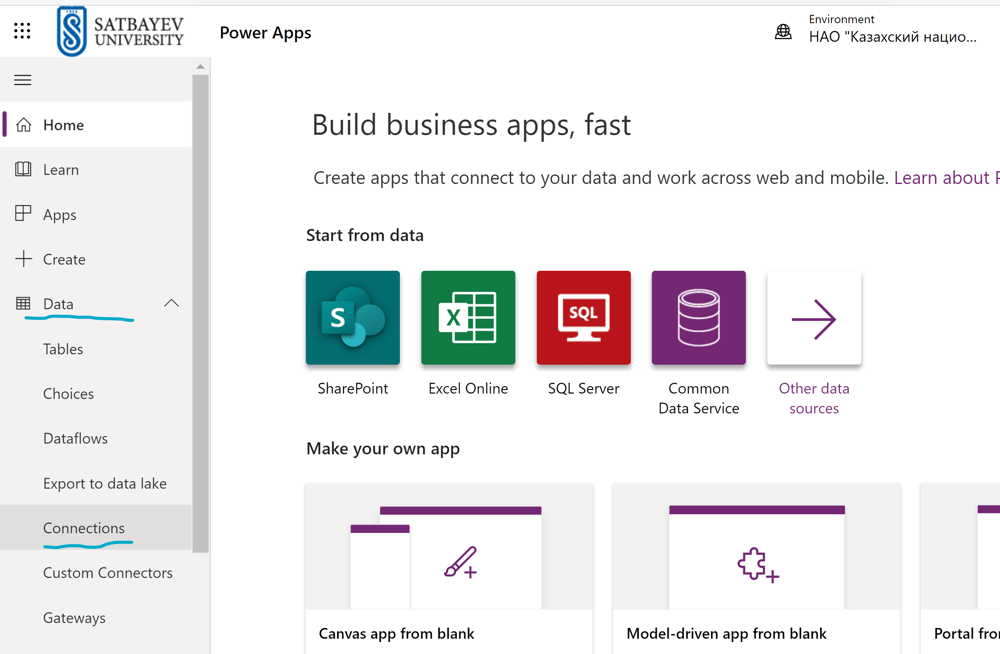
Pic.36 If you have not used SharePoint or Kaizala connectors, you must now add them. To do this, go to Power Apps (Pic. 37), select Data> Connections on the left panel (Pic. 37).
Pic.37
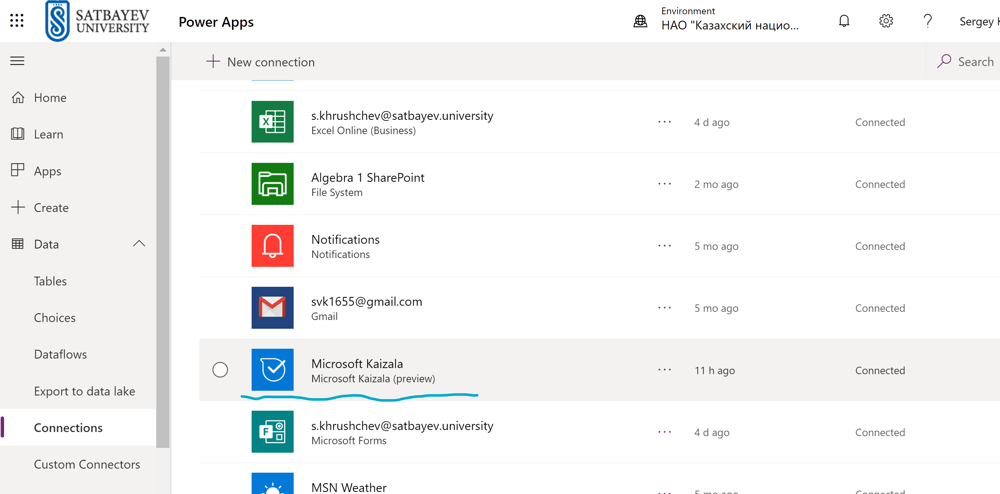
Pic.38 We get a list of all used connectors (Pic. 38-39.) I have both connectors installed.
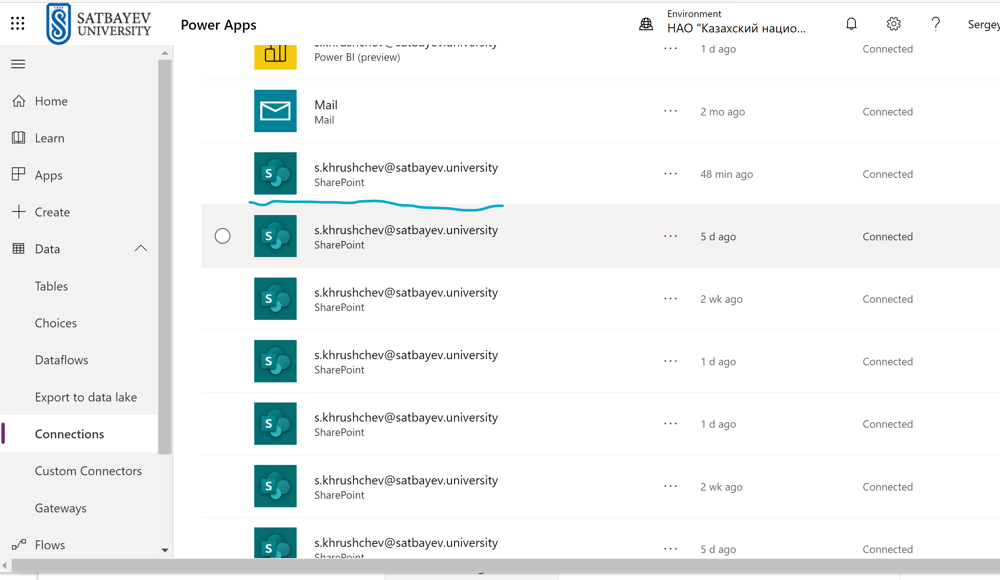
Pic.39 However, you can add them again or install for the first time. Click on "+ New" (Pic. 40), find "SharePoint" in the resulting list of connectors and click on the "+" sign in the line of this connector on the right. Then press on the "Kaizala" connector and repeat this operation.

Pic.40
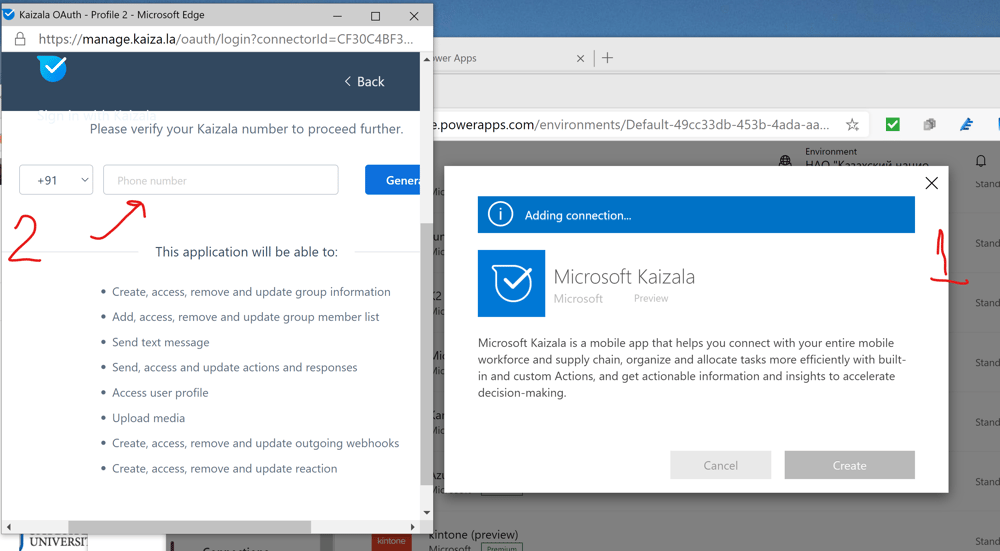
Pic. 41 It is possible that Kaizala will ask a confirmation (Pic. 41). Then you accurately and without errors enter your cell phone number that you registered when creating the team in question in Kaizala and click on the "Generate OTP" button to the right of the phone number. The system sends a one-time password to your phone number, which must be entered in the field at the bottom of this window. After confirmation, the connector will be added to your list.
Step 4. Installation of the Automate
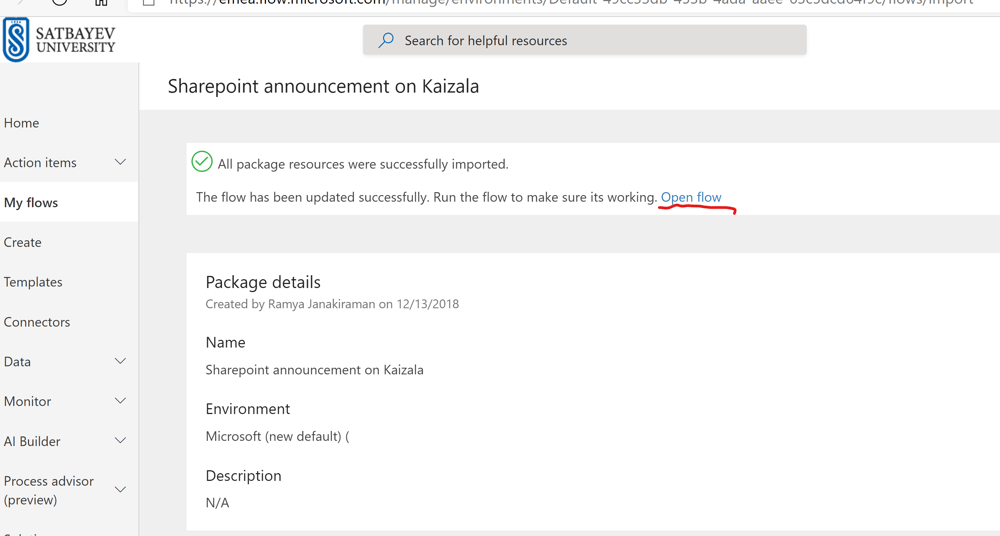
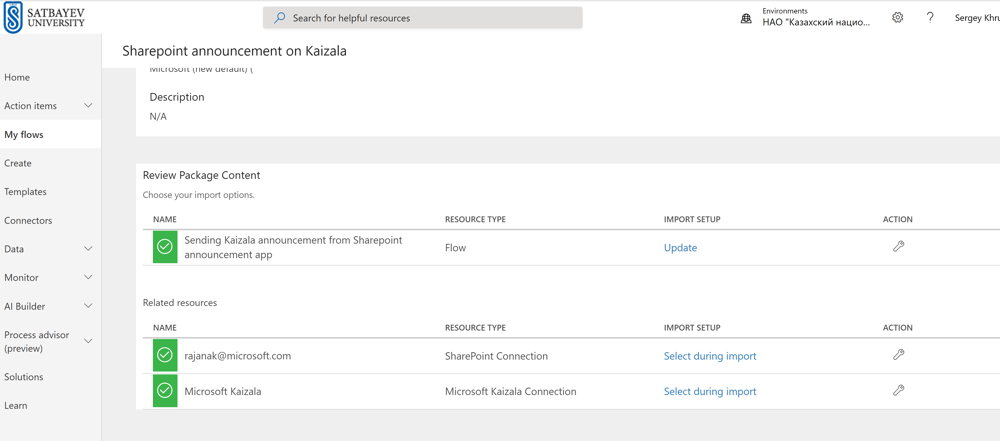
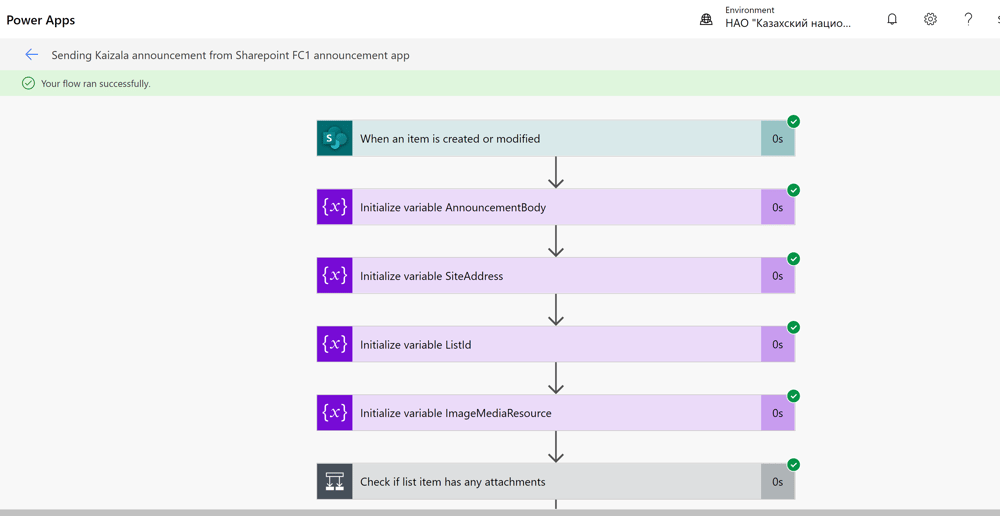
Now, when all connectors we need are installed, open Office 365 and click on "Power Automate" (Pic. 42.) A new window opens (Pic. 43.) The success of the import is indicated by green icons on the left part of the window shown on Pic. 52. Finally, click on "open flow" at the top of Pic. 53. The automate is ready (Pic. 54.)
Pic.42
Pic.43 Click on "My flows" on its left panel (Pic. 43), and in the next window (Pic. 44) click on "Import" at the top.
Pic.44 In the window that appears, click on "Upload" (Pic. 45).

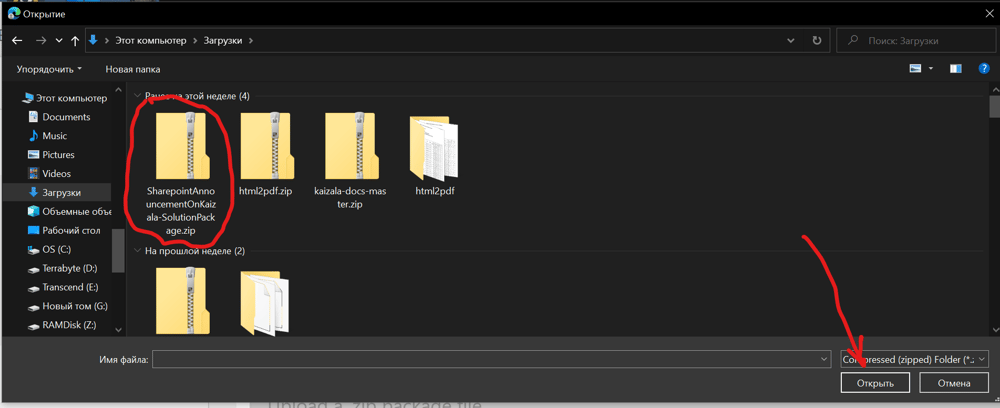
Pic.45 Using the file manager, which appears, you can find the required zip file in the "Downloads" directory. So, go there and find the file you want by its name.
Pic.46 Click "Open" in Pic. 46. The file is imported and a window appears as it is shown on Pic. 47.
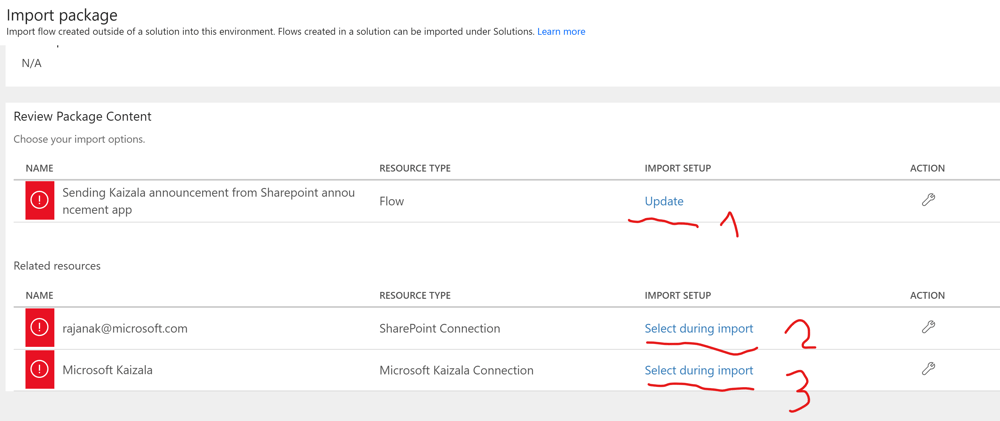
Pic.47 Then you should click on the symbols of wrenches three times in the "Action" column and select the necessary connectors. Since the creation times of the connectors are always displayed, it is easy to find the most recent ones. This selection is made at Pic. 48-50.
Gallery
Pic. 48
Pic. 49
Pic. 50
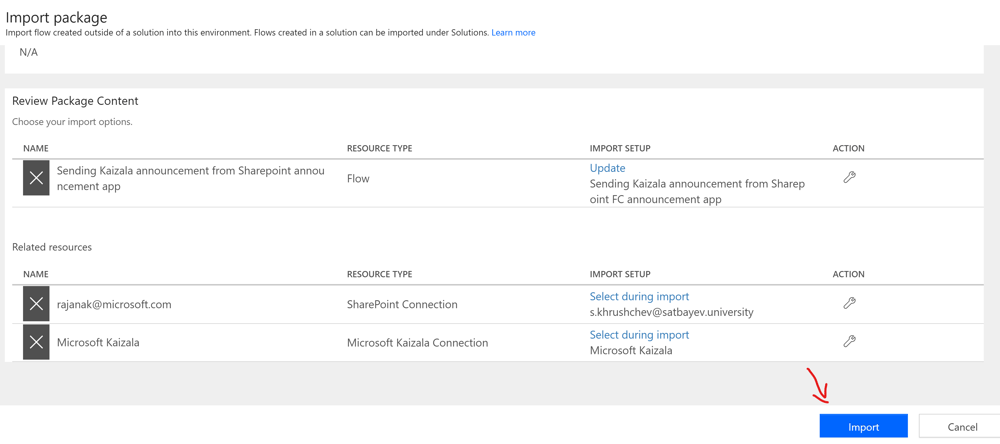
Pic.51 As a result, we get a window on Pic. 51. Click on "Import" in this window and after a few seconds we get the bottom part of the new window (Pic. 52) and its upper part (Pic. 53.)
Pic.52
Pic.53
Step 5. Editting of the Automate
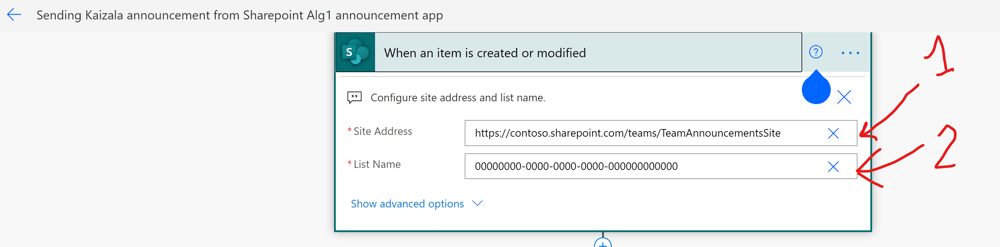
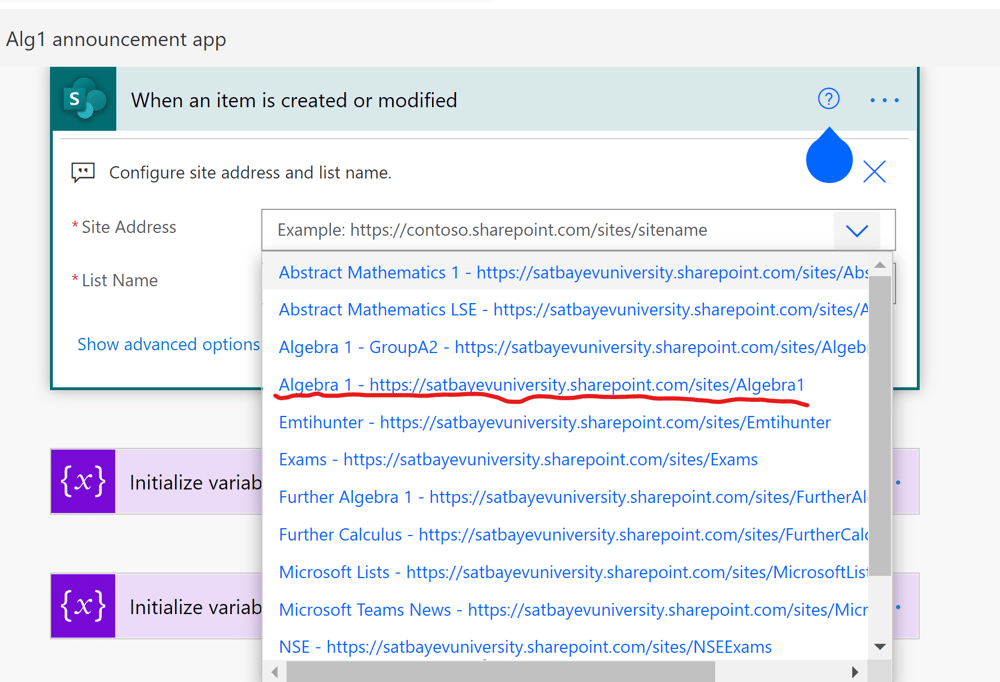
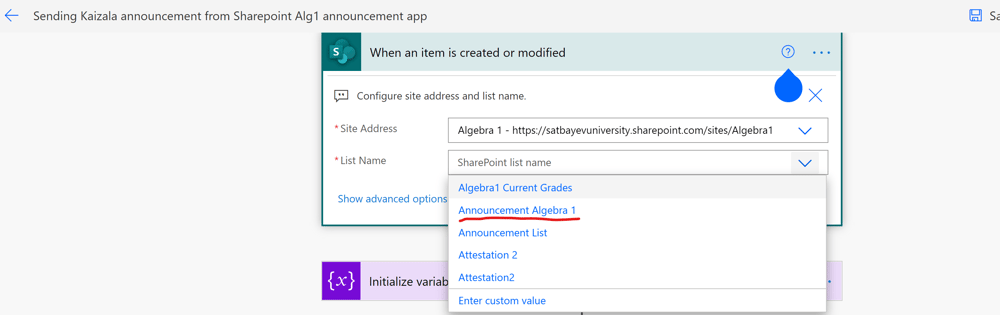
Three blocks marked on Pic 55 must be editted. First, click on "x" marked by "1" in the field. A list of all sites, which are at your disposal, will be shown to you. Select SharePoint site "Algebra 1" (Pic. 56-57). Similarly, a list of all lists available is displayed if you press "x" marked by "2". In this case, select "Announcement Algebra 1", see Pic. 58.
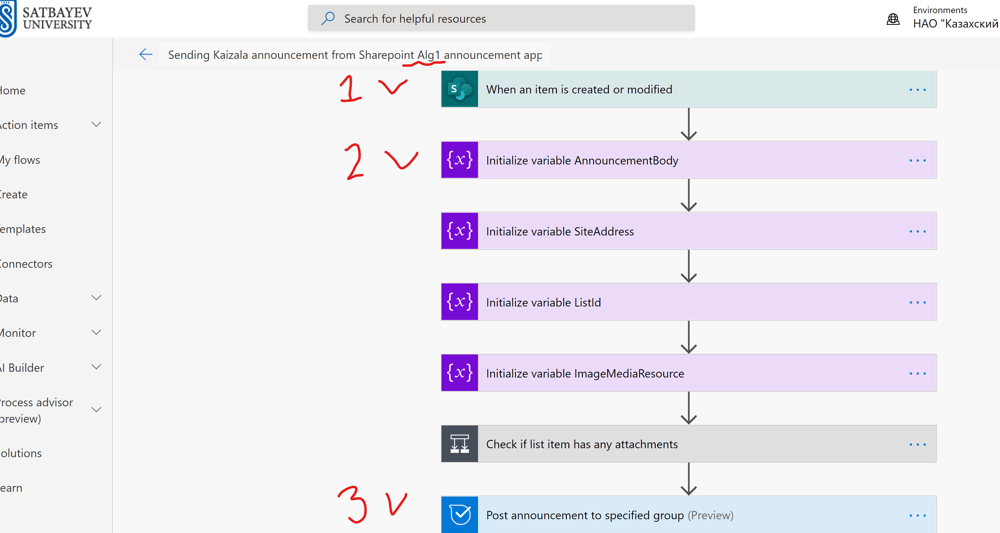
Pic.55
Pic.56
Pic.57
Pic.58
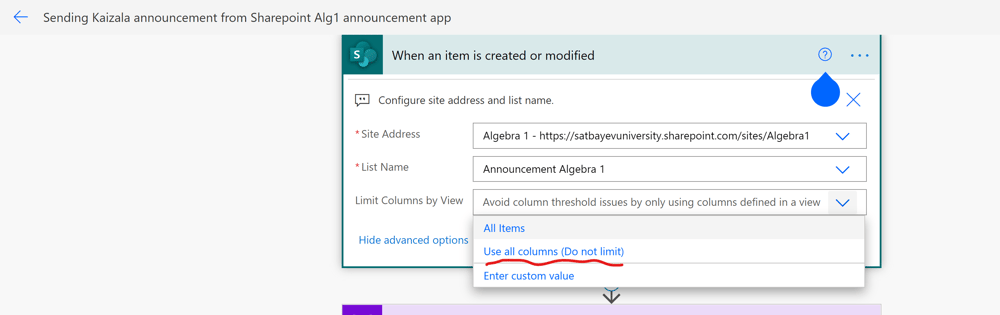
Pic.59 Click "Advanced options" and press "Use all columns (Do not limit)" (Pic. 59).
.
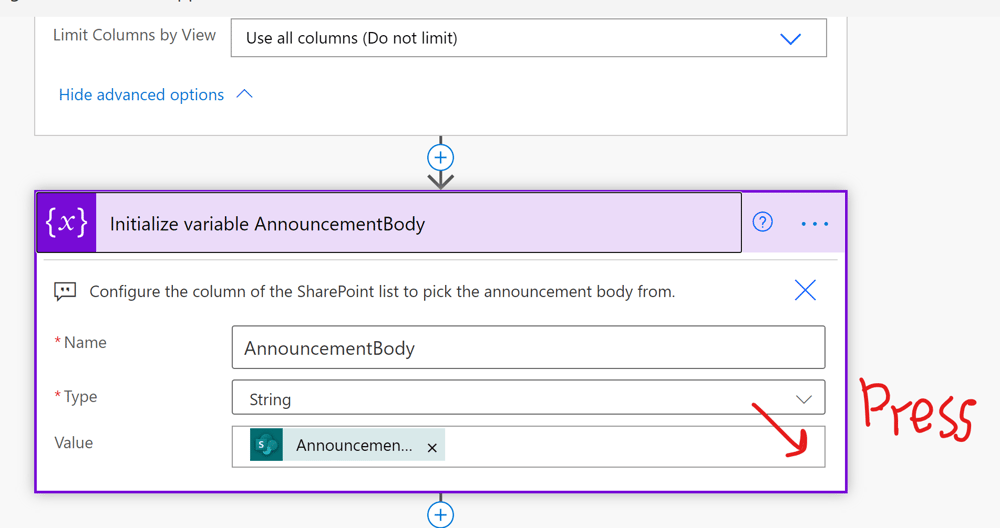
Pic.60 Let's edit the second block of this automation (Pic. 60). Since we have not changed the name of the third column, click on the lower right corner of the third rectangle and in the drop-down dynamic menu click on "Announcement body (description)" (Pic. 61).
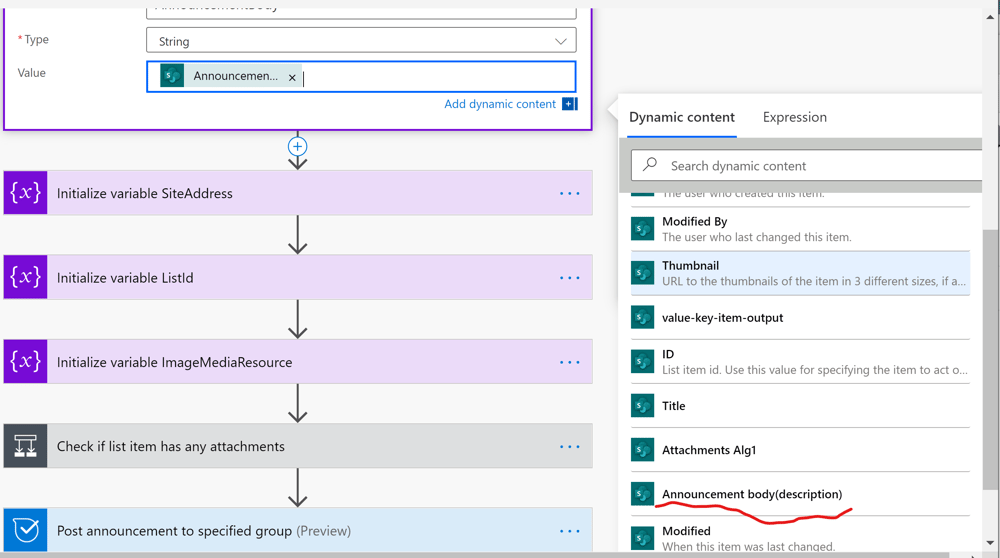
Pic.61
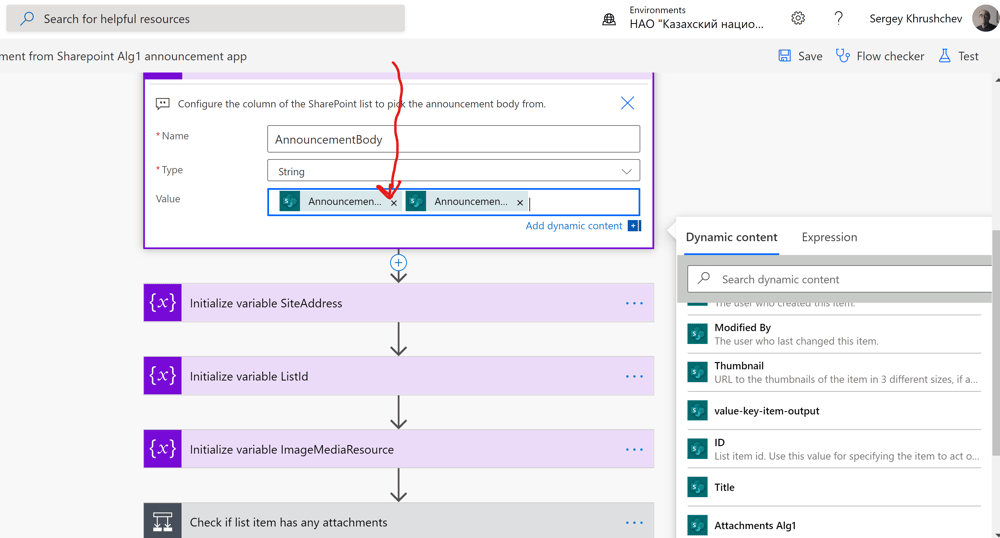
Pic.62 Delete the dynamic value that was there before (Pic. 62).
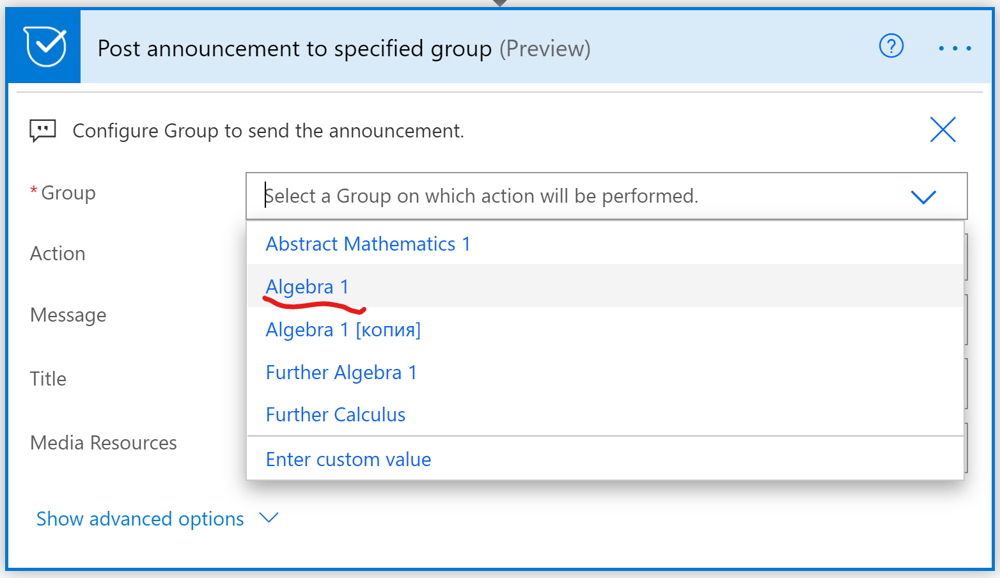
Pic.63 Finally, we configure the third block (Pic. 63) by choosing the Kaizala group required.
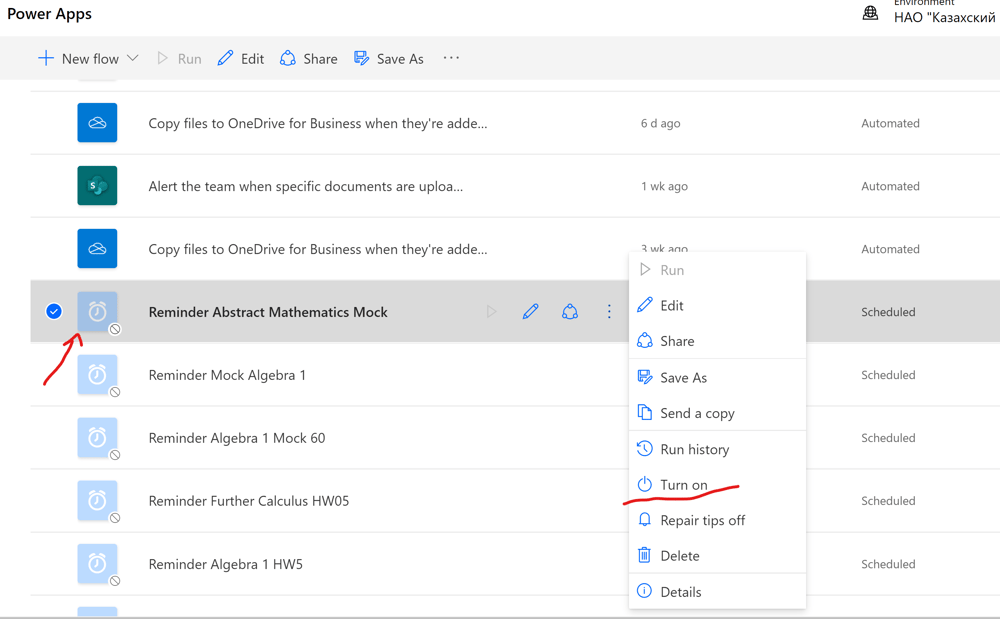
Pic.65 Click "Save" to finish editing. To turn on the automate, go to Power Apps, click on "Flows" on the left panel and get a list of all automates, including the one that has just been created. By default, the automate after the first installation is turned off. This state of the automate is shown by the fogged icon (Pic. 65). To turn it on one just mark the circle to the left of the flow's icon. The time passed since the last turn on is shown in the list of all automates. This feature is very helpful, especially if you have many automates. You click on the right ellipsis and click on "Turn on" in the menu (Pic. 65). The automate comes out of the fog and is ready to go.
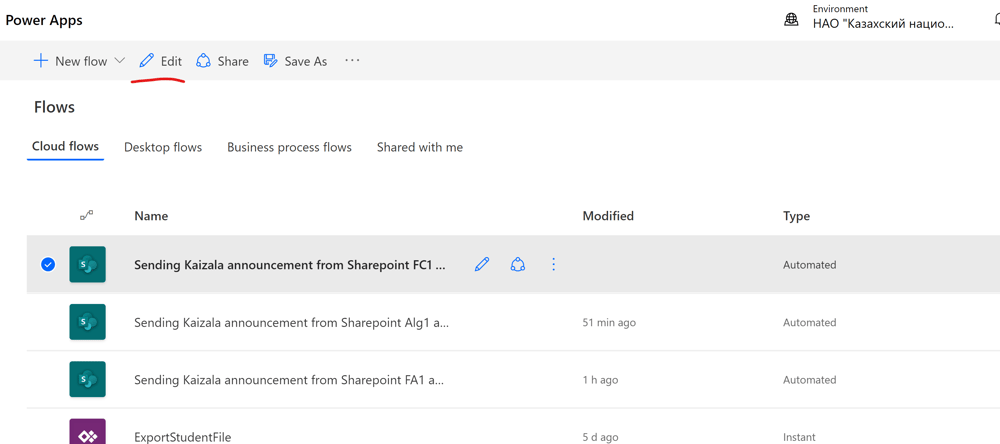
Pic.66 At the very top of the menu I click "Edit" (Pic. 66) and return to the window, in which this automate was constructed (Pic. 67).
Pic. 67 In the upper-right upper corner of this window, we click on the flask sign to carry out a real test (Pic. 68). The previous test only showed that everything is connected correctly inside the automate. Check "Manually" and click "Test" (Pic. 69-70). The result is displayed in window Pic. 71. If the test was not successful, the mistakes can be found by pressing "Flow Run Page". Click "Done" and this automate is ready for work.
Gallery
Pic. 68
Pic. 69
Pic. 70
Pic. 71
Step 6. The Final Test
Now we go to the SharePoint site of Team "Algebra 1" and add a line to the "Announcement Algebra 1" list by clicking on "Edit in grid view" in the top menu of the list. We type the title of the message in the first field and its body in the third. It looks like pictures cannot be attached at the moment since work on Microsoft Lists is still ongoing. To finish editing, we click on the same field, so that "Edit in grid view" is seen again. The automate detects a fresh line in the list under its control and sends a new message to the whole Kaizala group of this class.
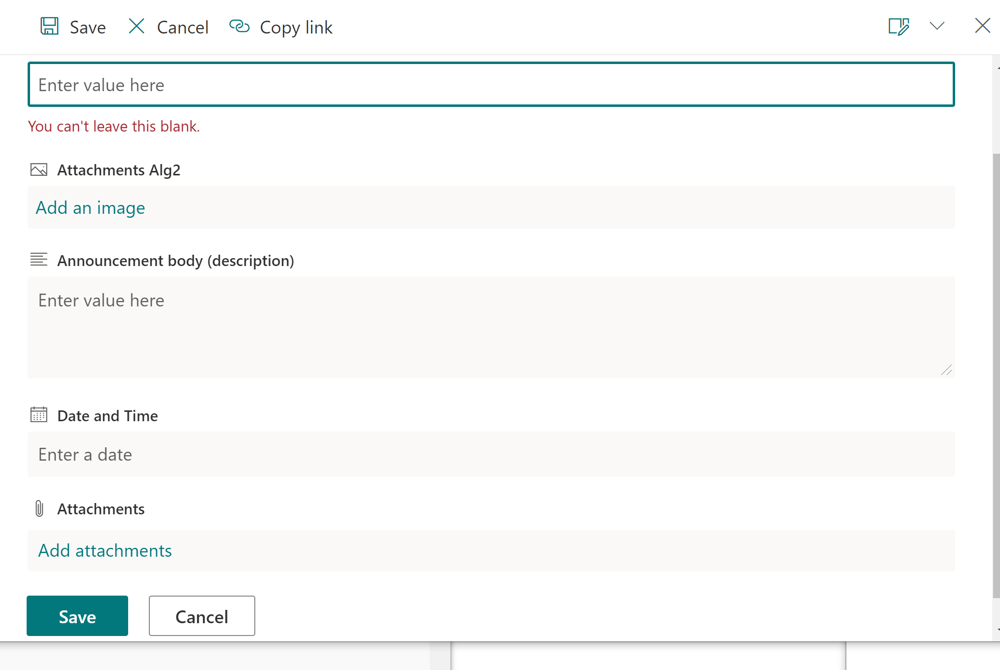
Pic.72-1 You may also create a new line in the List by pressing "New" button.
Pic.72-2 Then you fill in the fields. The title is required. You may skip the "Add image" field. Then fill in the Announcement body. You may attach images with the clip. If you attach two or more, then the announcement will display the first one in Kaizala and further images can be seen by pressing the arrows on the card. It is the best way to distribute messages with pictures.
Pic.73 If you have several classes, then there should be the same number of groups in Kaizala and the alike number of automates. If you repeat for them everything that we did the first time this will be not only unnecessary, but will be also harmful, because in the end, you will get one automate for a new class, and the previous one will disappear. Instead, we'll just copy the created automaton. Let's show how this is done with an example. Mark the created flow, click on the ellipsis and then on "Save as" (Pic. 73).
Pic.74 Edit the name of the copy, like this: "Sending Kaizala announcement from SharePoint FC announcement app", and click "Save" (Pic. 74). Turn on this automate if necessary, and after that click on the top "Edit".
Welcome to Adaptive Cards
Adaptive cards can be used to distribute information directly to Teams if the teacher adds a row to a special Microsoft Lists in the SharePoint of the Team.
Welcome to Adaptive Cards
I open the main window of Power Automate and press "Templates."
Welcome to Adaptive Cards
I enter "SharePoint Teams" in the search field.
Welcome to Adaptive Cards
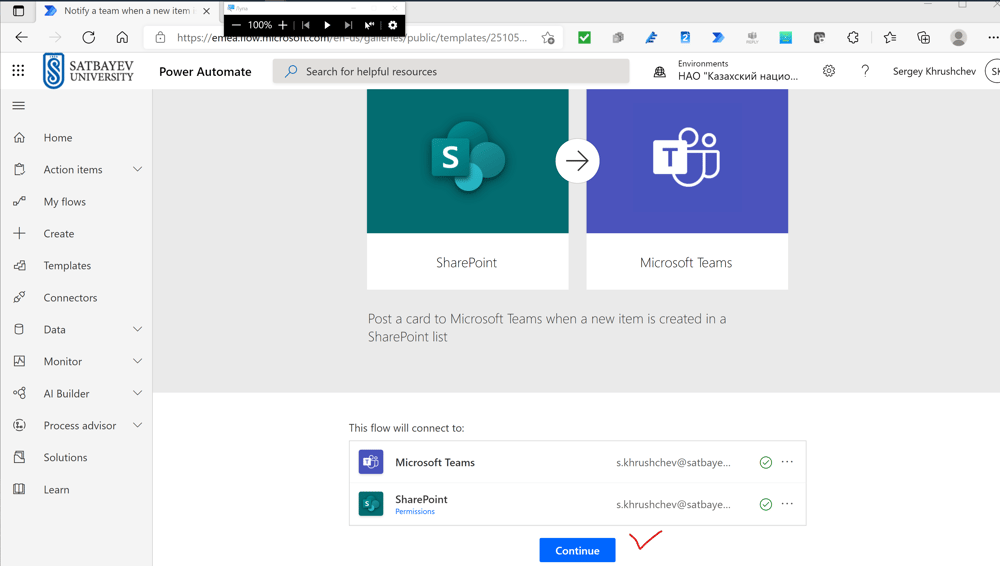
I press the card "Post message to Team when new item is created to SharePoint list."
Welcome to Adaptive Cards
I wait until the green check marks appear on the right side. If instead this fields inform anyone to follow some actions, then these action must be done first.
Welcome to Adaptive Cards
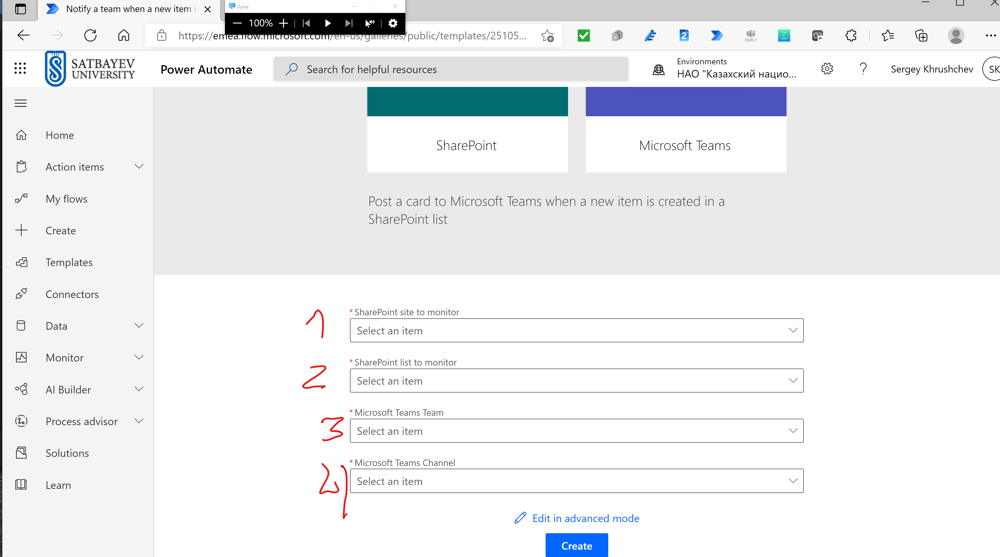
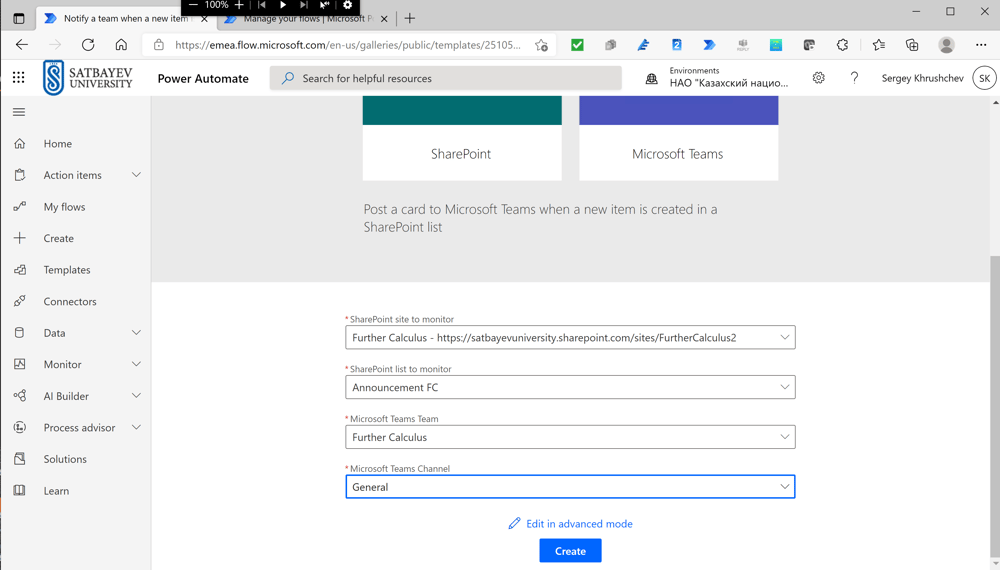
The following fields appear. They all must be filled in with the values shown on the picture below.
Welcome to Adaptive Cards
This example shows how to fill in these fields. The first two are related to the SharePoint site, whereas the last two deal with the corresponding team. I press "Create."
Welcome to Adaptive Cards
Add I press the icon "Save as" at the top band.
Welcome to Adaptive Card
I must change the name of this flow.
Welcome to Adaptive Cards
I change the name of the flow and save it.
Welcome to Adaptive Cards
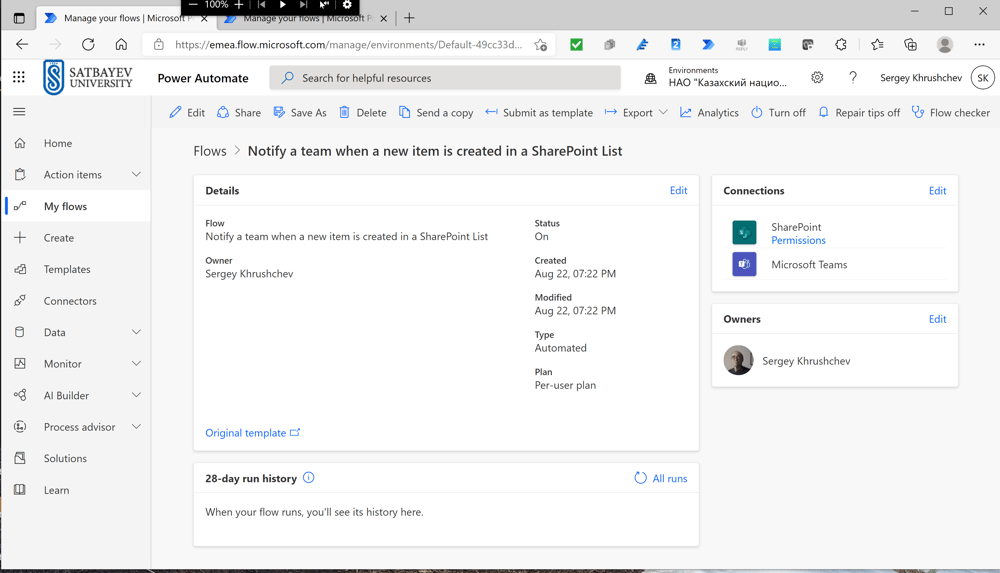
My flow is turned off.
Welcome to Adaptive Cards
This picture shows how to turn the flow on.
Welcome to Adaptive Cards
To see the detailed structure of this flow I press the pencil.
Welcome to Adaptive Cards
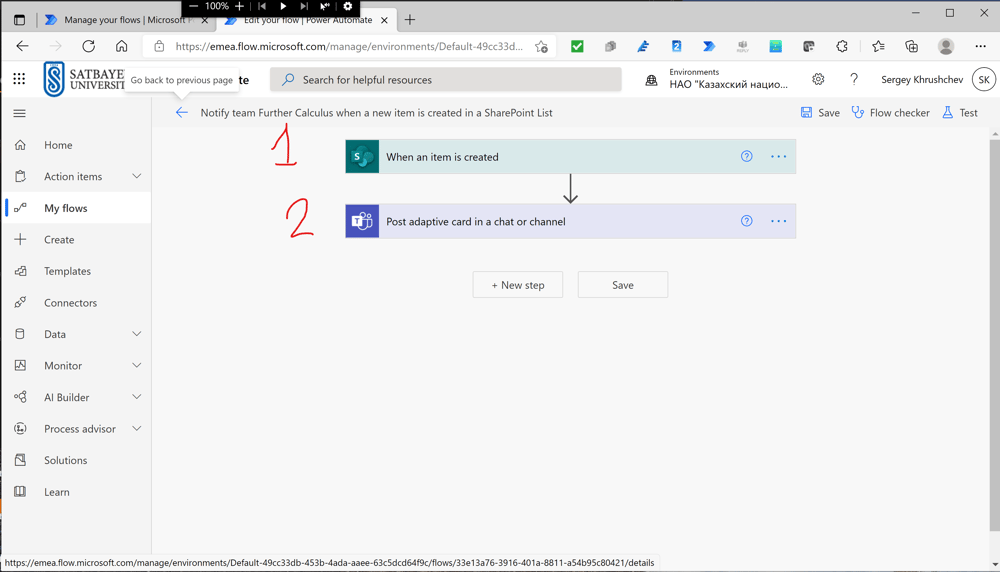
The first box is standard. I press onto the second one.
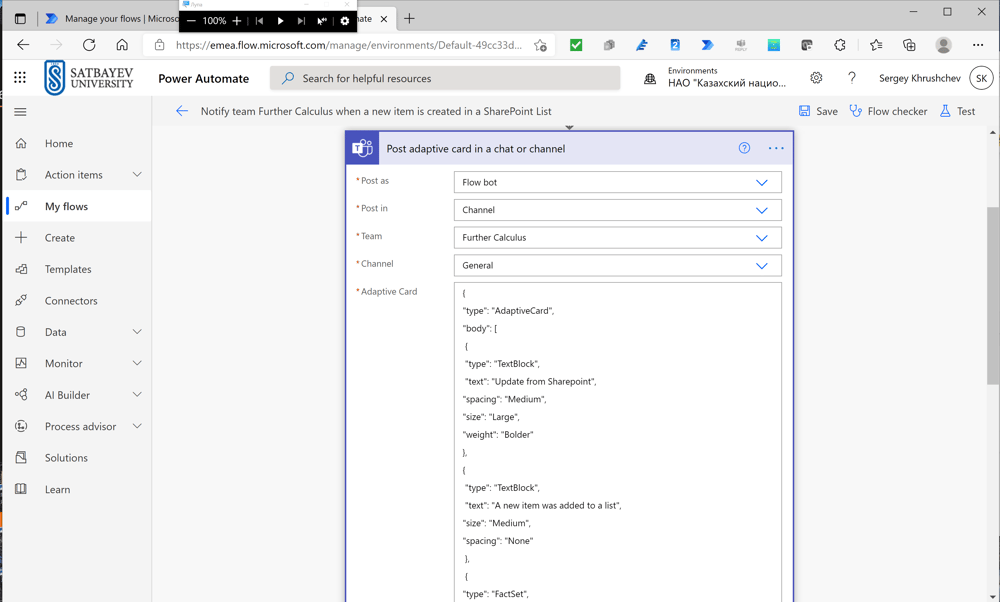
Welcome to Adaptive Cards
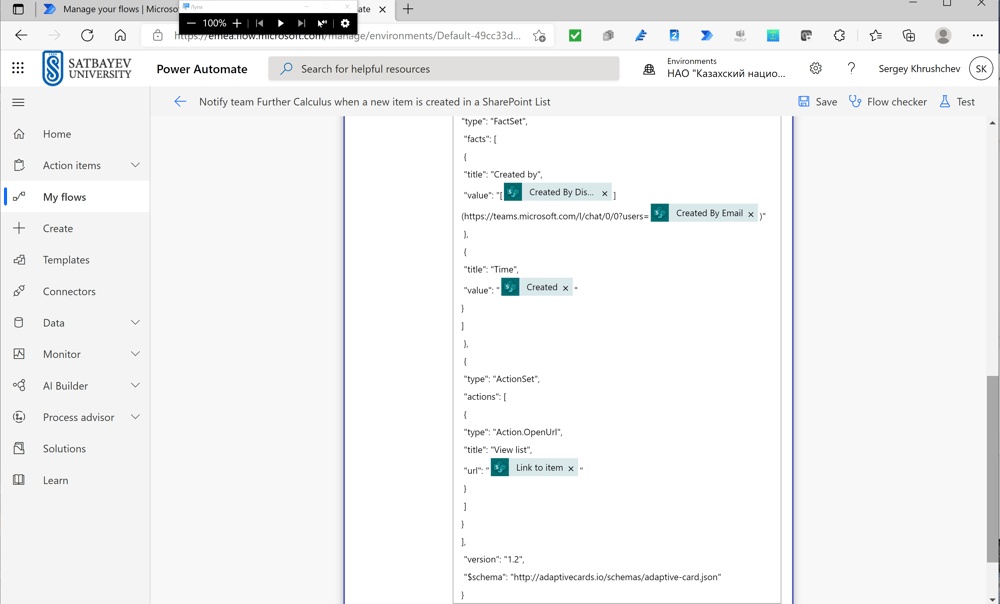
The first four fields are clear. The forth field contains the JSON code of this particular adaptive card. This code begins with "{" and ends with "}". The lines are always have the structure "type": "AdaptiveCard". To understand JSON it is recommended to compare the obtained Adaptive Card with the full list of this code.
Welcome to Adaptive Cards
Notice that this list contains at the very bottom the reference to the scheme.
Welcome to Adaptive Cards
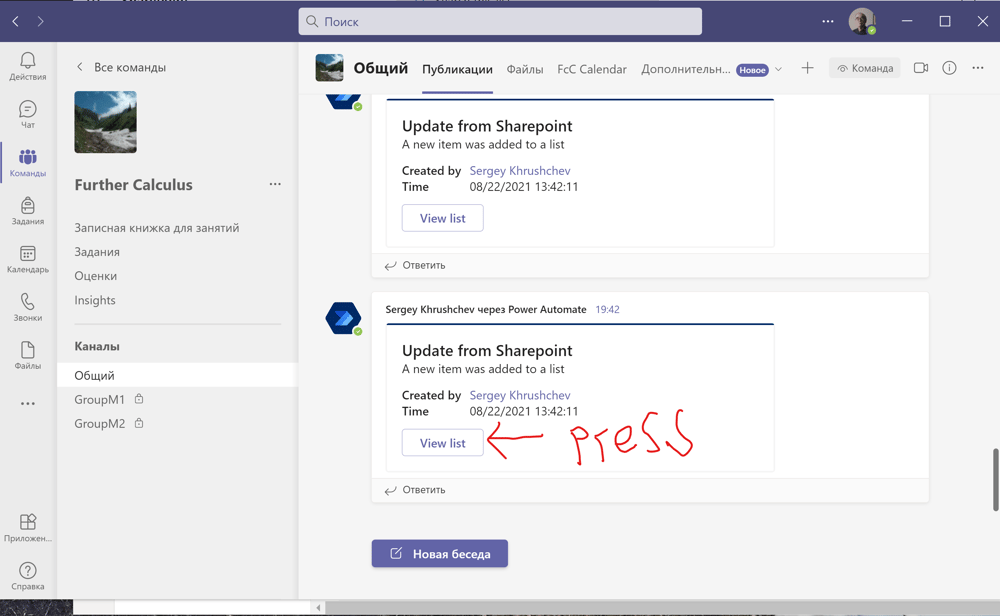
To access the data, students must press "View list".
Welcome to Adaptive Cards
The picture above shows the list. If a student presses 2, then a picture opens. If a students presses 3, then a document opens. There may be many files attached.
Welcome to Adaptive Cards
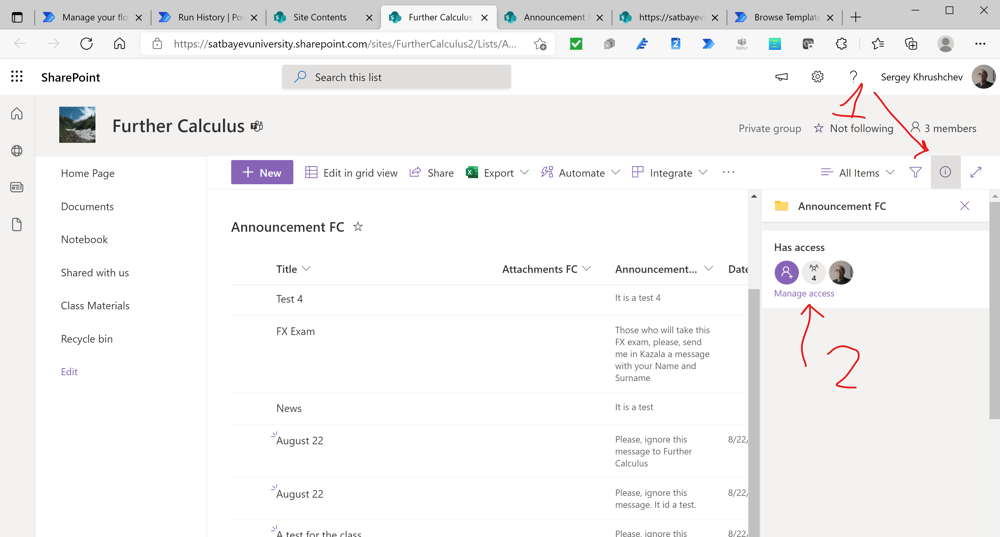
To use this flow, the teacher must check if the permissions for visitors and members are read only.
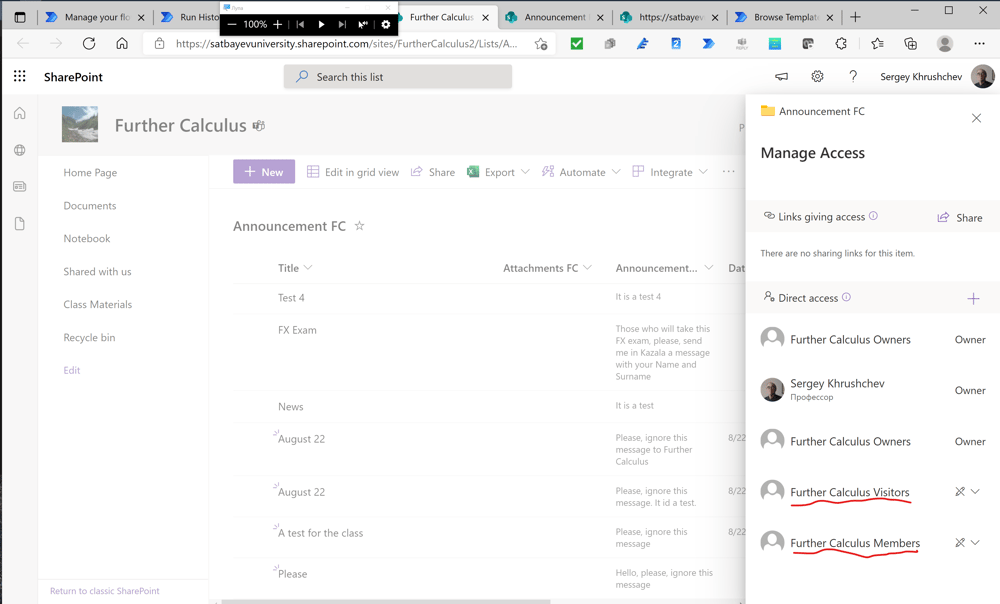
Welcome to Adaptive Cards
To change the permissions, the teacher should get crossed pencils in both positions. This can be done using the check marks on the right.
Good templates of a flows using adaptive cards can be found here
https://www.penthara.com/creating-interactive-adaptive-cards-in-ms-teams-with-dynamic-data-from-sharepoint-lists/
https://www.penthara.com/creating-reminder-adaptive-cards-in-microsoft-teams-for-upcoming-events-from-a-sharepoint-calendar-list/
A Power Automate to distribute Surveys in Kaizala groups.
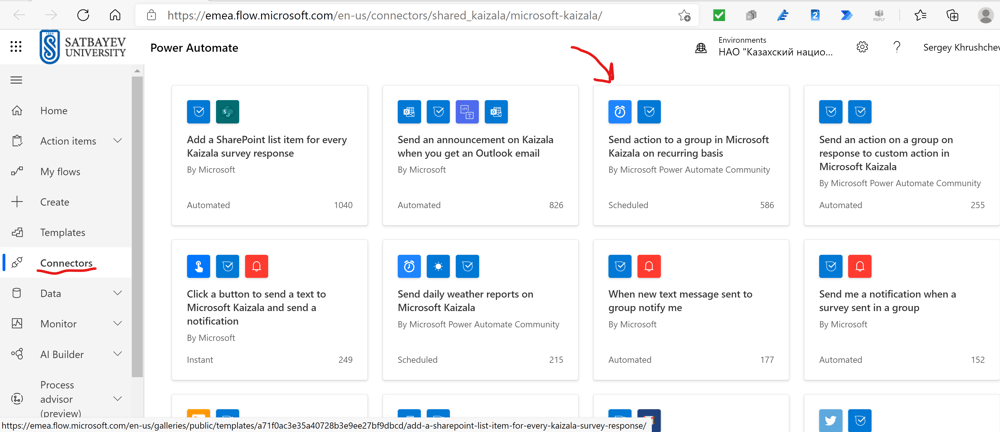
This Power Automate allows teachers to collect attendance in their classes with locations and photos of students. You may start with a ready automate in Power Automate and then edit it. To find it run "Power Automate" from your Office, go to the "Connectors" tab on the left pane (see the picture below) and search for "Kaizala" in the search field.
Press "Send action to a group in Microsoft Kaizala on recurring basis".
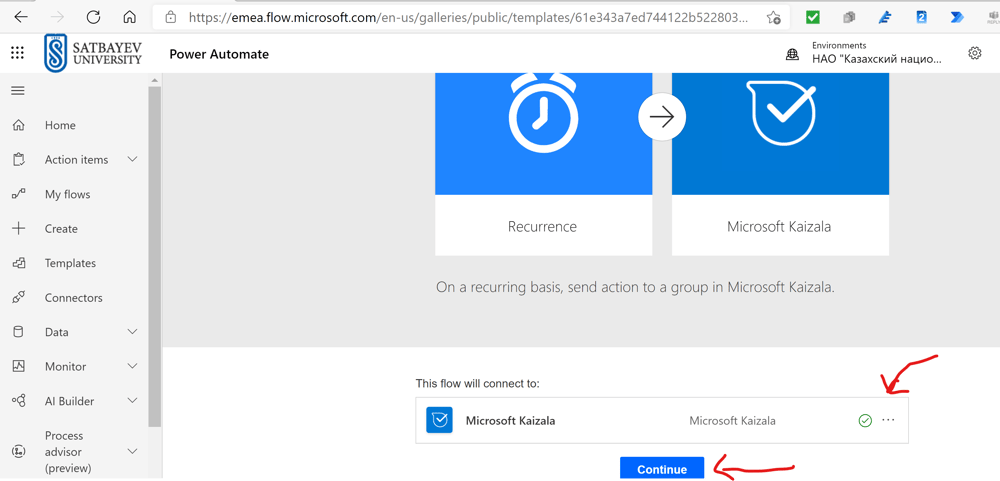
Check that you have a green check mark to the right of "Microsoft Kaizala" (this indicates that the Kaizala connector was installed) and then press "Continue".
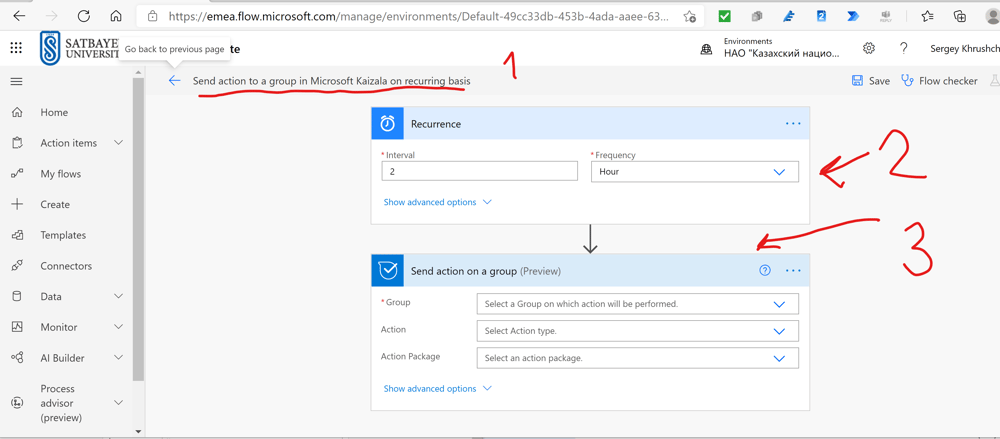
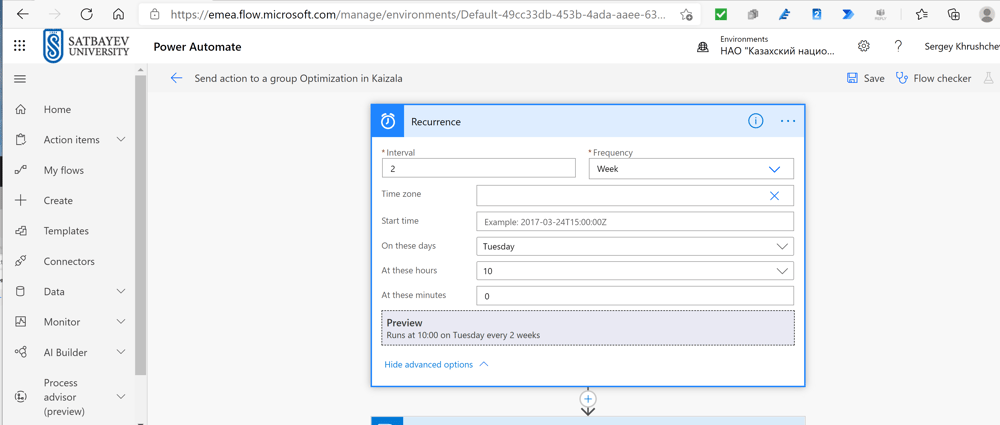
Now, edit the title and the automate boxes as shown below.
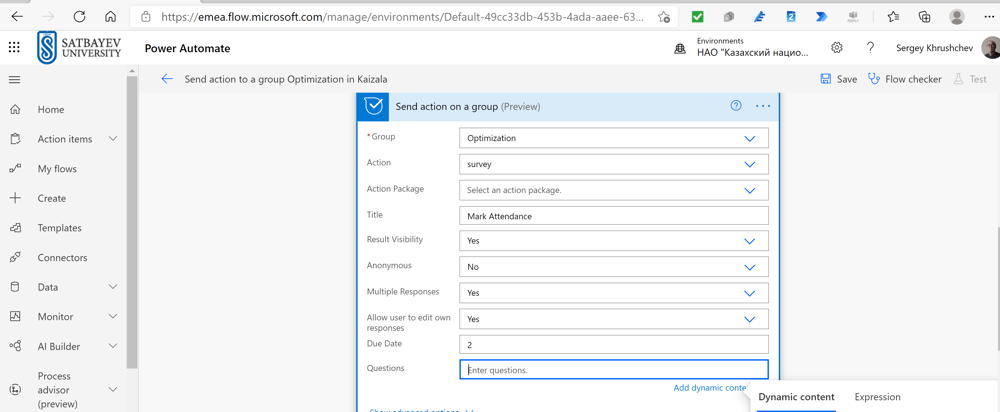
I insert the following JSON code in the last field "Questions":
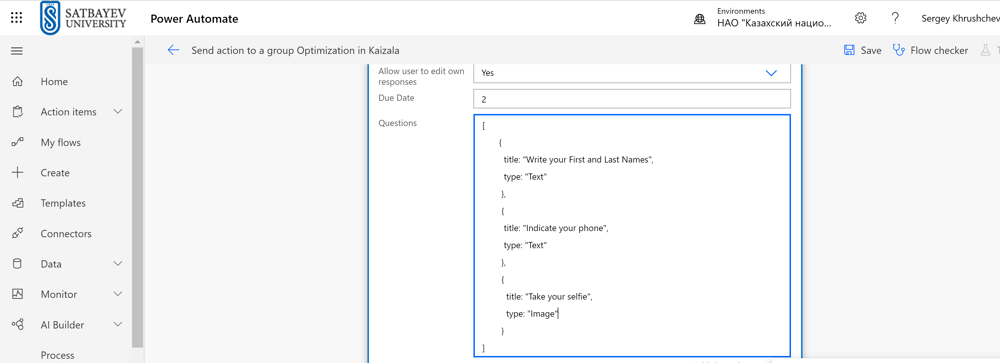
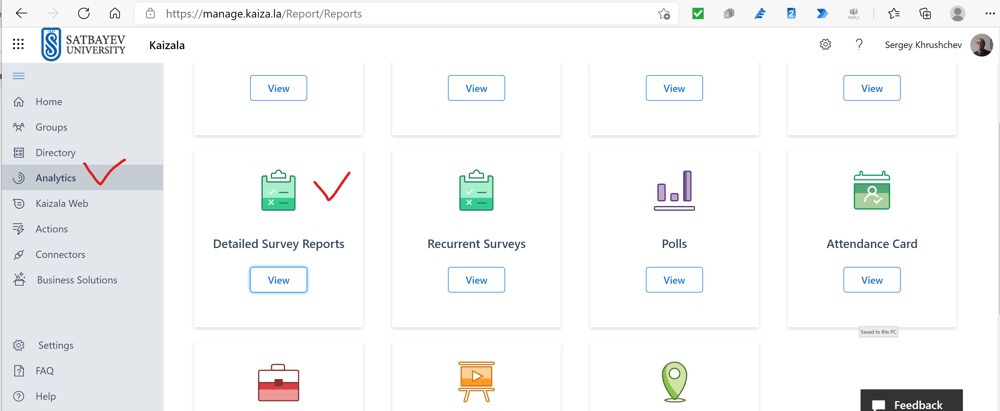
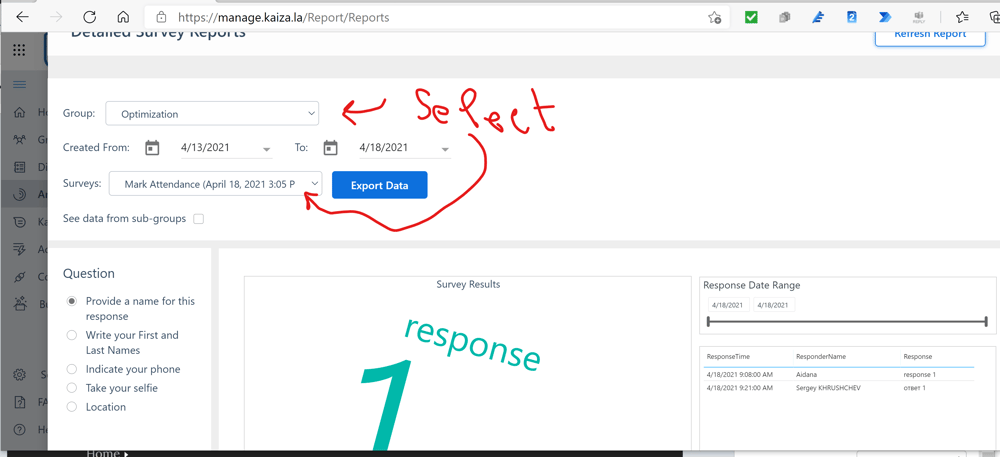
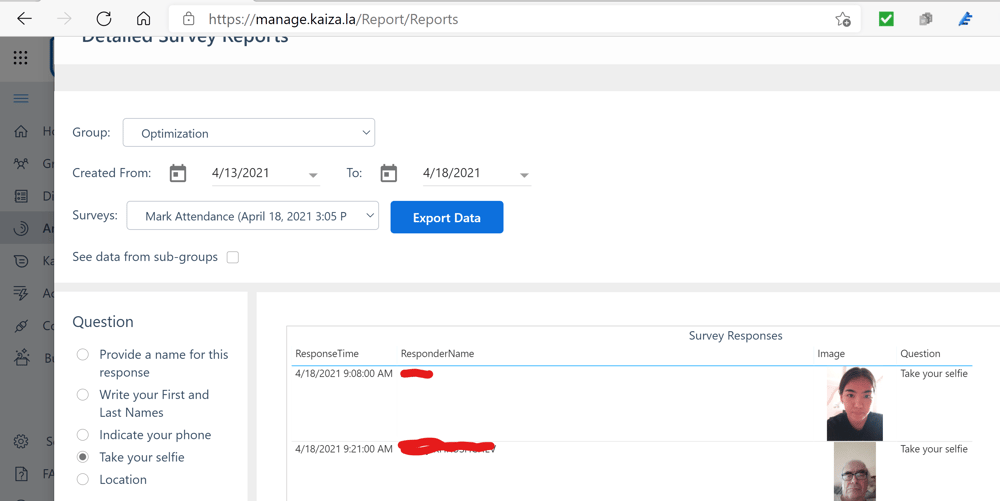
Number 2 in the "Due date" field means that the survey will be closed in two hours after the moment of publication. The JSON code above indicates which questions will be asked. It remains only to test the automate created. The results are collected in Kaizala web (go to "Analytics" and press the "Detailed Survey Reports" button)
Do

Below I include Introductory Lectures to Power Automate
CSV files by Power Automate
I press "Files", then "+ Create," and choose "Excel Book."
CSV files by Power Automate
I give a name to this file.
CSV files by Power Automate
The Excel book opens in Microsoft Teams.
CSV files by Power Automate
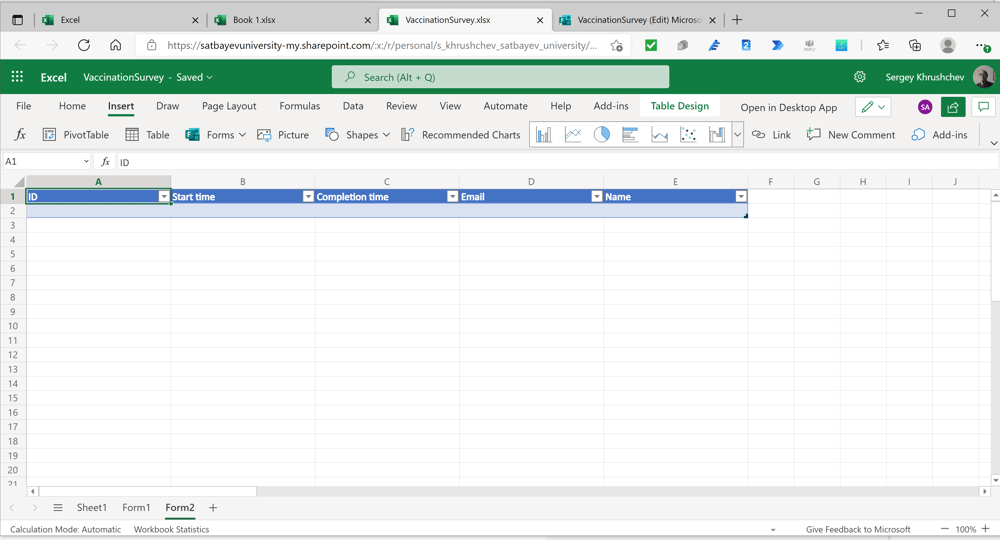
I give the names to the columns as it is specified for csv files in Jibble. I also select two rows including the titles to make a table. Since my interface is in Russian, I change the name of the table to Table 1.

CSV files by Power Automate
It is not possible to change the name of table in Excel Online. Therefore, I open the desktop version of Excel from my desktop Office and click the first available file in the list. Then I open the "Table Design" tab and change the name in the rectangle 2.
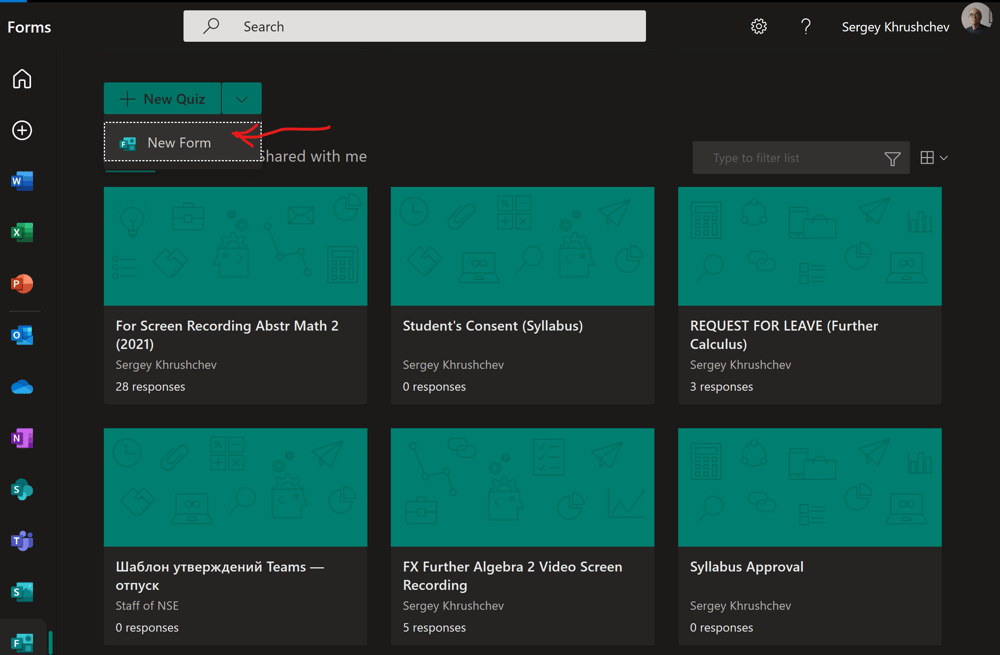
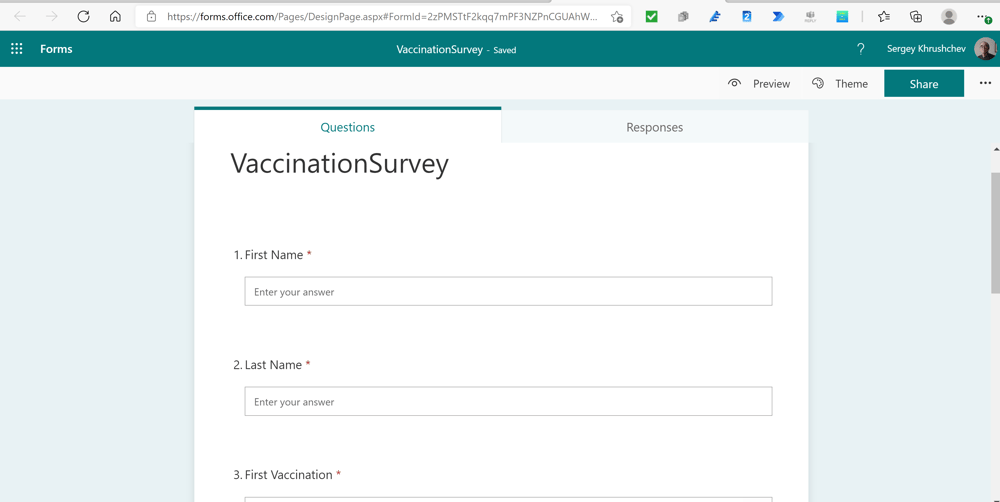
Microsoft Forms
I open my desktop Office and press "Forms."
.
Microsoft Forms
I press "New Form."
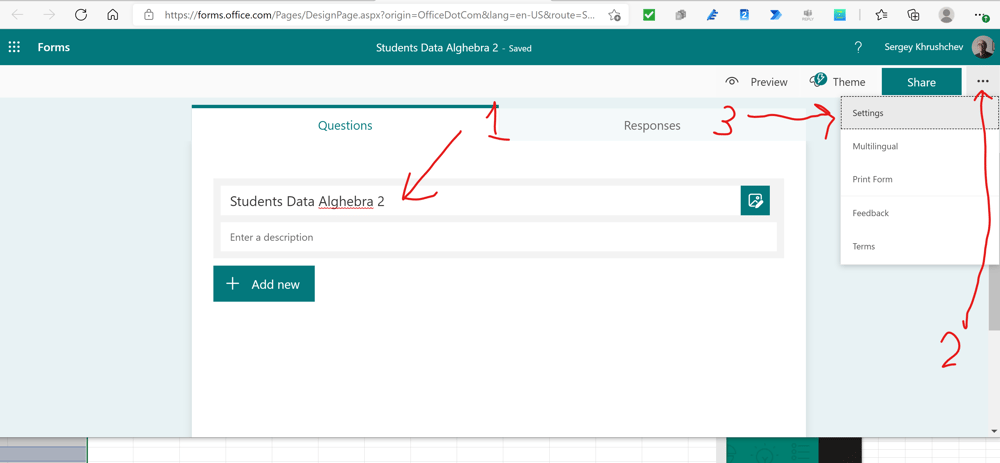
Microsoft Forms
I give a name to this form.
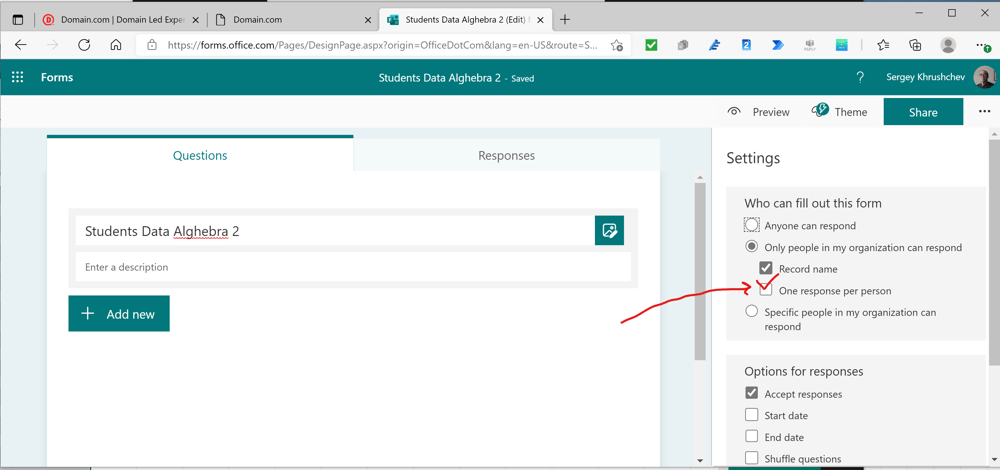
Microsoft Forms
I click on the square in front of "One response per person."
Microsoft Forms
I give the same names to the fields of the form as the names of the Excel Table.
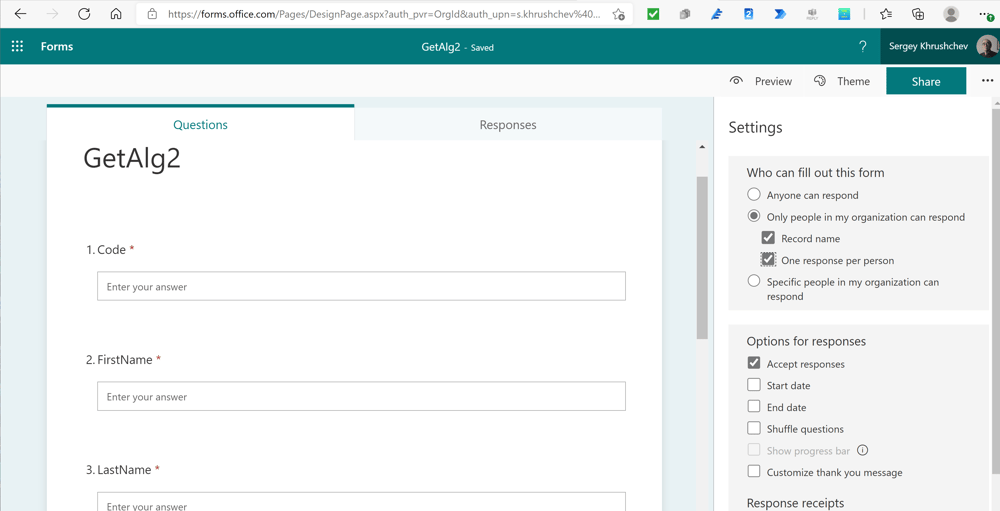
Microsoft Forms
I renamed the Form since it is not possible any more to collect in one form the Full Names and Emails of students. Microsoft 365 Education will block such a form with a reference to security problems.
.
Microsoft Forms
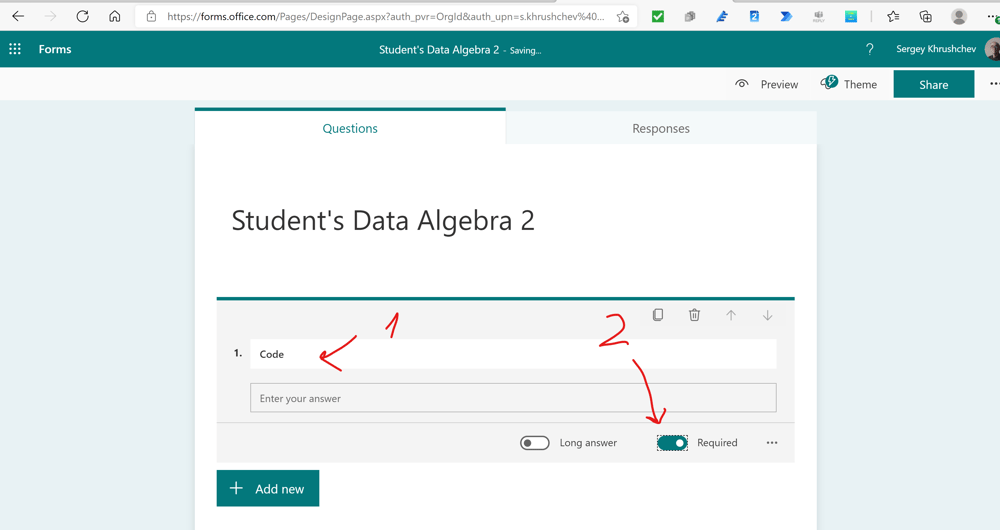
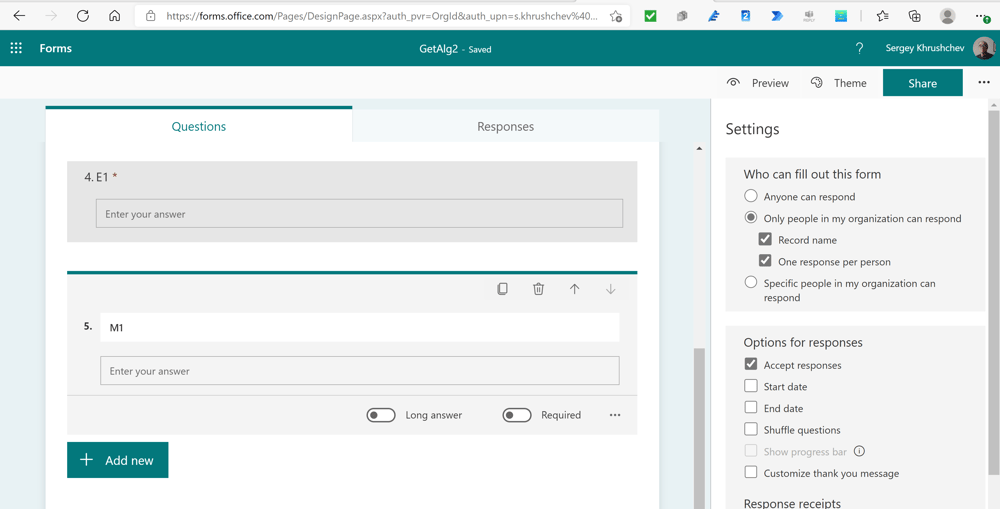
Add Therefore, I give different names E1 for the Email field and M1 for MobilePhone. Since this column does not require data, I put the switch "Required" in the off position.

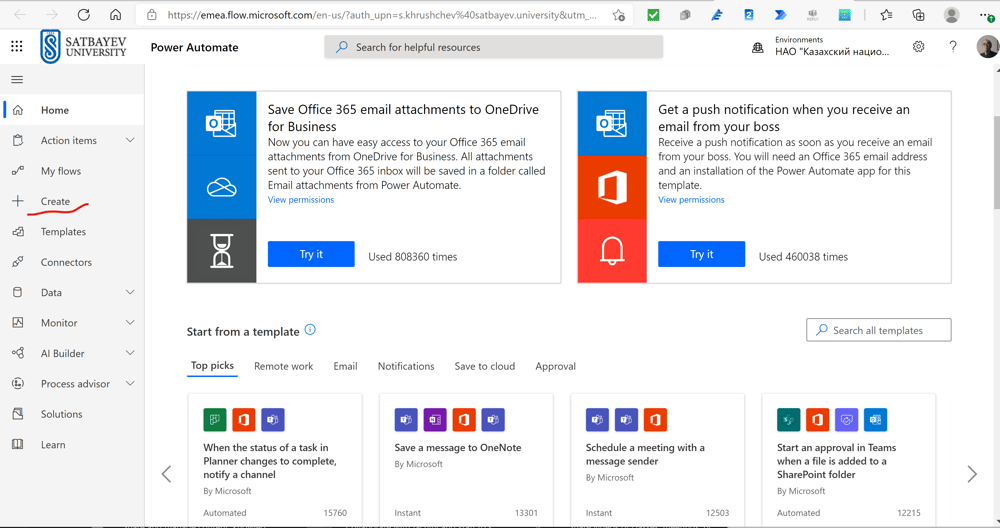
Click "Power Automate"
Run the Power Automate.
Power Automate
I click "+ Create."
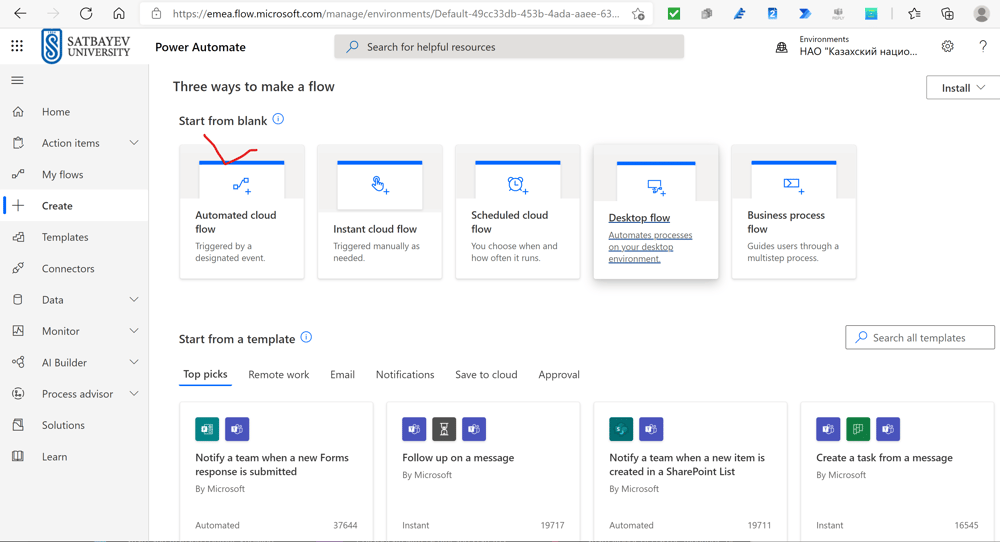
Power Automate
I click "Automated cloud flow."
Power Automate
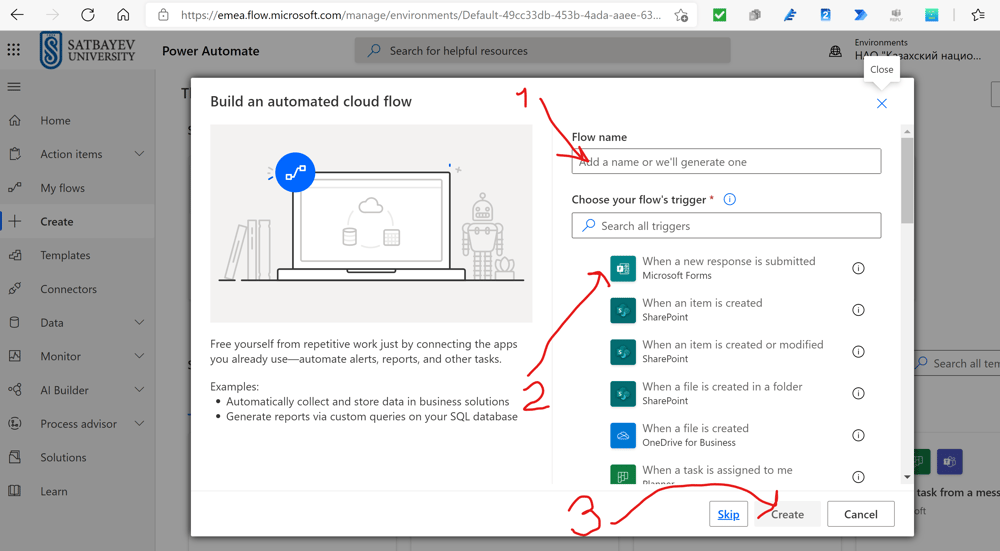
I give the name to this flow. Then I mark the circle on the right side of the selected trigger.
Power Automate
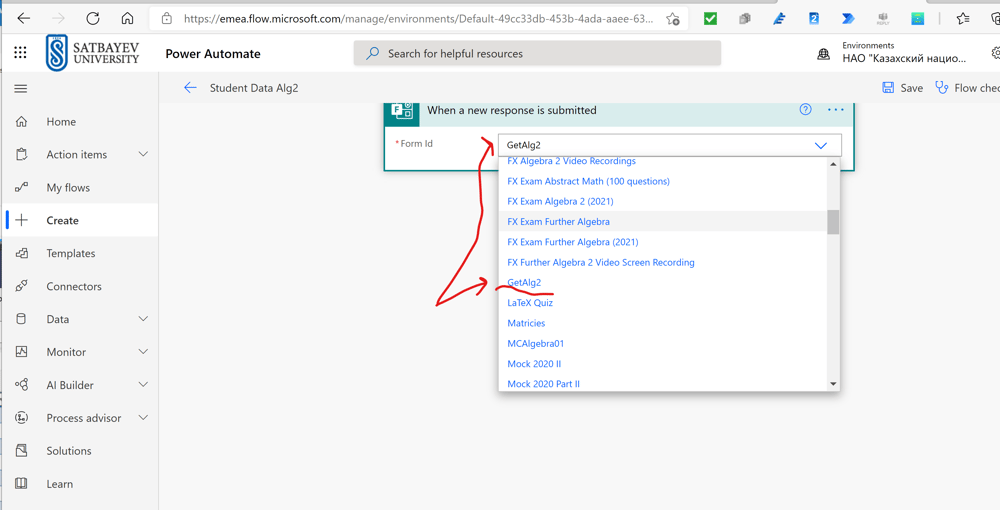
I select the required Form in the drop-down menu. I press "Next step."
Power Automate
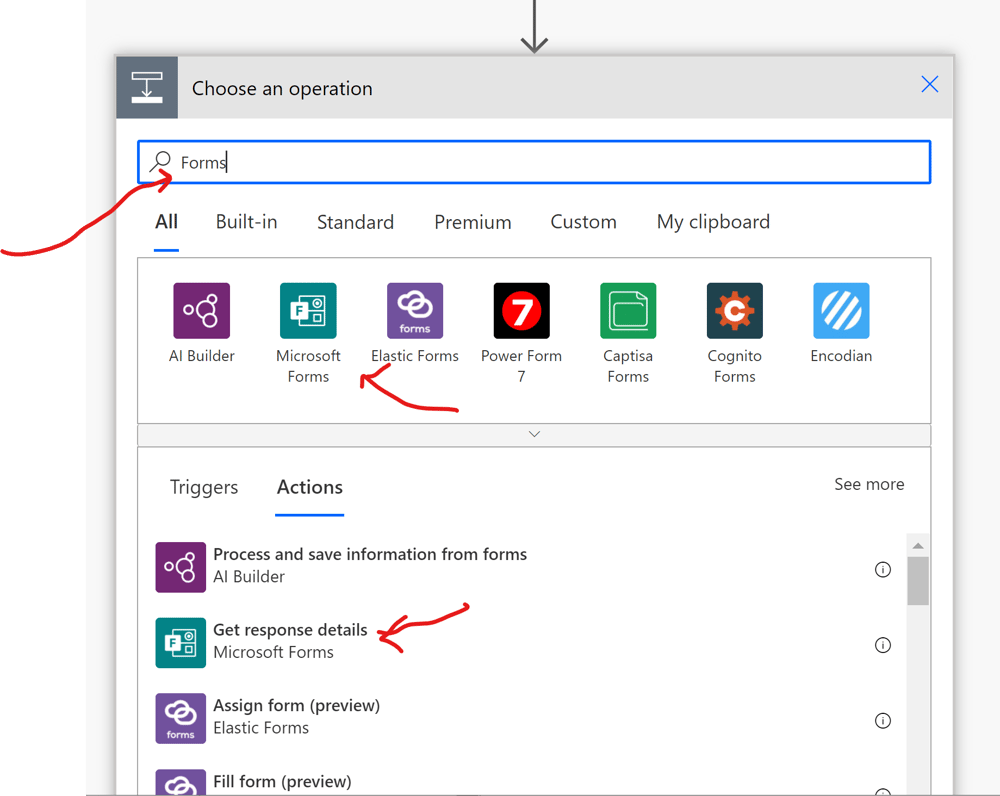
Add In the search field, I type "Forms" and press the action "Get response details."
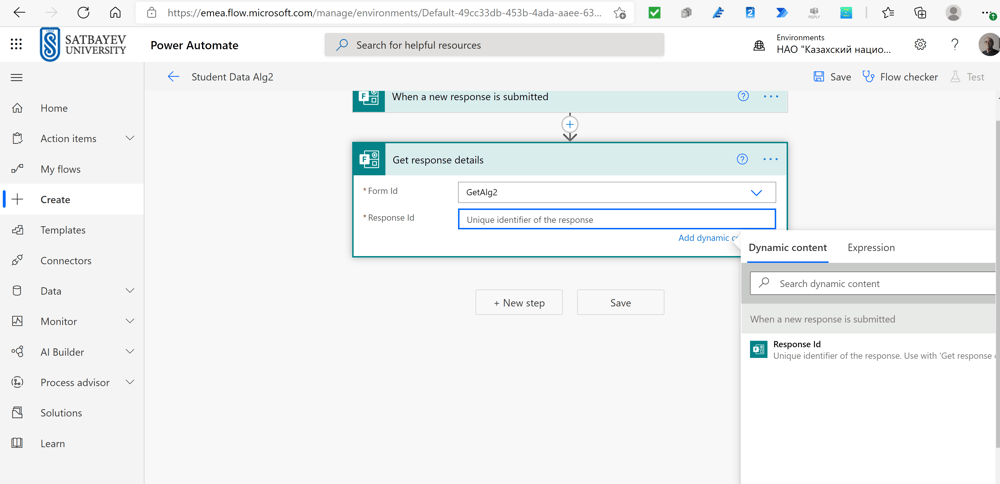
Power Automate
In the first field I again select the name of the Form from the drop-down menu. The second field is filled through the dynamic contents as shown above. Then I press "+ New step."
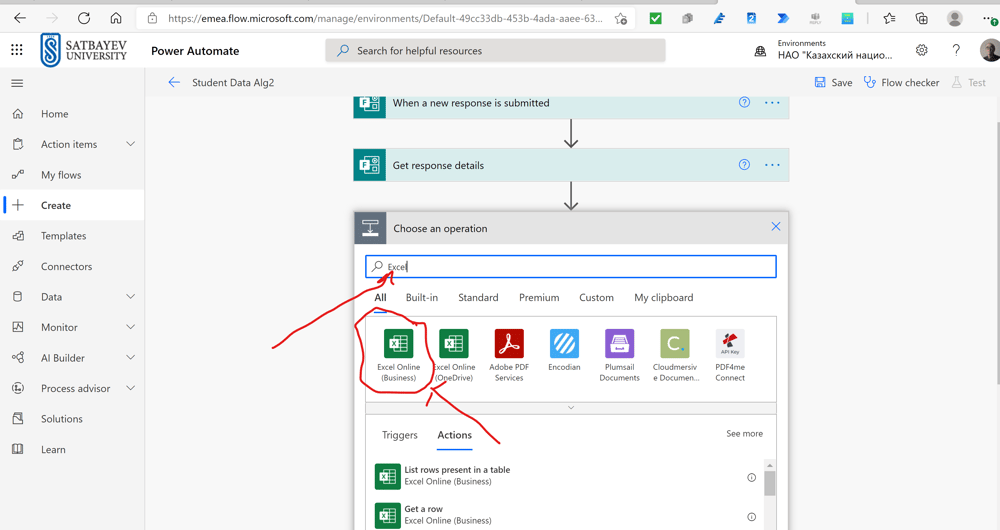
Power Automate
In the search field, I type "Excel." Then I press "Excel Online (Business)."

Power Automate
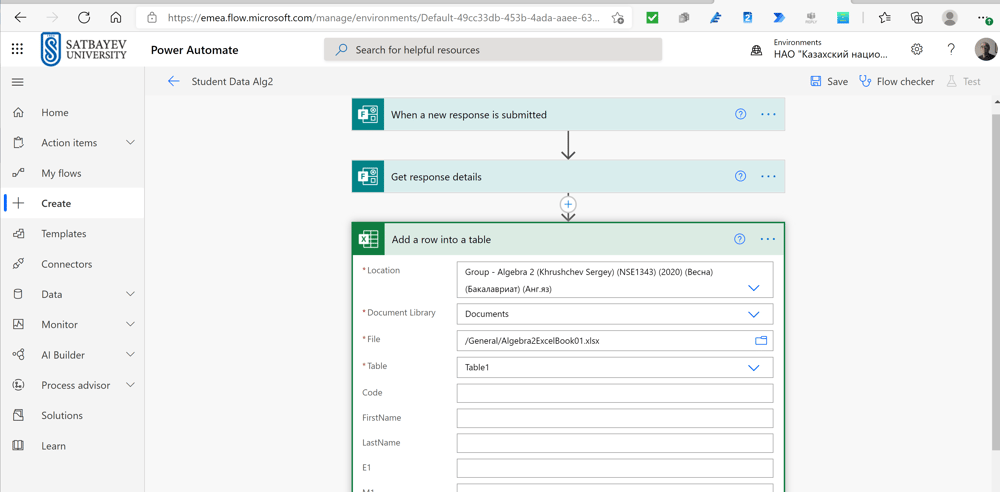
I press "Add a row into a table."
.
Power Automate
The first fields marked with the red stars are filled through drop-down menus and reflect the position of the Excel file.
Power Automate
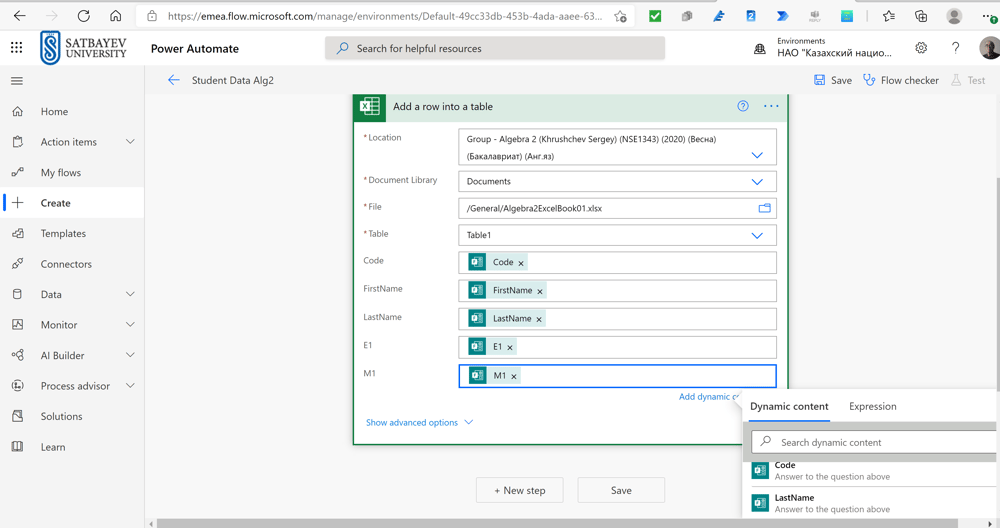
Other five fields corresponding to the table's titles are filled dynamically as shown above. This time I press "Save." To check the flow, I fill in the form and press submit.
.
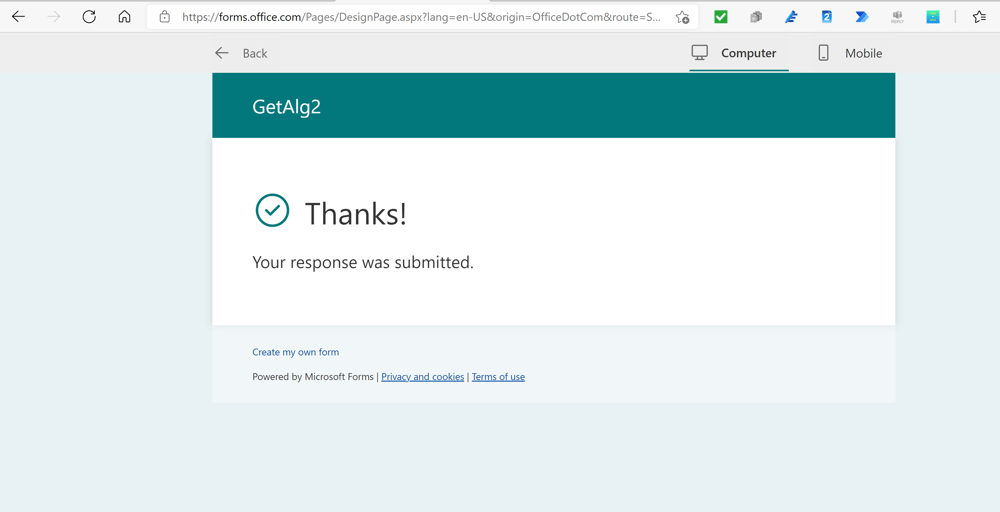
Power Automate
The system confirms the submission of the form.
Power Automate
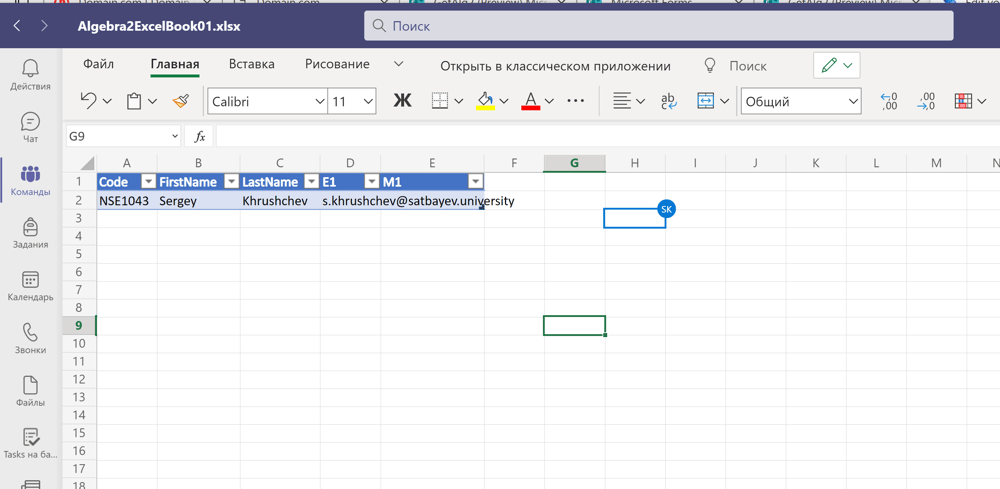
The line of data is added to the table. These flows can serve for other data collection except for Emails. In this case the excel file was placed to the directory with students access. If you modify the location and place it to your OneDrive, or in a special directory to which only you may have access, then I think this will work. This method as presented here looks simpler, since you open Excel Online directly from Microsoft Teams. But you can change this and open Excel Online (Business) from https://office.com . However, it is much better to collect personal information through Teams PowerShell.
Excel+Forms
Excel+Forms
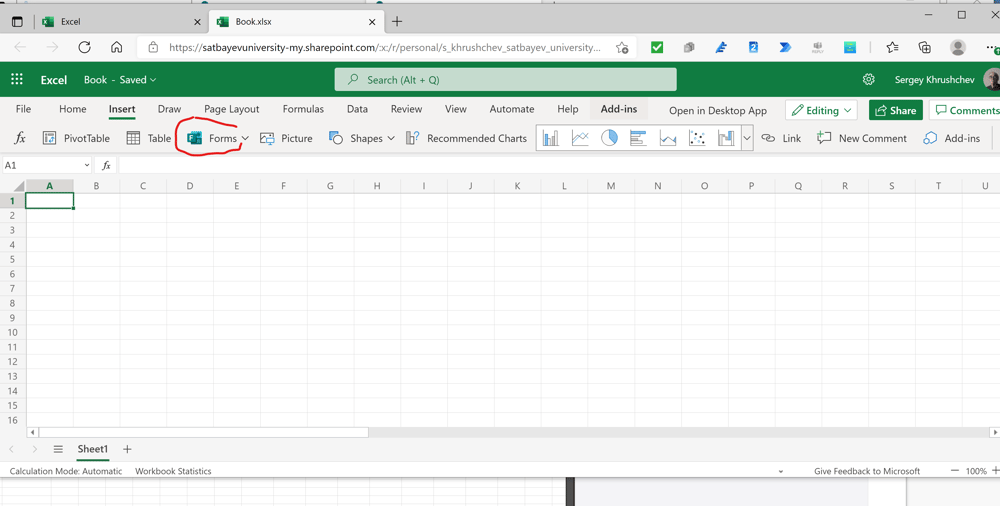
The above flow was recently incorporated in Microsoft Forms. One should open Excel Online (Business) through https://office.com and save it online under some name. You open the tab "Insert." Press the "Forms" icon and create your form. Its name coincides with the name of the excel file. The Excel xlsx table will be created automatically and it will be related to the form.
Excel+Forms
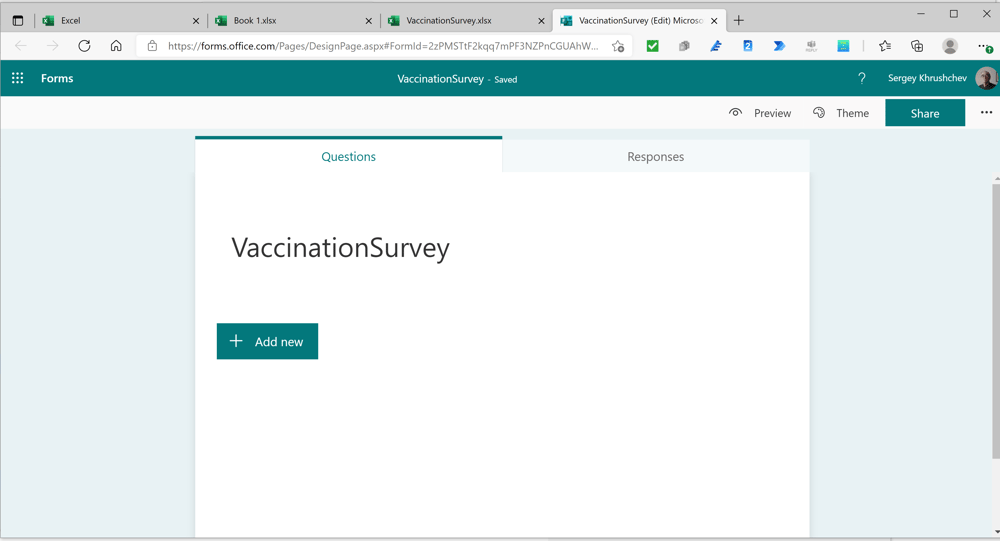
It is the Form which is connected to the excel file with the same name.
Excel+Forms
The system creates first five fields in the excel file automatically as soon as the "Forms" icon is pressed.
Excel+Forms
I create six fields in the form.

Excel+Forms

Excel+Forms
A common practice is to check mark the square in front of "One response per person." Since I do not have many accounts, I leave it blank to submit my data several times.
Excel+Forms
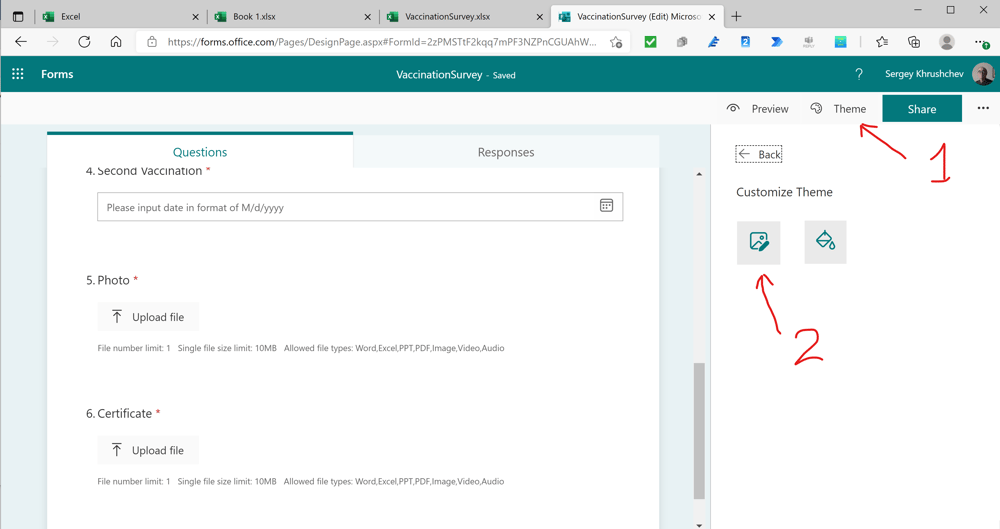
Since I want to add to this form my personal background, I press 1, then + and, finally, 2.
Excel+Forms
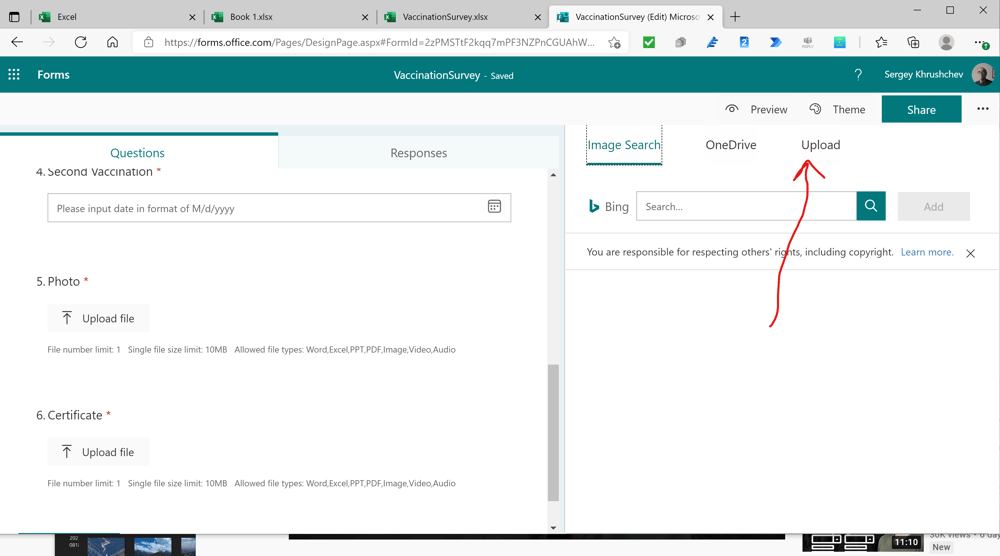
I upload the picture from my computer.
Excel+Forms
Excel+Forms
Excel+Forms
I fill this form.
Excel+Forms
New fields in the form are automatically added to the first six system forms.
Excel+Forms
I press the "Submit" button.

Excel+Forms
Excel+Forms
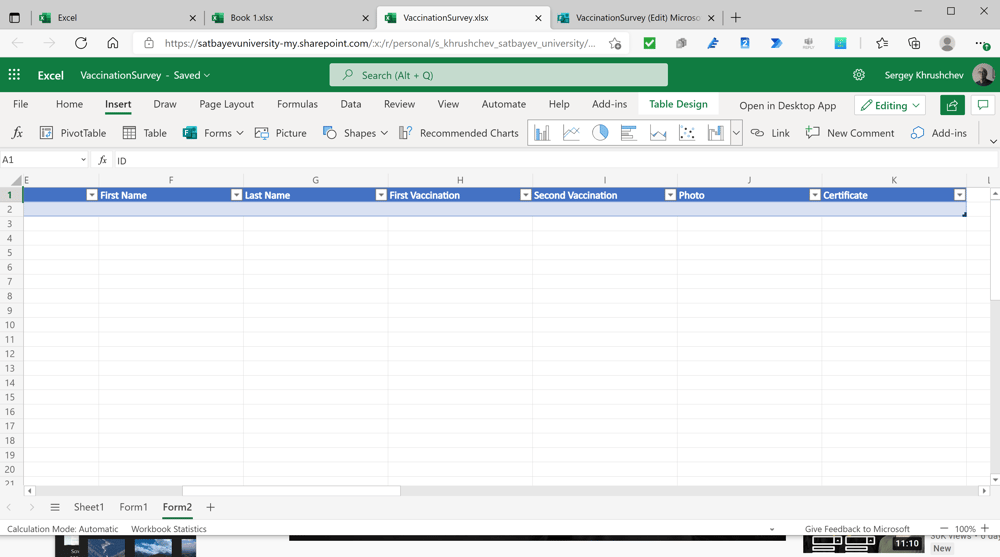
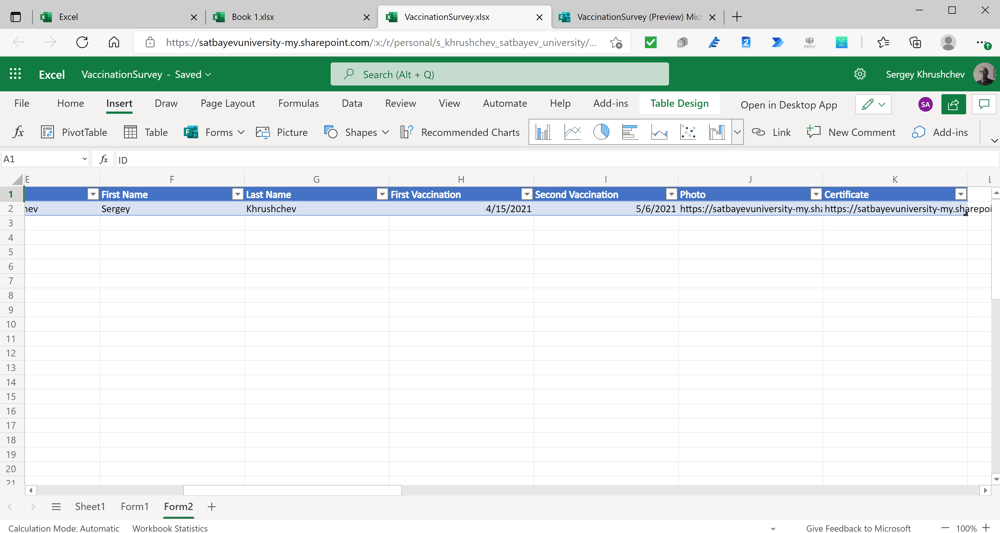
My response appears in the excel file.

Excel+Forms
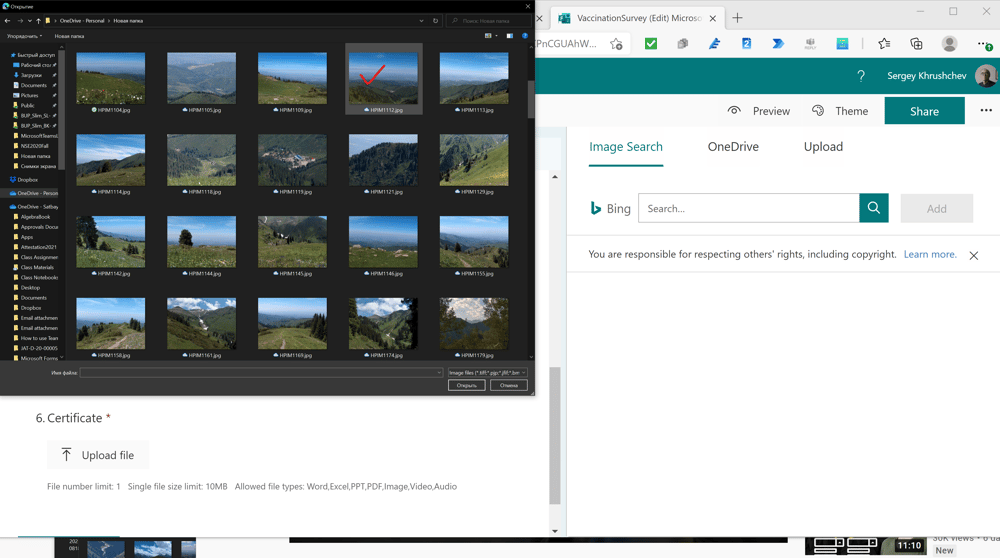
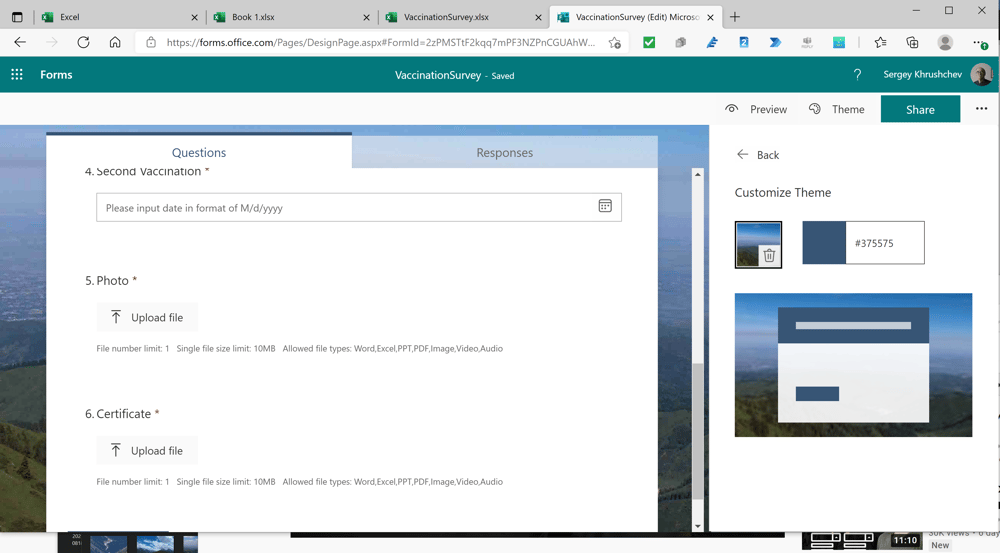
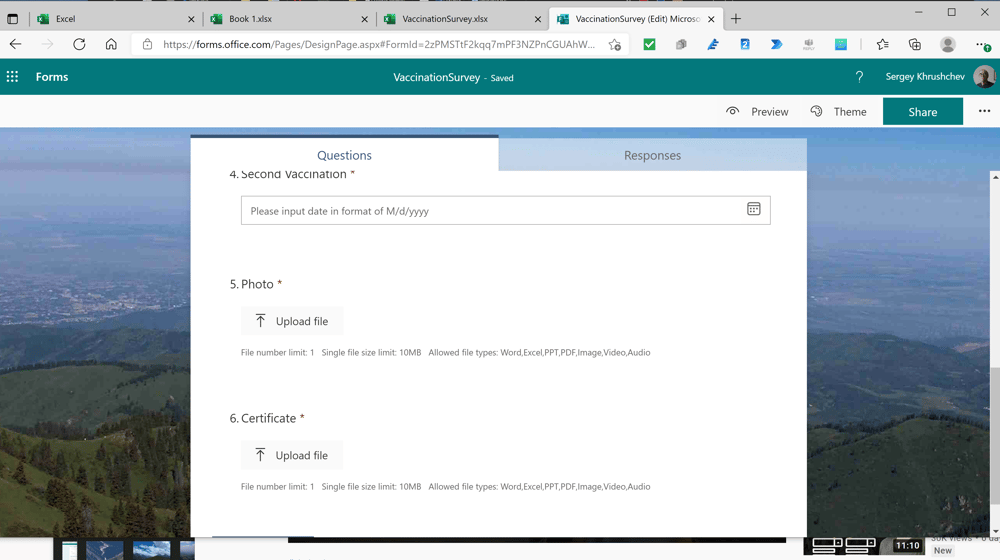
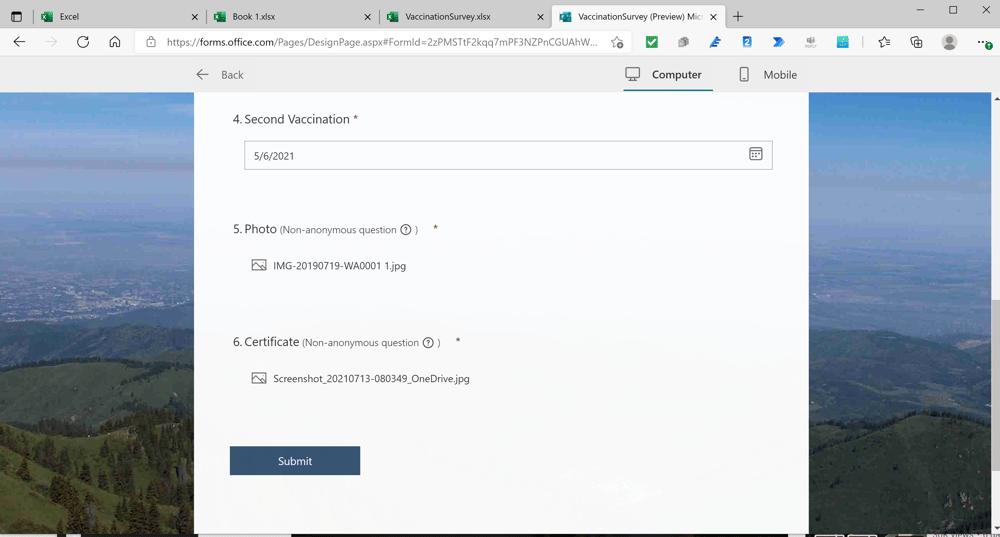
I can even see the attachments. For this, I copy the field in column "Certificate."
Excel+Forms
I paste the link to my browser and see the attached picture or document.
Excel+Forms
If you try to open this file with the desktop version of Excel, then no data can be seen. However, you may copy the table with the mouse and
Excel+Forms
paste it into the Excel Desktop. Then the data can be saved on the OneDrive. You can watch some more details in the video below.
A Power Automate to Announce new OneNote Pages

Pic. 1
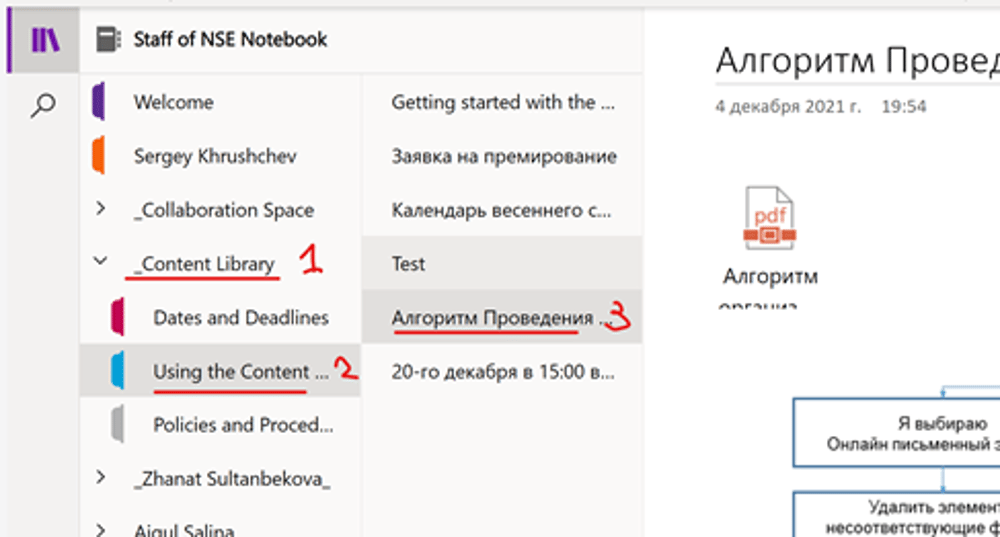
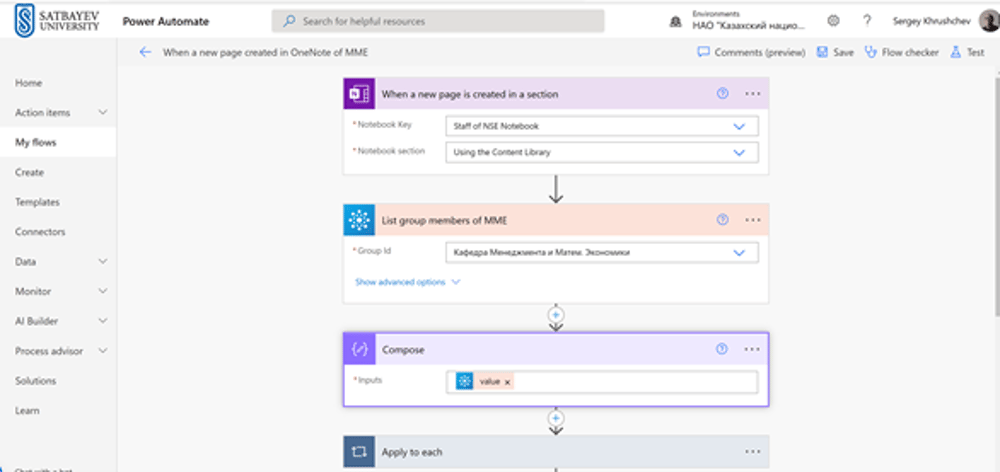
Add This flow informs the staff (students) on new pages added to the Class Notebook of a team, Usually, these pages are added to the section “_Content Library,” see pic 1. The first part of this flow is shown on pic. 2. It is an automatic cloud flow, which is started by the OneNote trigger “When a new page is created in a section.” The first box indicates the desired Notebook and its section. The second box gets the list of group members. This box is followed by “Compose,” where the “Input” field is filled with the dynamical icon “value.” The third box is followed by “Apply to each” section, see pic. 3.
Pic. 2
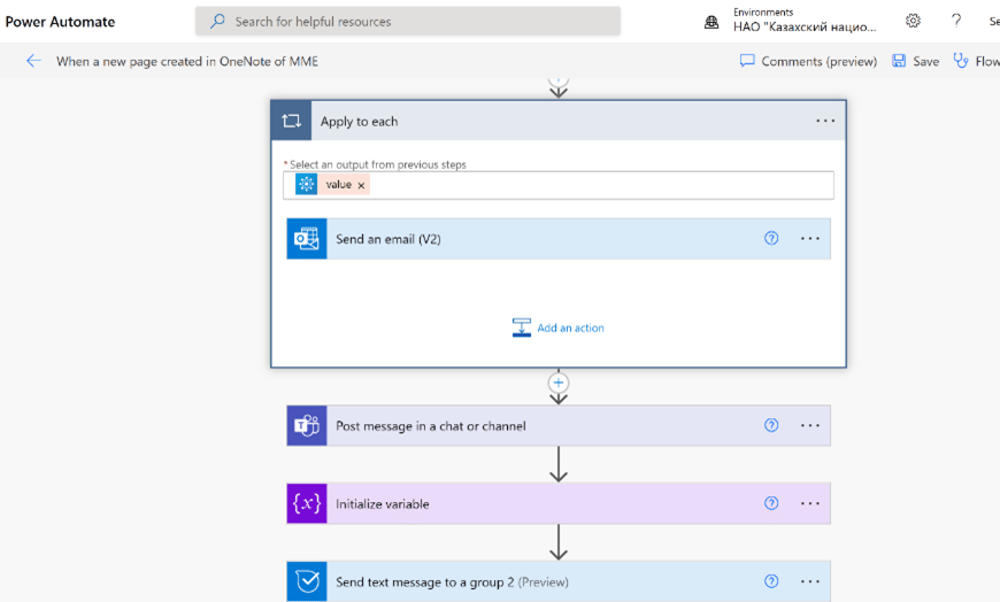
Pic. 3
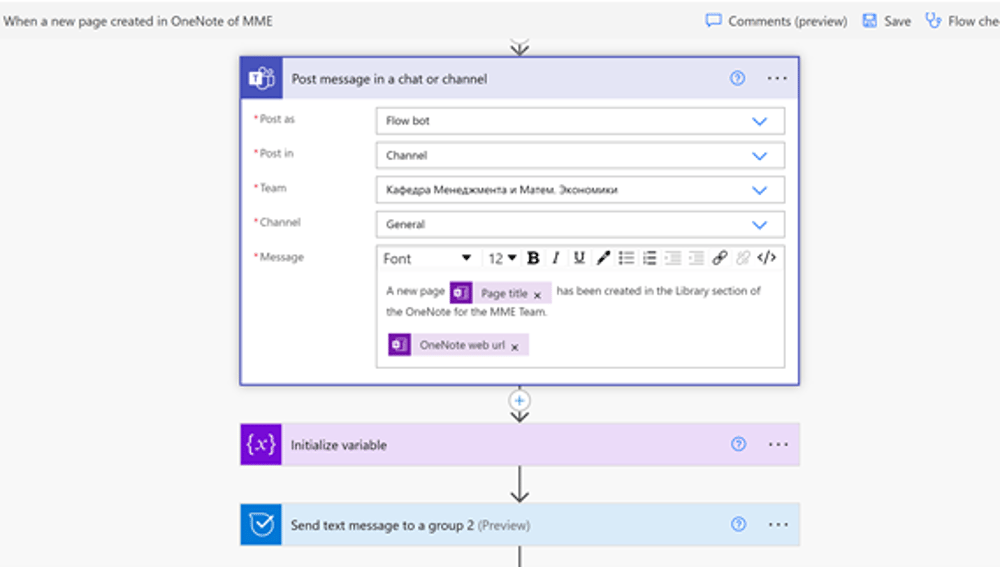
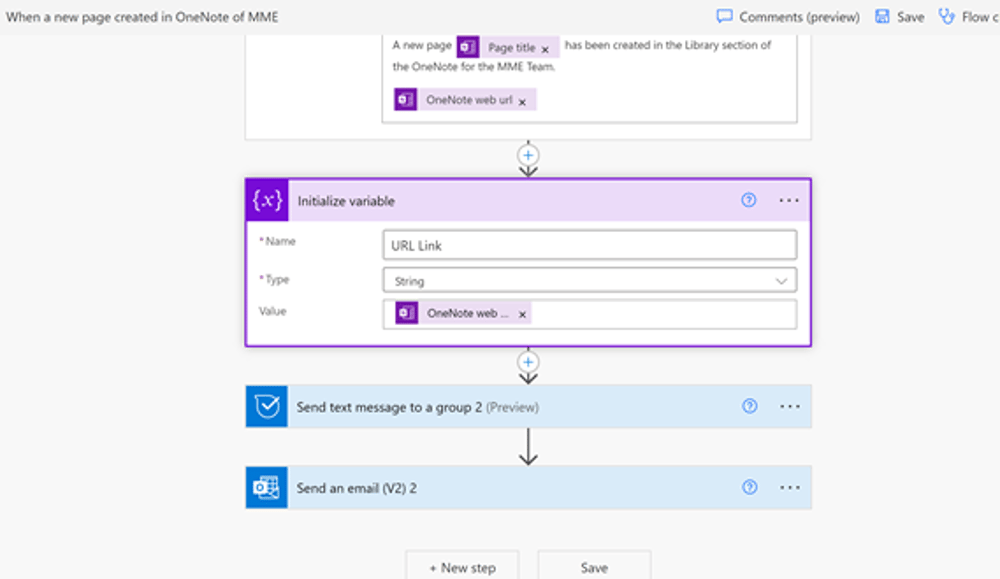
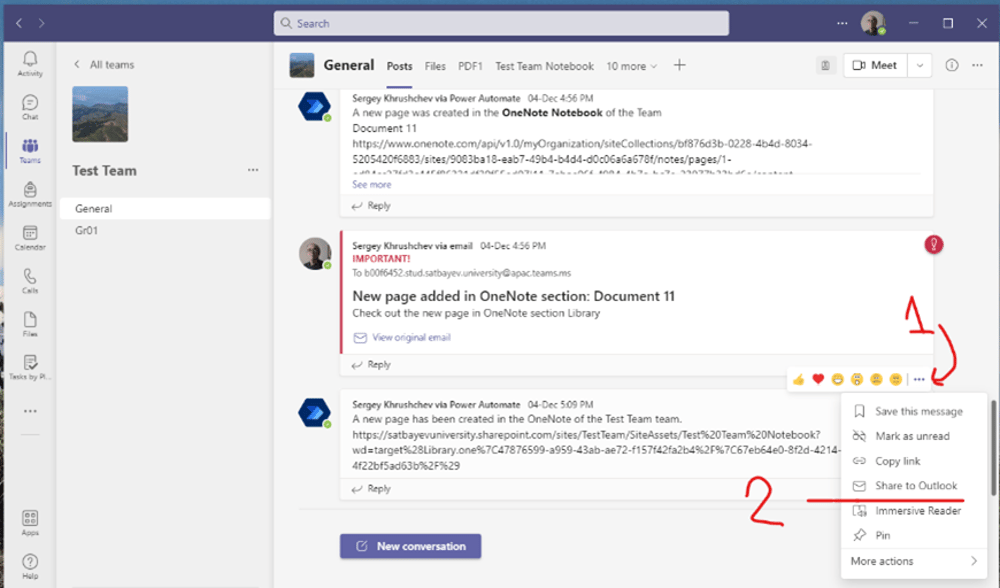
The output from the previous step is again the dynamical icon “value.” This cycle sends messages to Outlook with information about the inserted page. One can fill in this box following the example shown on pic. 4. The box “Post message in a chat or channel” must be outside the box “Apply to each.” It is filled as it is shown on pic. 5. Then we initialize variable, see pic. 6. Its name is “URL Link,” its type is “string,” and its value is given by the dynamical icon “OneNote web url.” The two last boxes initiating messages to Kaizala and to the group mailbox of the team are shown on pic. 7. As soon as a new page in the specified section of the Class Notebook is added, this flow sends individual messages to Outlook for every member of the team, posts a similar message to the “Publications” tab of the team, sends a message to Kaizala group and to the class.
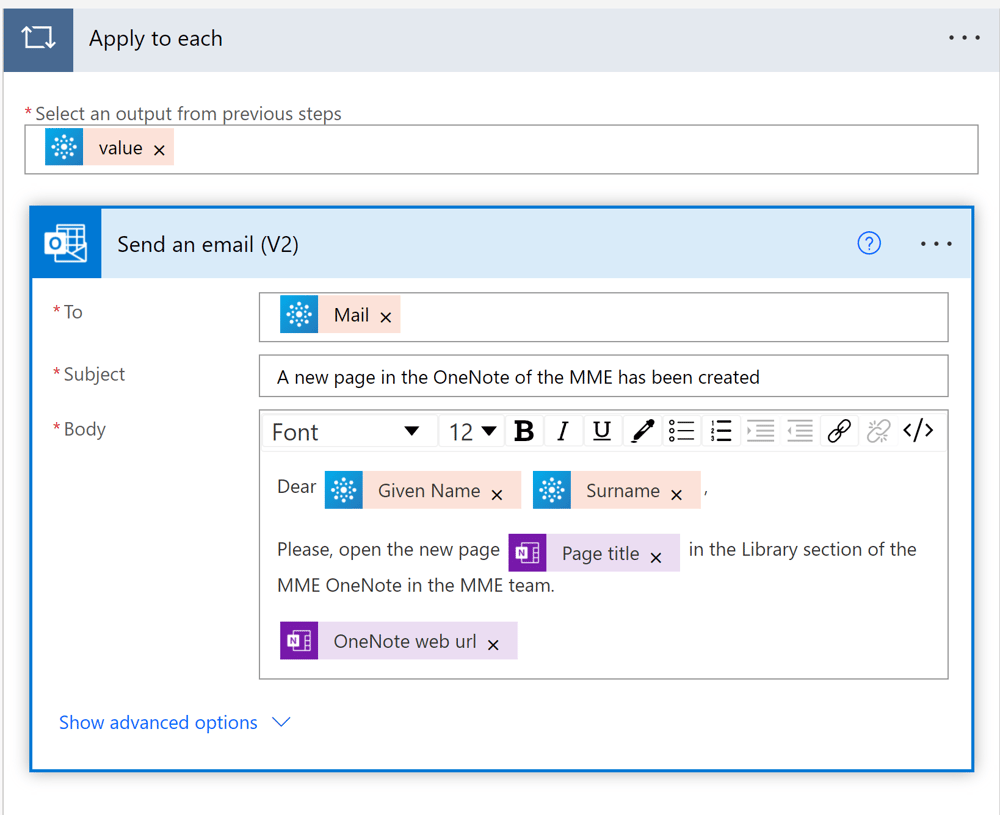
Pic 4.
Pic. 5
Pic. 6
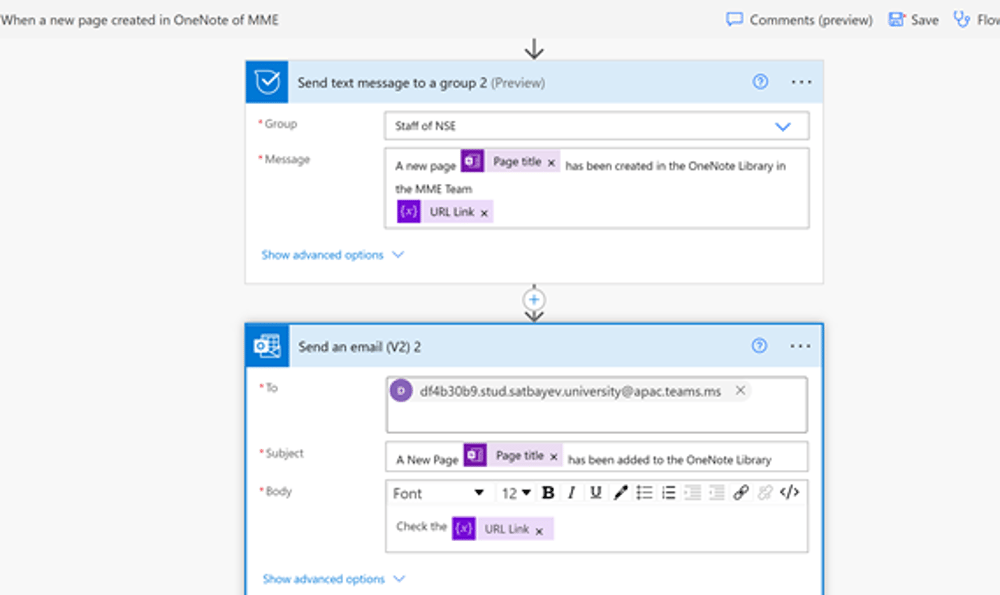
Pic. 7
The last box requires the email address of the team in Outlook. I explained how one can find it on pic. 8-9. The idea is to use the option in Microsoft Teams, which allows to forward some messages in the "Publication" tab to the collective mailbox of the team.
Pic. 8
Pic. 9
Add a description here.
Below I include Introductory Lectures to Power Automate
You may also study the templates constructed by Microsoft.